coolhikinggear.com

  • Men’s
    • Best Hiking Rain Jackets for Men In 2024
    • Best Men’s Hardshell Jackets Of 2023
    • Best Hiking Pants For Men In 2023
    • Best Ultralight Rain Pants For Men
    • Best Men’s Daypacks For Hiking In 2023
    • Best Backpacking Backpacks For Men In 2023
    • Best Base Layers For Men In 2023
  • Women’s
    • The Best Hiking Rain Jackets For Women In 2023
    • Best Women’s Hardshell Jackets Of 2023
    • Best Hiking Pants For Women In 2023
    • Best Ultralight Rain Pants For Women
    • Best Daypacks For Women
    • Best Backpacking Backpacks For Women In 2023
    • Best Base Layers For Women In 2023
  • Hiking Accessories
    • Best Hiking Poles
    • Best Trekking Pole Monopod Camera Mount
    • Best Hiking Headlamps
    • The Best Hiking Watches In 2023
    • The Best Hiking Gloves In 2023
    • Best Hydration Bladders For Hiking In 2023
    • Best Compass For Hiking Our Top Picks
    • Cool Hiking Gadgets
  • Footwear
    • The Best Men’s Hiking Boots In 2024!
    • Best Hiking Shoes For Men In 2023
    • The Best Women’s Hiking Boots In 2023!
    • Best Hiking Shoes For Women In 2023
    • Best Hiking Sandals
    • Best Hiking Sandals For Women in 2023
  • Hiking Guides and Resources

What Happens when you don’t Bring your Gaiters!

Last weekend I went on a wonderful weekends hiking with some friends. It was just awesome … the weather up until the weekend hadn’t been great, for like three weeks beforehand, and it was looking like this would continue into the weekend.

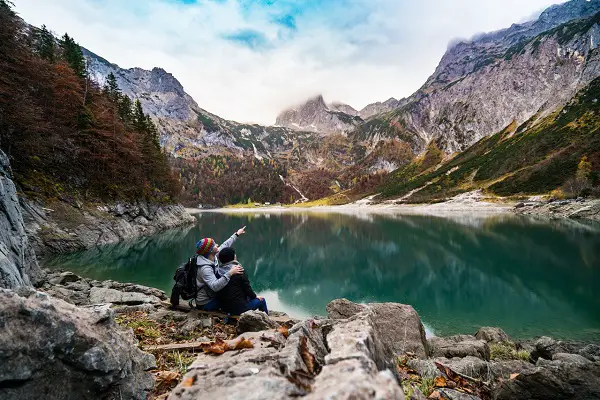
However, we got lucky! Come last Friday, the sun was shining as we headed out on our first hike of the weekend along some beautiful cliffs in Donegal, Ireland along the Atlantic coast.

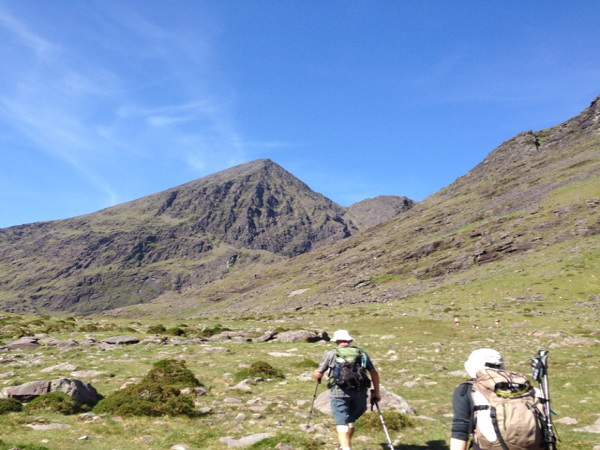
An absolutely gorgeous day. The terrain there is quite rocky so nothing to much to be concerned about in terms of mud, bog or whatever. The following day we had a hike around a beautiful horseshoe shaped set of mountains.

Again, the weather was stunning on Saturday morning, we couldn’t have asked for a better day as we prepared our gear for the day out on the hills.

Anyway, as I was packing up my stuff for the day, I was looking to see what I could leave out of my day pack, it was a sunny day so thought I could lighten the load a bit in terms of gear to carry. I started looking and first took out an extra layer for warmth which I wasn’t going to need, a lighter one I also had in the pack was enough.

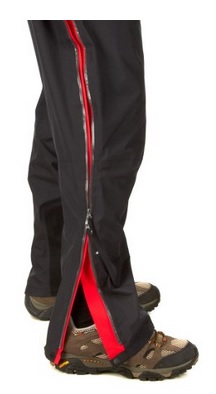
Next up, my gaiters caught my eye. I looked at them and made a classic mistake. I looked up and saw nothing but beautiful hazy sunshine on a really hot day.

Sure the mountains we were going into can be boggy as you traverse the valley basin to get up to the mountains proper but that didn’t enter my mind … it was July, it was sunny and hot. Nah, I thought, I won’t need them today.

Mistake!

Remember when I said at the start that it had been raining for the previous three weeks? Well, that was my classic mistake … taken with the beauty of the day I completely neglected what had been happening, in terms of the weather, the previous three weeks! It had been raining, most days, and raining quite a lot at times.

So, decision made, I left my gaiters in the place I was staying and headed out to the car to get to the starting point for the hike.

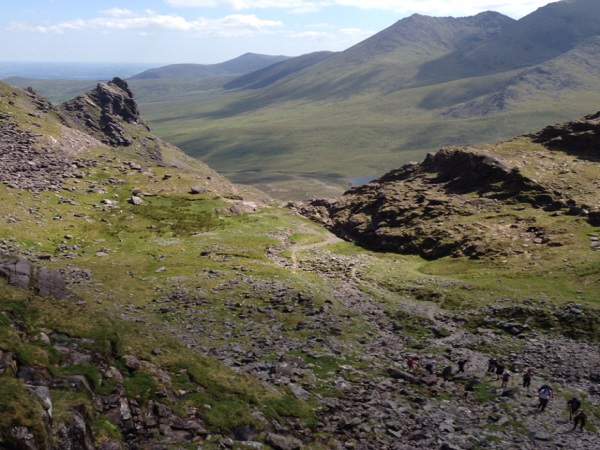
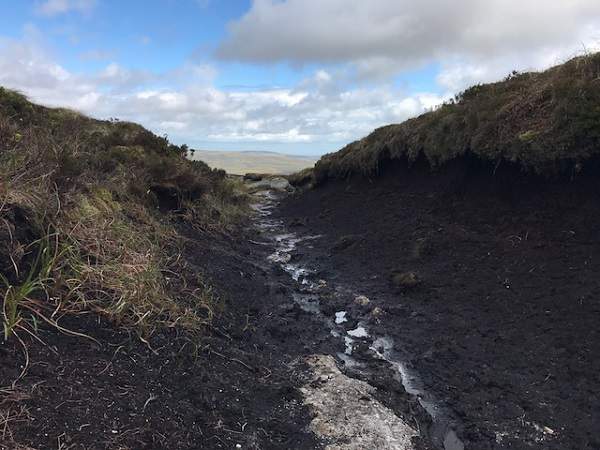
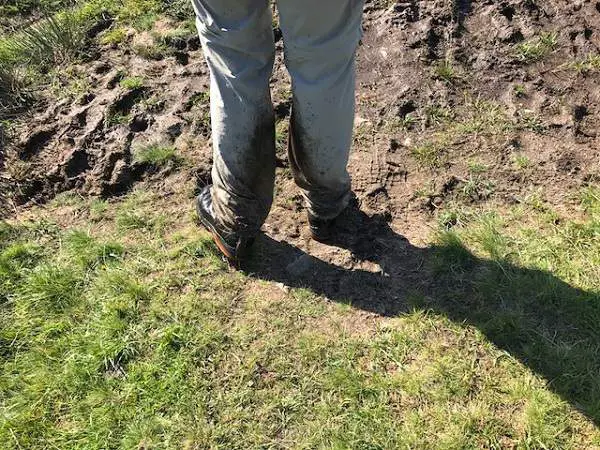
From there we walked about 500 meters before we hit the valley floor proper and man oh man, even though it was sunny and hot, the valley floor was very wet and boggy! Of course, from all the rain previous three weeks, it would take days of the heat to burn it off a bit.

So, by the time I realized my mistake, it was of course too late. I had left my gaiters behind and I couldn’t go back and get them as it was too far away.

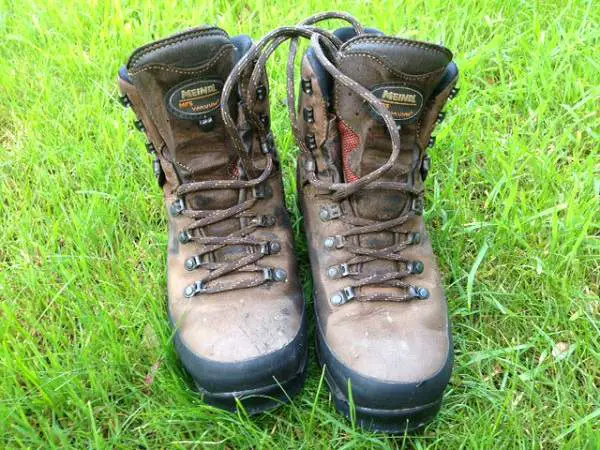
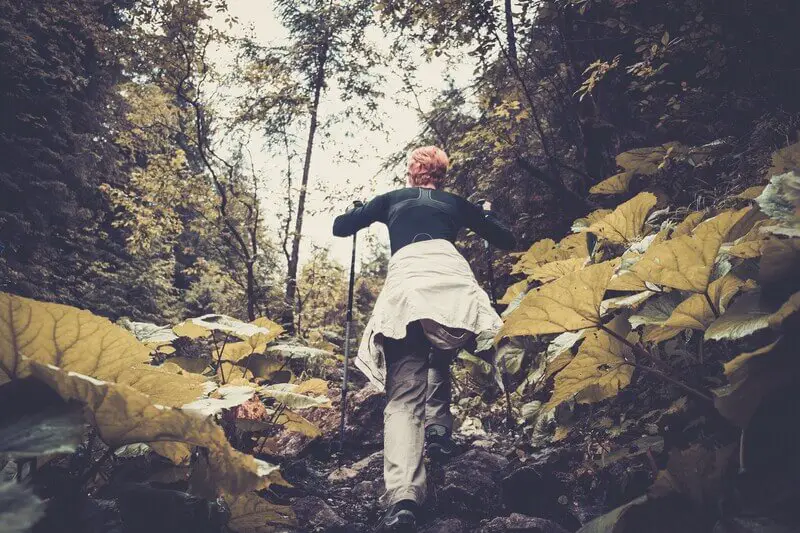
So, I of course just got on with things and did the hike. How did it turn out? Well, the hike was great, but not having my gaiters, my hiking boots and hiking pants took a fair bit of a bashing lol 🙂 as you can see in the photo below!

Muddy Hiking Pants

Conclusion

Moral of the story? Well, first, just always remember to be careful what hiking gear you leave behind, thinking you won’t need it, you never know!

Secondly, never forget what the weather has been doing in the time running up to your hike. If it’s been raining a lot you could have a lot of saturated ground like I had or overflowing rivers, etc. There are all sorts of latent dangers and challenges that could develop from previous heavy conditions.

It didn’t effect my days hiking thankfully and I had a great day out. However, I got a good reminder how easy it can be to add a bit more difficulty of your own accord. I also got a great reminder how absolutely wonderful gaiters are 🙂 A really great piece of kit!

Hiking in Summer

Broadly stated, there is usually no better time of the year to head out on the trail than in Summer. I like hiking all year round, but I thought it would be interesting to assess what I see as some of the benefits of hiking in Summer as opposed to other times of the year.

A Sunny Day For Hiking

The Weather

First up, the obvious place to start is with the weather. The weather tends to be nicer, in many parts of the world, with more sunshine and less cloud in Summer. Of course, even if it is sunnier and hotter, you still need to be careful when it comes to the sun.

It can cause as many problems as cold weather when you’re out hiking in the heat for a long period of time. Dehydration is not uncommon for example and although this can happen at any time of the year, a beating sun certainly increases the likelihood.

The potential to encounter this problem is of course exacerbated in more extreme parts of the world, say hiking in a desert for example.

However, generally speaking, the warmer weather and nicer temperatures make for a much more pleasant hiking experience. I should conclude this section by saying that even in Summer, in temperate parts of the world, you can still get drenched in a downpour and caught out by the weather at any time.

The advantage can be that you may get as cold as you might in Winter, however, I have hiked in the Summer and got drenched in various parts of the world and with a cool breeze and heavy cloud cover, it didn’t feel like summer at all, at times!

People are more Likely to Hike

Summer is the perfect time for a beginner hiker to get started as the better conditions mean one less thing for them to factor in when preparing and getting used to what’s involved.

Similarly, there are plenty of fair weather hikers who only poke their heads out onto the trail in the Summer time. The thought of dragging themselves across mountains in cold and wet conditions is simply a no no for them.

That isn’t an issue in my world as I know plenty of all year round hikers. However, I know a couple of friends who would like to get out on the trail more, but they need to bring their wives out with them too as they only get to spend a day together here and there, what with kids and so on.

Their wives would not even consider setting foot onto any trail if there was a threat of rain!

However, in Summer, it’s a much more viable option for many people and you of course tend to see many more people out on the trail in summer that at any other time of year.

Beautiful Views

This one ties in with the weather but it does merit a special point all of its own. Summer is really great when it comes to getting those panoramic views that every hiker hopes to get rewarded with after a long trek up a mountainside!

A Beautiful View

There is much more chance of catching amazing views, and that great photograph to show off to your friends, when the sun is out! Now, of course some places experience sun most of the year round, but for many, summer is the best chance of a blue sky photo opportunity.

I hasten to add that there are plenty of beautiful views to be had on cloudy days too, they can have their own mystique and qualities which are always worth experiencing, but much harder to catch on camera by an untrained photographer like myself!

More Options

In Summer, generally speaking, when you visit a national park or the like, all the various trails on offer tend to be open.

Although it’s likely to be a busier time of year so there will be more people too, it does mean there are usually plenty more options to experience on the trail. If you plan ahead, you should get to do the hike you prefer.

At other times of year, due to the weather for example, many trails are closed as they are deemed to be too dangerous. Think of heavy snowfall threatening avalanche, or perhaps the Narrows in Zion National Park, where the river is too dangerous to hike in for periods of the year due to run-off from rainfall and melting snow.

There are plenty of examples of this and overall, it’s more likely that in Summer, you have plenty more options to choose from when you hit the trail.

Less Gear to Carry

Again, broadly speaking, your gear bag will be a bit lighter in the Summer. While you always should have extra layers for warmth and suitable rain jacket and rain gear, in summer time, the necessary performance requirements are likely to be less.

For example, as I move through the year, I go from wearing a very thick and heavy fleece in Winter, to a much lighter one in spring and Autumn, to an even lighter one in Summer. In fact in summer, many times, it just stays in my day pack.

Similarly, in winter, I will carry extra pairs of thick gloves and mitts but in Summer, when the temperatures are much better, I don’t need this kind of heavy artillery gear in my bag. I of course always have suitable spares for emergencies but there is definitely more leeway when the sun is shining and the temperatures are up.

Conclusion

So, there you have it, some of what I see as advantages to hiking in Summer, as opposed to any other time of the year. Now, as I said at the start, I hike all year round and love what every season brings in terms of experience and enjoyment.

However, Summer is a fine time to experience the mountains and it can be really sweet to hike when nature is in full bloom, and you can really see off into the distant horizon. Summer time certainly brings it’s own majesty to an experience on the trail, that is for sure!

What about you? Is Summer your favorite time of year to hike? I’d love to hear your thoughts in the comments below.

Hiking in Bad Weather

I went out for a hike yesterday, to prepare for a hike next week when I am taking a group out on this particular route. Basically, a recce as such. Nothing new with that, standard practice when I lead a hike, to check the route beforehand.

Some Blue Sky

Now, I had been in this area before and even on three of the peaks, of which there were four, on the route. However, I had never done this exact route, so I wanted to check it out. In terms of distance, it is nothing too crazy coming in at about 10 miles with a height gain of 700 meters all told.

Getting Ready!

I of course, went through the usual routine before heading out on the hike in the morning before I left. So, preparing gear, getting my rain jacket, rain pants, hiking boots, etc. ready as well as food and water. I also made sure I had my safety kit, first aid kit, bothy bag, etc. with me, just in case of an emergency.

One of the standard things I of course check, is the weather. Long story short, to set some context, the weather has been pretty bad the last week with lot’s of heavy rain and generally very unsettled conditions.

So, first off I had to factor that into my thinking, The place I was going to is boggy and with all that rain, it would make the going harder underfoot, much more slippy and so the potential of turning on an ankle or slipping onto my keister, which did actually happen once, was something to really think about.

The next thing, was the weather on the day. It was the same as the week previous,and was to be  very unsettled. Blasts of sunshine, heavy rain, high wind with plenty of cloud cover at times too. Basically, four seasons in one day!

Now, I need to emphasize the rain and wind, as the wind was to have pretty high gusts at times and the rain was to be very heavy it short blasts. The place I was hiking in was also particularly exposed i.e. ideal for winds to build up from pretty much any direction.

On the Day!

Anyway, I started out and I was actually wearing my sunglasses as the sun was beating out of the sky. Within about twenty minutes, the clouds came over and the wind started to pick up. By the time I got to the first peak, dark clouds had formed covering all the sky above.

As I made my way to the second peak, the fun really began! The skies opened up and the rain pummeled me for about 20 minutes. I had my rain gear on so I was well protected.

Now, the ground on the way to the second peak was really wet and boggy and there were really large pools of rainwater left from all the previous week’s rain.

It was very difficult to see where was reasonable to walk to be sure the footing was good. The raindrops bouncing into the massive puddles didn’t help matters either!

By the time I got to the top of the second peak, see the image below, the rain had stopped but the winds had really got up, so much so that it was making my eyes water heavily.

Peak Two

I had already put my sunglasses away, as they made it too dark to see the ground in terms of footing, so I had no protection on them.

The wind was that strong, I decided taking anything out of my day pack there wasn’t a good idea, so I figured I’d wait till I went into shelter a bit as I headed down into a saddle before heading for the third peak.

That was all fine but, as soon as I got a bit, and I mean only a little bit, out of the wind, the heavens opened up again, twice as heavy as the last downpour.

Rain Again … and Again

After about a 15 minute battering of heavy rain, it stopped and the sun came out! With all my rain gear on it actually started to get very warm, to the point I took my jacket off.

I could see clouds looming in the distance so I didn’t bother taking my rain pants off. Twenty minutes later, baddabing, the sun was covered in dark clouds and the skies opened up again.

As I made my way up to the third peak, the wind got up even more as the peak is very exposed in the surrounding area. I took a beeline to the next peak which involved a steep decline from there down over what was practically a water slide at that point.

Then over a river (which had lots of run off in it after all the rain) which I needed to be careful with and back up to the final peak.

All the while, the same pattern played out i.e. torrential rain for twenty minutes, high gusts of wind with crescendos that would nearly lift you off your feet, topped off with a blast of beautiful sunshine and heat!

It was a bizarre day in terms of weather for sure, and in truth, I wouldn’t have went out, except for the fact it was my only opportunity to check the route out before next weekend!

The Take Away

So, what point am I driving at with all this? Well, a couple of years back I did a post on how quickly and easily mountain weather can change, especially if you are hiking in typically meteorologically temperamental areas, if you will. This really reminded me of that fact.

Even with all the best planning in advance, on the day of your hike, so many things can be thrown in your face to challenge you. The weather is a typical example of this and one that most every hiker will have come across at some point.

If you look at the outward facts of this hike I was taking on … it is June, it is Summertime, the temperatures are pleasant and although the weather has been erratic, the sun was making an appearance a fair bit. All sounds reasonable enough!

Even factoring in the fact that the forecast was accurate, and it was challenging on the day as predicted, you can never underestimate the weather when you are heading out on the trail. It can turn on a sixpence and bring all sorts of challenges, just like that.

The hike I was doing, was a relatively tame one, nothing too strenuous for the group I am taking out next week. However, in conditions like I did my recce in, a whole new dimension of difficulty is added.

Conclusion!

In conclusion, the message here is simple. Always do the right planning when it comes to the weather.

Check the forecast and think what the weather has been doing in the run up to your hike e.g. if there has been lot’s of rain, rivers will be more swollen and there may be more run off which can add a whole new set of hazards.

Never take anything for granted and always be prepared with the right gear and equipment. If you’re prepared and the sky turns on you, with the right gear, you should be fine, and nearly always, hiking in bad weather just adds an extra challenge factor to proceedings.

Although often nothing more than a pain, it can also turn out to just be a whole lot of fun on your hike. 

If on the other hand, you are not adequately prepared, well, that can be a whole different story and that extra challenge could develop into a serious problem quite easily.

Anyway, this was fresh in my mind after getting battered by the wind and rain yesterday lol 🙂 so I figured I’d add up a few thoughts on it.

Stay safe!

How to Choose the Right Hiking Trail

For someone new to hiking, it can be a bit daunting when you are trying to get out on the trail for the first time. There is a fair bit to think about before you set out.

On the Trail

What clothes should I wear? Have I got the right hiking boots? What food is good for a hike and how much water should I take with me? Where should I go for a hike?

The day hiking checklist is extensive when you’re new to it all. In this post I want to look one of the many items on that list that a new hiker needs to take into consideration. That is, how to you choose the right trail for a hike.

This of course gets easier and easier with experience but it always plays a part in your planning, even for the most experienced hikers, you always need to be aware and check on many things to confirm that a particular trail or route is right for you.

OK, although we’re going to assume that the hiker who is the subject of this article is new to hiking and so needs to start from the basics when picking a route, the same things apply to experienced hikers too. Let’s kick on!

Fitness

The trail you take on, will need to match up to your level of fitness and capability. If you never hike more than 3 miles in your normal run of things, setting out on a 10 mile hike is of course not a smart idea. Your body will not be able to jump to that kind of exertion.

Next up, in terms of fitness, take the activity itself into consideration. What I mean by that can be illustrated by a personal example.

My ex girlfriend was a Pilates and Yoga teacher, so obviously pretty fit with good core strength. However, when she came out on hikes with me, she could often struggle at times and found the going, even on short hikes, tough.

Why would that be, she is very fit after all? Well, you need to factor in the activity. Being very fit from doing Pilates and Yoga, may not necessarily transfer over to hiking 10 miles.

It’s a different kind of fitness. Another area I have seen this a lot in is people who are into strength training and weight lifting, as I am myself a bit. If you have good conditioning, it should be a good help to your hiking, but strength from doing weights does not necessarily transfer across.

Weightlifter

We’re of course always looking at aerobic or anaerobic exercises which can deliver different things in terms of fitness. You’d be surprised how many people automatically assume their normal training transfers across to hiking.

If you’re not used to hiking, your body needs to adjust, just like for any new activity. Some will do it faster than others of course, but most people have to go through some period of adaptation.

Bottom Line

When you’re choosing your first trail for your initial hikes, choose something that is well within your comfort zone. It will give you a good feel for what you are capable of.

It can be OK to push it a little bit, for example, say if you run 3 miles regularly, maybe try a 5 mile hike and see how you get on. That should be within your reach, but be sensible, only you know what works best for you 🙂

Location

Ideally, on your first time out, when deciding where to go for a hike, pick an area you know or at least near to you. Why does that matter? Well, you already know the climate, the temperature at the time of year (Although bear in mind it will get cooler as you gain altitude), what wildlife you may have to consider and so on.

Now, in saying that, you will likely be going into a more wilderness type area and with that in mind, you should still check up these same items as you may well encounter a whole range of different things in a more wilderness area.

For example, as already mentioned, the weather can change significantly as you hike up a mountain, there may be wildlife that you don’t normally encounter that you need to think about, etc..

When thinking about location when starting out hiking, it’s a good idea to pick a place that is popular i.e. so you will encounter other folks on the trail. As you’re just starting out, you never know what may happen and so you want to be as safe as possible in the location you choose.

If, heaven forbid, something was to happen to you and you couldn’t get help, if there are people around, there is more chance of being found and getting help if you need it.

Trail Difficulty

This kind of ties in with fitness, but assuming you go to a well established area for your initial hikes, there is a good chance there will be well established trails that are split out into levels of difficulty. An example is listed below:

Difficulty LevelDescription
EasyHiking on obvious trails that are easy to follow and are well maintained, minimal height gain and less distance
ModerateLonger distance with more ascent and potential off trail segments i.e. over tougher terrain
HardLonger trails with much more up and down with more height gain, potentially more off trail and challenging terrain to negotiate e.g. scree, rocky areas, etc.

Basic trail maps are also often available to buy in information stations so you can find your way around.

Of course, you may want a challenge but again, be sensible! Pick something that is well within your capability. It’s fine to push the boat out a bit and challenge yourself but just do it in a sensible manner.

If you’re unsure, start of on an easy level of difficulty and you can work up as you get used to the different challenges available. In fact, you may do a basic trail and find that you’re happy to stay at that level, no more difficulty required! That’s totally cool too.

Again, at the start, the best advice it to stick to well marked, even signposted, trails to be sure you don’t get lost. I do not recommend going off trail when you are only starting with hiking, you need to get some proper experience under your belt before even considering that.

By the way, just because trails are popular and well sign posted, it doesn’t mean they aren’t challenging. There are plenty of well marked popular trails all over the world that are challenging, even to experienced hikers!

Going Alone?

I am not against this is you have followed all the items listed above. If you’re in a well established area with decent foot traffic, you are probably safe to go out alone as long as you take sensible precautions e.g. tell people where you are going and when you should be back, etc.

Hiker on Trail

Ideally, going out with a few people is better. If something happens to one or more of you, there are others there ready to act to get help.

I don’t mean to flog a dead horse but it can’t be emphasized enough … be sensible about what you decide to do always keeping your safety in mind and you will most likely be fine.

Hiking Gear

This is a HUGE topic and one you need to spend time learning more about as you get more and more into hiking. If you’re just starting out, and getting a flavor for the trail and sticking to well known trails, you don’t need to spend a fortune on gear at the start.

Some things, like hiking boots and a decent rain jacket are non negotiable though. Again though, if the sun is splitting the trees where you plan to hike, you might be fine in a pair of shorts.

Hiker Eating On The Trail

The overall point here is that if you’re choosing a hiking trail you should be sure you have appropriate gear with you for that trail.

If you expect rain, have a good rain jacket and suitable hiking pants, if the sun will be strong, you need a good sun hat, sunglasses, sunscreen, etc. you get the idea, bring gear appropriate to the challenge of the trail and its location.

You will nearly always need some kind of good day pack too, to carry any spare gear as well as your food, water, a basic first aid kit, etc. so keep that in mind!

Safety

This should probably be first on the agenda but it really encompasses everything else that has already been listed, as at the end of the day, it’s all about staying safe! Whatever you do, don’t put yourself at risk and be sure you have a plan and know how to get help in an emergency.

Don’t take on more than you can chew and be sure to check out the basics like:

  • Weather on the day
  • The nature of the trail you are taking i.e. terrain, altitude gain, etc.
  • What gear you should have
  • You have a fully charged phone (There is hopefully reception)
  • You let people know where you are going, what route you will take and when they should expect you back, etc.
  • You have adequate food and water with you
  • Any other safety concerns you should think about e.g. wildlife, access restrictions, etc.

There is a lot to consider when it comes to staying safe on the trail for sure, but a little thinking and planning in advance becomes second nature in no time!

Conclusion

I hope you found this short article on how to choose the right hiking trail useful. While it is aimed more at the beginner hiker, as mentioned at the start, it is always relevant to all hikers, on all trails!

Always think safety first and how you can maximize the enjoyment of your day without taking any unnecessary risks. I think it is fine to push the boat out a little but only within your capabilities, in a safe and sensible (there’s that word again) manner.

I lead groups in the mountains and one of the biggest causes of people getting into difficulty in the mountains that I have come across, is bad preparation and lack of knowledge.

I would guess that 95% of this is easily preventable, and there is plenty of information to keep you safe, that is freely available before you ever set out.

Get online and do some research about all you need to prepare for, or even better speak with someone who has hiked the trail you want to hike, hiking clubs and associations are an excellent resource for this.

To conclude, whatever you do, choose your initial trails to hike on wisely and be sure to always stay safe. I hope you found this useful, please like and share it if you did!

What Should I Pack for a 2 to 3 Day Backpacking Trip?

Typically most backpacking trips I do, are over the span of a weekend, so usually 1 to 2 nights, sometimes 3. Having done many of them over the years at this stage, I thought it would be useful to lay out some information with regards to what I typically pack for a 2 to 3 day backpacking trip of this kind.

Backpacking Gear

I will try and split the various bits and pieces out into logical groupings to help make it clearer to follow. So if you’re unsure of a particular area, say food, you can just skip to that area to read up on it.

I’m going to preface this article by stating that when you start backpacking you need to develop a system. The system obviously needs to be adapted for varying locations, conditions, seasons, etc.

We’ll explore that more below but ultimately, while most ‘systems’ will be similar, there will be nuance based on personal preferences.

Your overall backpacking system comprises of several smaller systems. So, you have a system for shelter, for sleeping, cooking, and so on. Breaking it down that way makes it easier to manage and map out what you think you need.

Shelter

Let’s start with the obvious one for backpacking, shelter. You of course must have shelter with you if you plan to stay out overnight in the wilderness. With that in mind I recommend a one or two person tent. 

A two person tent is a bit too much in my opinion but it is doable to carry for one person if it’s a sleek enough package. If you’re with a friend, you can always share the load by splitting it up between two people.

Now, you can of course choose an ultralight backpacking option, like a tarp and some kind of bivvy bag, if the conditions allow that. Personally, I always go with a one person tent, the one I am currently using is the Terra Nova Zephyros 1 Person Tent, you can see a picture of it in the field during my winter experiment below.

Terra Nova Zephyros 1 Person Tent

I like this as it is compact and lightweight (plus it didn’t break the bank). It’s a 3 season tent but I have used it in winter. I tried an experiment to see if a 3 season tent could be used in winter and it went fine. Of course, it all depends what type of winter weather you’re talking about! Our old friend common sense plays a part here as always!

As a tip, I pack my tent by removing all the packing and take only the tent pieces I need with me. I also stuff the tent down into the bottom of my backpack. This saves on space and makes it easier to carry.

As a final note, if you are new to buying a tent, check out the tent buying guide as well, it covers all the various shelter options that are available. Remember to get clear on the conditions of where you plan to camp, as that will have a big impact on what kind of tent you need.

Sleep System

Crucial to a successful night out under the stars, or clouds 🙂 , is of course, a good night’s sleep. As part of your overall backpacking system, you need a sleep system.

In brief, you need a suitable air mattress and pillow (a pillow is not necessary but I like to have one). I used to use a foam roll mat but my air mattress, pictured in it’s packed form below, is head and shoulders above it in terms of comfort.

Thermarest ProLite Plus Size

Next up, a critical piece of your comfort and safety is your sleeping bag. You must have a suitable sleeping bag for the temperatures and conditions you are planning to camp in. This is critical, as finding out your bag isn’t going to work in the middle of the night in the wilderness, is not a recipe for a happy experience!

Check out the sleeping bag buying guide to learn more about how to choose an appropriate sleeping bag. The process is pretty straightforward when you know how.

You may also want to consider a sleeping bag liner but I tend not to bother with that for a backpacking weekend. I use those for trips into the huts in places like the Alps.

Cooking

Cooking is of course the next thing you need to consider. I will look at food and water next but to help qualify this, I only ever heat food for main meals up while backpacking.

I use food in a bag that I just have to heat up. Very easy and efficient with minimal hassle. Anyway, I digress … in terms of cooking I bring a simple butane gas stove with me. I always bring an extra gas canister as well, just in case I run out.

Gas Stove

It’s a good idea to check how full your existing gas canister is. This is usually very easily done by putting it into water to see how much it floats / sinks. The canister will usually have instructions on it, on how to do this.

I bring one basic but functional stainless steel pot with me and I use that for all my cooking. As I said I only ever heat things up in water so I have zero mess and no cleaning at the end.

I also tend to use the water I heat stuff up in e.g. for coffee, tea, etc. I also try to pack the cooker and whatever else I can squeeze into it, inside my cooking pot. This saves on packing space when getting your kit together.

Lighter and Utensils

As well as this, you need to bring a way to light the gas. Typically I pack a few lighters, I always bring spares just in case. Pack these in dry bags so they are functional in bad conditions when you need them. In fact as a rule, I typically put all my cooking gear into a dry bag, easier to keep it all together.

Finally, you need utensils to eat and drink with. Again, I aim for zero fuss and minimal packing weight so I bring only a suitable mug, a flask (can double as a mug) and a spork to eat with.

I eat straight from the bag so I don’t need a container of any kind. If you do, I suggest eating straight from the pot as a plate is a needless extra in my opinion.

Ideally, cook away from your tent to avoid any major mishaps as tents can go up in an instant if they get an errant spark on them! If the weather is too bad, utilize the porch in your tent (Look for a functional porch when buying your tent) and be very careful if you cook while still in the tent!

Food and Hydration

Food Packet and Spork

Next up, you have to bring food and source water. As already alluded to, in terms of food, I only ever bring pre-cooked food that can be heated up in water. It’s easy to manage with zero fuss. The food available in these bags is actually really pretty tasty and I have been happy to eat it for a few days on the trot.

I don’t entertain any cooking that means I have to wash up for two reasons. First, I am lazy when it comes to this 🙂 and two, more importantly, it’s all about leave no trace and washing a dirty pot out will invariably leave bits of food lying about.

As well as this I bring easy carry food in wrappers for backpacking. Things like energy bars, chocolate bars, boiled sweets. Anything that is dry and in a wrapper. When I day hike I will take fruit with me but I don’t bother when I backpack on a weekend as it means there will be decomposing waste to carry out.

One of the things I like about backpacking is that your pack should be lighter on the way out, than on the way in. After you’ve ate your food and used some of your gas, you knock some weight down.

Waste

Be sure to pack your food and waste / empty bags away in a seal-able bag of some kind as the waft from them can attract animals and that is not ideal. In some cases, say if you have bears to consider, you may need a proper canister that will really stop any waft from getting out.

Also, I always carry my waste with me. So, if I camp up for a night but then head out for a day hike the following day, I take all waste and all my food with me.

If you leave it behind and a smell gets out, it could easily to be too much of an attraction to animals, especially if you’re not around to dissuade them.

You can easily come back to a ruined tent as animals try to get at the food inside. This is not good as not only will you possibly go hungry but you may not have a roof over your head for the night!

Water

Water is of course critical. I source all my water in the mountains. I plan my camping location in advance so I am relatively close to a good water source.

I also do my research, and if it is OK to drink the water straight from the river (common in the UK and Ireland), I have no issue drinking it straight if the source is high up enough. You need to decide what is right for you though, as I have friends who would never do this and they always use a filtration method.

If the water is not safe to drink, you need a way to purify it. There are many ways to purify river water these days. I recommend a bit of experimentation to see what you prefer as there are many ways to do it.

Of course you then need a way to carry water. When I day hike, I prefer to use a hydration bladder to carry my drinking water. However, I don’t do this when I backpack for several reasons.

Firstly, if a bag full of water bursts inside your backpack, that is not going to be cool. You should utilize dry bags as much as you can but even with your stuff packed into them, something inside still could get soaked.

If a bladder burst or water seeped out through a hole, it would probably be a while before you realized as it is on your back and not directly in your view.

The first time you notice it is probably when you feel it on your back or legs and by that time, it is very possible that some of your stuff could be wet.

Think about if you had a down sleeping bag and it got drenched … D’oh! No warm and comfy nights sleep for you 🙂 Again, employing dry bags will help prevent this but it is still something to try and avoid. On top of this, you have probably just lost all your drinking water.

When I backpack, I always use water bottles. I tend to bring two, one 1 liter bottle and one 0.5 liter bottle. I place the 0.5 liter in a side pocket so I can access on the move without taking my pack off my back.

Water Bottle

The 1 liter bottle is kept in my pack. I use it to refill my drinking water bottle should I need to, or to carry water to cook with. You should always try to camp close to a water source if possible so you can replenish your reserves as you need to.

Another good option which I use from time to time, is a water bag. These are just bags that you can fill up with water and leave near your tent, can be very handy to have to save multiple trips back and forth to the river. A hydration bladder can do this job fine as well.

Safety

By default, you should always have some safety gear with you. This should comprise of:

  • a first aid kit
  • an emergency blanket
  • your mobile phone and some extra charging capability
  • a bothy bag
  • map and compass (Carry a spare)
  • a headlamp (with spare batteries and ideally a spare headlamp)
  • and possibly a suitable hiking rope (only include a rope if you know how to use it and think there may be a viable need for it)

These are the main items to think about in terms of safety. Follow the links above to learn more about each specific item. Now, depending on where you camp, your safety equipment may need to be more extensive. For example, are there animals you need to potentially protect yourself from in the area you plan to camp in?

As well as this, before you ever set out on a backpacking trip, make sure you do proper research. For example:

  • Do you need a permit to go where you want to go?
  • Is camping even allowed?
  • What time of year is it and is it safe to camp in the conditions?
  • What’s the weather forecast?
  • Where are you going to camp?
  • What’s your route to get there?
  • Can you get in touch with emergency services from where you will be?
  • Do you have the correct contact number?
  • Is there mobile reception?

You should be very well versed in all of this and more in advance. In truth most of your safety work is done long before you ever set out.

Anyone can be unfortunate and take a tumble, but good planning nearly always prevents problems long before they can get a chance to manifest and helps ensure you can deal with them if they do.

Clothing

It could be argued that clothing is part of your safety as the gear you wear and carry will have a major impact on the level of enjoyment you experience. Again, you need to be looking at the location, conditions, etc.to see what you need but as a general rule I take the items below.

Hiking Boots

It goes without saying, you should have good hiking boots or, if conditions allow, hiking shoes with you. I always go with sturdy backpacking boots, even in warm weather. Pictured below are my awesome Meindl Vacuum hiking boots!

my-meindl-vakuum-gtx-hiking-boots-after-some-good-use

The extra weight on my back means for me, that I want more stability in my feet and ankles, so  I go with boots every time. Some people do hike in trail shoes but that isn’t for me. I prefer the traditional leather Alpine style boot but the more technical looking backpacking boots are an equally viable option and can sometimes be lighter.

Ensure your boots are well broken in and you have suitable insoles should you need them, again break them in before heading out on extended backpacking trip.

Underwear

I will wear one pair of hiking socks which generally will do me the whole weekend. If the weather is to be very wet, I will carry a spare pair of socks. It can be a good idea to always have a spare pair, even in good weather but sometimes I’ll skimp on this if the conditions are good.

I tend to just wear normal boxers when I backpack and like socks, if it’s going to be wet, I carry a spare pair for a weekend trip. However, these boxers are made of cotton which for me, in any other aspect of hiking gear, is a no-no.

For some reason I let it slide when it comes to my boxers. I have tried using Nike running boxers instead of the cotton but, oddly enough, they didn’t work well for backpacking and led to a bit of chaffing.

This is something I need to look at some more but I haven’t had any major issues wearing cotton boxers in bad weather so that is most likely why I haven’t tried to change it too much.

My other gear and rain gear does the job well and so broadly speaking, my boxers stay dry enough. I also find if they’re a bit damp, if I sleep in them in my sleeping bag, they will dry up in no time from the heat inside the bag.

Base layers

You need a good base layer, even when the conditions are good, you should have one packed away. At colder times of year I wear one and carry a spare. Merino wool or synthetic is the order of the day here as you need good wicking capability for your base layers.

I prefer Merino when it’s cooler as it’s more snug and cosy on the skin. I think synthetic fiber base layers are maybe a better option in warmer weather as I tend to feel cooler in them. Whatever works best for you though.

I don’t bother with wearing baselayer leggings. I have them but even when I used them in Winter in the Alps, I found they were just far too warm for me.

If your legs get chilly though, they are an option. In saying that though, I pack them in as a spare at colder times of year as it’s handy way to add more heat while sleeping in a bag at night should you need it.

Mid layer

I will always wear a suitable hiking tee over my base layer top. Any synthetic running tee should do the job.

Although normally an outer layer I will add my pants into the mid layer section as I often wear rain gear over them. I wear hiking pants that are very breathable and ideally with venting options.

I like the more recent materials being utilized in hiking pants such as elastane mix. I find them very comfortable as they are stretchy and fit easily.

They also dry very quickly which is also something I look for. Hiking pants are a whole area in and of themselves, check out the hiking pants buying guide to learn more on what to look for.

Next up, over my tee, I will wear a fleece. If it’s a colder time of year I wear a heavier warmer one. If it’s warmer, I might wear a thinner one or none at all.

At all times I carry a micro fleece in my spare clothes bag for extra warmth as required. Again, you can use this as required e.g. over your base layer in your sleeping bag for extra warmth if that works.

Sometimes I carry an insulated jacket as well. They wrap up very small and they can be great for colder conditions. When you’re sitting about in your campsite, that extra warmth on top of a heavy fleece, tee and base layer can be just the ticket.

Outer layers

This is basically my rain gear. I carry rain pants and use them as I need to. Good rain pants are a very good investment indeed and I believe in paying a bit extra for good ones.

You will more than get it back in terms of use as, depending where you are backpacking of course, you will get rained on! I also use them as an extra layer for warmth over my hiking pants and they can be an excellent wind stopper i.e. keeping windchill at bay.

The next critical piece of my outer gear set up, is a good rain jacket. I opt for the rain shell jacket option as they are lighter and easier to pack and carry. Your jacket needs to provide rain protection and breathability.

Think Gore-tex or or other well known waterproof and breathable technologies. You can opt to carry a wind jacket but I don’t. I rely on my rain jacket to do that and keep the wind chill away.

Hats, gloves, etc.

I always carry a minimum of two hiking hats, one I have access to and one in my spares bag. These are usually beanies but in hotter times I wear and carry sunhats too.

I carry three pairs of gloves:

  1. One lightweight acrylic with touch screen capability
  2. One waterproof pair  (debatable if they are actually waterproof but they retain heat when wet and that’s what I want)
  3. A pair of ski gloves or mittens for warmth

Sometimes, if the weather might be chilly, I will take my neck gaiter with me. This is great for keeping the chill of my neck. Sometimes, I will pack a balaclava too as they are also excellent when you need to keep the head warm.

Hygiene

Not the most pleasant of things to talk about, but when you gotta go, you gotta go … and if you’re spending two to three days in the wilderness, you can rest assured that at some point, you will need to go 🙂

I won’t go into the details about what to do when nature calls in the wilderness but I will list out what I bring with me in for that purpose. I pack a trowel to dig a cat hole, tissues and baby wipes. You can use a lighter too to burn any used paper.

I don’t bother with a tooth brush, normally I just bring some chewing gum and that does me fine for a couple of days. For cleaning my hands and face, I use the baby wipes (any kind of hygienic skin wipe will do the job but baby wipes are easy to get).

Backpack

Last but most definitely not least, you can’t get very far on a backpacking trip without something to carry all this stuff in 🙂 With that in mind, you need a good backpack.

For a weekend trip I generally get away with a 53 liter bag (48+5) but aiming for a 60L to 65L bag is probably a good idea. It’s funny as although I prefer a bit more space, as I do more and more backpacking, I consistently try and carry less.

However, when starting out, you should probably aim for more space to get a chance to work your backpacking system first. After that, you can work out what needs to stay and what can go.

Miscellaneous

The core of what I carry is covered above but there can be miscellaneous items that I take with me from time to time. For example, if it’s sunny weather, I might pack some hiking sunglasses along.

I will often take gaiters with me too. They are great for wetter areas or if you’re hiking through shale and scree. Also, sometimes I will take walking poles, they can be really useful, especially when carrying a heavy load on your back over steep terrain. I don’t always take them though.

Conclusion

When I first started writing this article, I thought it would be a straightforward enough piece. However, it turned out to be a tad longer than I first thought lol 🙂

I hope you found the information here on what to pack for a 2 to 3 day backpacking trip useful. What I list here is how I go about my backpacking weekend trips so if you’re planning something similar, this should give you some good pointers if it is your first time.

I am sure I have may have missed one or two minor things but hopefully I have covered most of them.

While this is what I do at the minute, it is always an evolving process. As I get more gear, as gear gets better, as I learn more tricks, etc. I will continue to change and adapt how I go about this.

It’s a never ending work in progress but the one common goal for me will always stay the same, namely less weight and more efficiency 🙂

Please feel free to ask me any questions in the comments below and if I can help clarify anything for you, I will be only too happy to do my best to do that.

Finally, if you found value in this, please share it around your networks!

Are Base Layer Leggings a Good Investment for a Hiker?

In the last post I added up on the site I went into the basic topic of base layers, in terms of what a base layer is and what purpose they serve. 

In that post, I touched on base layer leggings. To me they are the secondary part of the base layer duo (top and bottom). Why is that? Well, because I don’t use base layer leggings for hiking.

In fact, I can’t really think of conditions I would normally hike in, in which I would need base layer leggings. I have hiked in temperatures of probably -5 C / in the 20’s Fahrenheit, so not intensely cold and I have had no need for anything but my normal hiking pants and my rain pants. Pictured below are the Duofold Men’s Mid-Weight Wicking Thermal Pant.

I have also skied in the Alps in winter. For neither of these, would I have worn base layer leggings simply because they were just too warm.I should add that I did try hiking and skiing in them but I quickly realized I had to take them off, within minutes actually, especially for hiking, as I was baking hot in them.

The only regular use I have for base layer leggings, is when I camp in cold conditions. I keep them as an extra layer in case I need it for warmth while sleeping at night.

Although I always keep them in my weekend backpacking gear in late Autumn / Winter, I have never really needed them and my sleeping bag has been enough to keep me warm … It is comforting to know I have them there though so I always carry them when I camp at those times of the year.

In saying all this though, do I envisage the possibility of a day hike where I would perhaps need base layer leggings? Sure I do. If the conditions were cold enough, I could see how they could be needed, even for me.

I can also see how they could be a great emergency layer that is easily tucked into your pack. If you are heading out into more extreme cold, it becomes a no brainer of course and you would need them.

So are Base Layer Leggings a Good Investment?

For me, in terms of hiking and camping, I think they are. This is purely as I use them as a spare layer to potentially use when I camp out in colder conditions.

I don’t think they have much regular use for me for my normal hiking, however I don’t rule me out for hiking in very, very cold conditions I am not accustomed to where hiking leggings would be a must.

Now, even for the types of conditions I normally hike in, a temperate climate, this may not be the case for you i.e. what works for me may of course not work for you.

My Irish blood can put up with a fair bit of damp and cold by default :-), and so base layer leggings may be perfect for your needs in similar conditions that I wouldn’t need them for.

As always, you need to take your own capabilities, comfort and needs into consideration. Some people can’t handle the cold at all, especially if they are used to a warmer climate.

Conclusion

In conclusion, to reiterate, I think base layer leggings are a good investment for a hiker if they make sense for your personal hiking and camping needs. If you camp out in cooler conditions, that alone I feel is a good enough reason to get a pair for extra warmth in the night.

You can get a cheap and cheerful pair that won’t break the bank easily enough anyway so even if you don’t use them a lot, you don’t have to spend a fortune to have them on hand.

If you are planning to hike in very, very cold conditions, I recommend that you first and foremost seek precise guidance from a knowledgeable resource who is used to those conditions.

Even basic base layer leggings may not be enough in those types of conditions and you might need something more specialized to keep you good. That applies to all your gear, not just a pair of base layer leggings, in that regard I hasten to add 🙂

I hope you found this useful. As always, please share or leave a comment below 🙂

What Is A Base Layer?

When you head out hiking, typically you wear your gear in layers. For example, you will have an outer layer which usually consists of your rain gear.

Best Hiking Rain Jackets For Men

This is the outer layer as it faces the outside. This layer typically involves protection from the outside in. So it protects you from the elements such as rain, snow, etc.

As well as keeping you dry, it is also typically has a level of breathability, so any humidity inside, can get out to keep your mid layer, the next one, dry.

Moving further inwards, typically you will have one, possibly two, mid layers. These sit under your outer layer and above, you guessed it, your base layer. A mid layer’s primary function is to provide warmth.

If your outer layer is rain gear, think of your mid layers as hiking pants, a hiking tee and a fleece as an example. Their main job is to keep you warm and comfortable. They may have some venting capability but their purpose is to keep you warm

Finally then, as we move another layer down, right next to your skin, we come to the base layer. An example of a base layer, is shown in the image above.

What is the Purpose of a Base Layer?

The base layer has two main functions. The first function, is to wick moisture away from your body. In brief, as you hike along, your body will typically heat up from your exertion.

Your body will react to cool you down by sweating. This sweat then has to be able to get away from your skin, otherwise it will cool you down too much as you will have cold damp sweat on your skin.

That’s where the wicking capability of a base layer comes in. The function here is to provide an easy vehicle for the moisture, your sweat, to move away from your skin.

Wicking fabric, typically merino wool or synthetic fibers like Polyester, in base layers are excellent at helping this process along. We delve more into base layer materials further below.

What Forms a Base Layer?

Normally, base layers are used to cover your torso and your legs. They also usually fit nice and snug to your skin to help the two main functions we touched on above.

Personally, I never use a base layer for my legs, even when I was skiing in the Alps in Winter, I tried them one morning but they were far too warm for me.

However, that is my personal preference only. Some people, who may feel the cold that bit more than me, may love to have the additional warmth of base layer leggings.

What’s the Best Base Layer Material?

The best material make-up for a base layer varies from one individual and one set of circumstances to the next. Let’s take a look at the following popular base layer materials and their pros and cons to find out which one is best suited to your needs.

Merino Wool

Natural merino wool is surprisingly soft compared to some other types of wool, thanks to its super-fine fibers. It also has excellent thermoregulatory properties, meaning it will help you to maintain a comfortable temperature.

If you’re planning on wearing a base layer over several days on a trip it can be the best choice thanks to its natural odor-resistance.

As well as wicking away perspiration fairly well, merino wool can also provide extra warmth. It dries less quickly than synthetic fibers and can have a slight dampness to it after high intensity activities, although it continues to insulate even when damp.

On the downside, it can be rather expensive and needs a certain amount of care, being less durable than your average synthetic base layer.

Pros:

  • Natural material with a soft cashmere-like touch
  • Excellent thermoregulatory properties so you won’t suddenly feel cold or too hot when stopping or starting a more strenuous section of your hike
  • Wicks well keeping you dry
  • Naturally odor-resistant, suitable for several days wear on extended backpacking trips without odor retention

Cons:

  • Not quite as dry nor as fast drying as synthetics
  • Can be less durable, especially if worn as a stand-alone piece of clothing

Synthetic

Polyester is the most common synthetic material found in base layers, although you’ll also find nylon, rayon and polypropylene (I think that is a type of polyester :-). Synthetic base layers often consist of blends of two or more different synthetics to improve stretch, breathability and insulation.

The addition of spandex and elastane creates closefitting, elastic base layers that move with your body for a “second skin” sensation.

Often recommended for more intense activities, synthetic base layers tend to dry quicker than wool and are highly breathable, as well as more durable. However, they do tend to retain odor, over time even treated versions will start to smell.

They also insulate less well than merino wool base layers and some versions can leave you feeling a little cold once you stop exercising, making them less practical for time spent around camp if you’re backpacking or hiking slower, say on more leisurely hikes.

Pros:

  • Quick drying – suitable for high intensity activities
  • Available in a range of blends so you can choose a base layer that suits your personal needs and preferences
  • Body hugging with “second skin” ease of movement
  • Excellent wicking and highly breathable

Cons:

  • Even treated versions can still eventually have odor buildup problems
  • Can leave you feeling cold after you stop exercising

Synthetic / Wool Blend

Synthetic and wool combined create versatile base layers that improve the durability and drying time of wool, while adding a luxuriously soft and cozy sensation as well as extra insulation to synthetic fibers.

Offering the best of both worlds, this is a popular choice among hikers when looking for a long lasting base layer to see them through more challenging hiking trips.

With improved durability and less snagging potential, synthetic and wool blend base layers can also be worn as a stand alone piece during milder months.

However, if you’re looking for more warmth and true odor resistance, you may be better off with a full merino base layer, or for maximum breathability and fastest drying times, a full synthetic one.

Pros:

  • Qualities of merino wool e.g. warmth, combined with the durability of synthetics
  • Highly versatile base layer that can be worn year round for a variety of activities
  • Excellent wicking and fast drying
  • Soft close to skin and offers increased insulation compared to synthetic only base layers

Cons:

  • Faster paced activities may be better matched by a fully synthetic base layer
  • Less warmth and odor-resistance than a full merino base layer

Silk

People often question silk’s suitability as a base layer. While it’s true that it is comfortable and lightweight, it does not really make for a great base layer for outdoor activities.

Unless specially treated, it does not wick as well and it tends to retain odor. Silk can also be difficult to launder, meaning you’ll have to spend time and effort to keep it in good shape.

So, unless you are planning on hiking with a very minimum of exertion, think more a gentle stroll, then we don’t recommend silk as an appropriate base layer.

Pros:

  • Lightweight
  • Soft to the touch and outer layers will slip on easily over
  • All natural product

Cons:

  • Does not wick as well
  • Hard to launder

How to Choose the Best Base Layer

In this section we take a look at what to consider when buying a new base layer. When you’re looking for the best base layer, you need to bear in mind that what works for somebody else, will not necessarily be the best choice for you.

We list out the main considerations you should take into account, to help you find one that will perform appropriately for your needs.

It can also help to have various different base layers to wear at different times of year on different types of hiking excursions, so you may in fact decide to purchase two very different types of base layer to keep you dry and comfortable throughout the year.

I think both merino and synthetic base layers are excellent, I use both, so there is plenty of choice available to you. Merino wool base layers are usually pricier than their synthetic counterparts, but they are excellent in terms of warmth and functionality. Let’s take a closer look at specifics.

Activity Levels

If your hikes tend to take you far and wide, with plenty of uphill sections and a fast pace, then you’re going to need a base layer that has very fast drying times and excellent wicking.

Woman-Hiking-Through-Forest-In-Mountains

Synthetics often are classed as the most appropriate, however, you’ll also need to bear in mind some other factors before making your decision.

A wool and synthetic blend might be more suitable for longer trips or a lightweight wool base layer if you’re not overexerting yourself too much and the weather is very cold.

Climate

You’ll need to consider the climate and time of year as well as the weather types that you tend to encounter. Dressing for cold and dry is very different from dressing for cold and wet.

A lot of the time you may be dressing for a variety of different weather types in one trip, and it also helps to have versatile base layers that can double up as stand-alone pieces during milder months.

Damper climates favor the wearing of synthetics, as the more humid it is, the more difficult it becomes for perspiration to evaporate. With infra-red heat from the sun, on dry, cold days, you can still feel surprisingly warm in the sun even though the surrounding air is very cold.

Cost

Natural fibers such as merino wool and silk tend to come at a premium, whereas man-made fibers are, for the most part, more economically priced.

You should also bear in mind that a well designed base layer garment from a reputable outdoor wear brand, will probably cost considerably more than what you will pay for elsewhere with a non branded item.

However, such a branded garment will be designed specifically to stand up to the wear and tear of life on the trail, and this is naturally reflected in the price.

Such base layers will probably include useful features such as shoulder panels, to avoid uncomfortable chaffing of shoulder seams with a backpack, and maybe thumbholes or elasticated cuffs, and underarm gussets.

Comfort

You also need to consider your own comfort levels. If you tend to feel the cold, you may prefer to opt for a heavyweight wool base layer. If you always feel on the warm side, you may feel better with a synthetic base layer even when temperatures plummet.

Some people don’t like the sensation of wool against their skin, even though merino wool is nothing like wearing a standard woolen sweater. Other people prefer natural fibers as an ecological choice, knowing that their synthetic clothes could still be around for years after they are finished with them.

Mountaineer In Snowy Mountains

As already touched on, the second main function of a base layer is to also provide warmth by not only keeping your skin dry from damp, but also to help keep your body heat in.

So, as mentioned earlier in this article, base layers encourage humidity, sweat, to move out and away from your skin, while also keeping warmth in.

Now, you may not always want to keep heat in when using a base layer. For example, maybe you would like to keep your body a bit cooler as opposed to trapping heat in.

This is where the differences between merino and synthetic base layers come into their own. From my experience, Merino wool is very warm and snug and so not only wicks moisture away from your skin to keep you dry, but also provides a very nice layer of warmth.

I also have synthetic polypropylene base layers. These are also excellent at wicking moisture away from my skin but they aren’t as efficient at keeping warmth in, in my experience.

I find these can be better for use while hiking in Autumn, while the Merino ones are best for hiking in Winter, when I want that bit of extra warmth. That’s my experience with them anyway.

Odor Control

One final personal note to mention is about odor control. Typically, people find merino base layers easier to keep clean and fresh, synthetic base layers have a reputation for storing and holding odor from sweat, etc.

Personally, I haven’t found this to be a big issue with my synthetic base layers but some folks do mention it as a problem so I wanted to flag it here. You will often see base layers that will have some form of odor resistance listed as a function of the material.

Conclusion

So, if you were wondering what a base layer is, I hope you found this short post giving a brief overview on it useful. If you are looking to purchase base layers, take your time to consider the items listed above, and find out what you need them for to match up suitable ones to meet your needs.

Also, check out our top base layer recommendations for men and our top base layer recommendations for women. There you can find a good mix of some of the best base layers available on the market today, of all types, synthetic, merino wool, etc.

If you’re having difficulty deciding, for average hiking try out a lightweight or medium weight merino wool base layer.

If you later decide to look for a synthetic version for more intense hikes, then you can always make use of a good quality merino undergarment around the house and to wear to work, whereas synthetic garments tend to be more sports orientated with less versatility for daily use.

So, that’s it for today. I hope you found this post useful, please share it around your networks if you did 🙂

Stuck for Folks to Hike With? Try These Suggestions!

This is a kind of funny topic to think about as I have never really had any issues with finding people to hike with. However, it can be pretty common for some.

I remember it a little myself when I first started out hiking, I just didn’t know any hikers so I had to have a think about the best ways to get some folks out hiking with me.

Lone Hiker

So, in this article I want to make some suggestions to help get you out to meet like minded folks to get started on the trail and save you having to hike on your own.

Join a Hiking Club / Group / Association

Far and above the best way to get started on the trail and to meet like minded folks, is to join a hiking club or association. They are built for beginners and will have all the necessary things in place to help a new hiker get started.

For example, typically they will have graded levels of difficulty hikes, transport (possibly), experienced hike leaders and so on. Getting started this was is my number one recommendation and you will quickly make lots of new friends.

But What if a Club Doesn’t Suit?

When you’re just getting started hiking, maybe you feel it’s too early to go hell for leather and join a club or association. That may be too much of a commitment for you at the start and you just want to give it a try to see if you will like hiking as a pastime.

It could also be that there just aren’t any hiking clubs or associations in your local area so you have to work it out yourself. Having never been to the mountains before, you should always do plenty of research on what to expect, how to prepare etc. Check out the hiking for beginners guide for more information on that.

However, assuming, you have done your research and you are ready to safely hit a trail near you off of your own bat, you could find yourself stuck with no-one to go along with you on your adventure.

If that is the case, fear not, as with anything in life, you can always get creative to try and recruit people to head out on the trail with you!

Your Buddies

Yes indeed, some of your friends may look at you like you have ten heads when you suggest to head to the mountains for a hike … for fun!

However, mixed in among them you may well be able to find some willing resources who just need a little bit of cajoling. You most likely already have fit and healthy friends who maybe get their kicks from lifting weights in the gym or running miles on a treadmill.

These are a good bunch to target. Already fit and healthy, they are probably not averse to a challenge. If you get rebuttals at the start some simple reverse psychology could easily do the trick.

For example, cajole your weight lifting friends that they probably wouldn’t be able to hike up a mountain as it’s a different kind of fitness than they’re used to … that can get a very swift ‘Yes I can’ reaction as no-one likes to be told they can’t do something.

Another example, you have a friend who is big into yoga. Tell them that there’s nowhere more peaceful and spiritual than the mountains with nature all around. This is of course actually very true and it may just appeal to their mindful nature!

For friends in general, always start with highlighting the benefits of hiking. Match up what they think they would like with their personality and what they already enjoy.

Work Colleagues

If you have no joy with your friends, you could always look to your work colleagues. This may not be a runner for some, I totally understand that. But for others it could be a winner.

Just think about it, a common pastime among work folks is heading for a few beers after a hard week at the office. What better time to put forward a suggestion to head for the hills over a weekend than when everyone is winding down after a relaxing beer or five 🙂 You could get a lot of takers!

Think about taking a wider initiative too. Does your workplace have a sports and social or some kind of extracurricular activities club? Why not put a hike in the mountains forward as a suggestion for them for their next big trip away?

You can easily hire a guide to take you on a tour of a mountain or two in a range close to home. There are all manner of tour companies available too

If that’s not an option, just start to talk about a hike to help with team bonding and you could start to get people interested. What better way to get to know some of your work mates than to head out into a totally new and challenging environment for some team bonding!

Family

Are you not keeping in touch with your extended, or connecting with your immediate family as much as you should? Not enough family time going on? What better way to sort that out than to get a bunch of the relatives out on the mountains for a day out!

It could be novel … it could be hell … who knows until you try! Of course, similar to the work colleagues option above, this is possibly just a very bad idea for some.

However, if you and your extended / immediate family get along (at least a bit) and you fancy a hike in the hills, it could be a great source of folks to get to head out with you.

Don’t be limited by age barriers either! My uncle still hikes in the mountains in his 80’s and at the other end of the age spectrum, what better kind of adventure can a kid have than heading into the wilderness and the mountains. A break from video games and the internet could be a winner!

Also, if you haven’t taken some time out with that special someone in a while, a romantic trip into the wilderness could be just the ticket!

Couple Hiking

Most couples and families like the idea of spending time together so this could be a great option to suggest to do just that!

Conclusion

As I stated at the start, if you’re stuck for people to hike with, it can be best to seek out a hiking club or association. Meetup is also another really good way to see if there are hiking meetups in your local area and a great way to meet folks.

If that isn’t an option, why not try and use one of these options to see how you get on. When you head out on your first hike into the mountains, I recommend that you don’t go out on your own if possible.

It’s nearly always better to head out with other folks when it’s your first few times out. Just to get comfortable before you get more adventurous. Heaven forbid that anything should go wrong but if you happened to get unlucky and take a tumble, there is safety in numbers, to get emergency help, for sure!

I hope you found this article lighthearted and useful! What do you think? Is there anyone else you could call if you’re stuck for a hiking buddy? Please let me know in the comments below!

How to Wear Rain Pants

I had a very interesting, and somewhat surprising, conversation with a Guy at the weekend about the subject of how to wear rain pants. That is, he struck up a conversation with me on whether they should be worn as standalone pants or combined with other hiking pants.

Berghaus Mens Helvellyn Pant2

I have to say, that even considering this, really took me by surprise as I only ever wear rain pants in one way, and that is over my regular hiking pants.

However, he contested that he had read of people who do wear them as standalone hiking pants and hence, this was why he was asking me about it.

I started to think about it and couldn’t see how wearing rain pants as a single pair of pants would be a good idea.

However, after we had this conversation, when I got back home, I Googled it and I found that some people do seem to wear their rain pants as standalone pants, or at least there was talk of people doing it.

Is it comfortable?

Now, I have to say that I can’t imagine how this would be too comfortable, and I also can’t think of many advantages with it. The only thing that came to mind when thinking about it, is possibly in very, very humid environments that have heavy rain (maybe a jungle or such).

In that kind of environment, maybe normal hiking pants would just get soaking wet on the inside from humidity and possibly uncomfortable to wear.

You might still want protection from heavy rain from the outside. Even then though, I assume convertible hiking pants would be the way to go. Just zip off the bottoms to turn them into shorts and put your rain pants over on top.

I haven’t been in a jungle as yet so can’t say if this could be an advantage in terms of wearing rain pants only. However, given that there are so many lightweight and quick drying hiking pant options available on the market today, again I am not sure I see how this would be advantageous.

I only ever carry my rain gear in my pack to be put on as outer shell layer over my layers for warmth and protection, it is always my outer layer in my layering system for wet weather. However, when it’s very warm, even when it rains, I might not necessarily put my rain pants or rain jacket on.

As mentioned, some hiking pants available these days are, broadly speaking, very quick drying so if it’s warm enough. So even if I get wet, my normal hiking pants will dry in a relatively short period of time so I won’t bother with the outer layer.

Conclusion

So, there you go, It’s an interesting one, and I never thought I would be considering alternative ways of how to wear rain pants! Thinking about it now though, it has certainly made me reflect on alternative possibilities I guess.

As already mentioned, I only ever wear my rain pants over my normal hiking pants as an outer shell when needed.

However, if you find it practical and functional to wear them as standalone pants, relative to the conditions you hike in, by all means go for it. I never like to say never in terms of gear, so whatever works is the name of the game at the end of the day.

What do you think? Do ever wear hiking pants as standalone pants? If yes, where are you hiking and in what conditions? I’d be fascinated to hear about it in the comments below!

  • « Previous Page
  • 1
  • …
  • 5
  • 6
  • 7
  • 8
  • 9
  • …
  • 16
  • Next Page »
  • Facebook
  • Pinterest

What are you looking for?

Copyright © 2025 · Cool Hiking Gear

Cool Hiking Gear is a participant in the Amazon Services LLC Associates Program, an affiliate advertising program designed to provide a means for us to earn fees by linking to Amazon.com and affiliated sites.

  • About This Site
  • Privacy Policy
  • Affiliate Disclosure Statement
  • Contact