Today I wanted to write some notes on how to break hiking boots in, specifically what I do to help with the process. I have written on this subject on the site before but I thought doing a post specifically on the topic would be useful as it does up come up for people regularly enough.

First off, if you’re coming to this article and you want to get hiking boots but you’re completely new on what to look for when buying hiking boots, I recommend you read this post on how to choose hiking boots and trail shoes, as well as this article on how to find the perfect fit, where I list out some further tips to consider when trying to find the right boots for you.
Think of those articles as the critical foundation you need to get in place before choosing hiking boots and taking them out into the field so to speak.
If you’re in the market for a new pair of hiking boots, you can find our top hiking boot recommendations for men here and our top hiking boots recommendations for women here.
What is Breaking Boots in and why do I Need to do it?
When you buy new hiking boots, they’re more or less fresh off the manufacturing line or, if you’ve got a really sweet pair, straight from the cobblers hands by the time you get them. That is, they haven’t been worn to any significant level.
As with all parts of the body, each persons feet are unique. You need to get these fresh new boots molded and adapted to your feet by normal wear and use. That is essentially what ‘breaking your hiking boots in’ means. You’re adapting them to your unique foot shape.
Why you need to do this is that most hiking boots, especially good quality leather ones, won’t fit your feet perfectly from day one for the reasons listed in the last paragraph. So, if you put them on and head straight out on a 20 mile hike, you will most likely experience aggravation and upset on your feet.
This usually manifests as hot spots, blisters, small cuts, and that type of thing. To avoid that, you build up your use of them slowly, allowing your feet to adapt to the boots over a period of time. That is why breaking hiking boots in is so important. Trust me, you won’t too far with a blister being aggravated by your new hiking boots.
What I do
When it comes to breaking hiking boots in, there are several things I do to help the process go as smoothly as possible which I list out in the coming paragraphs. However, before getting into the detail, I think some general points are worth reviewing.
First off, it is worth noting at the start that some hiking boots need more breaking in than others. For example, leather hiking boots will nearly always take longer to break in than hiking boots made from Gore-tex.
In fact, from my experience, Gore-tex boots have never needed more than a minimal break in process, but that may not always be the case I hasten to add.
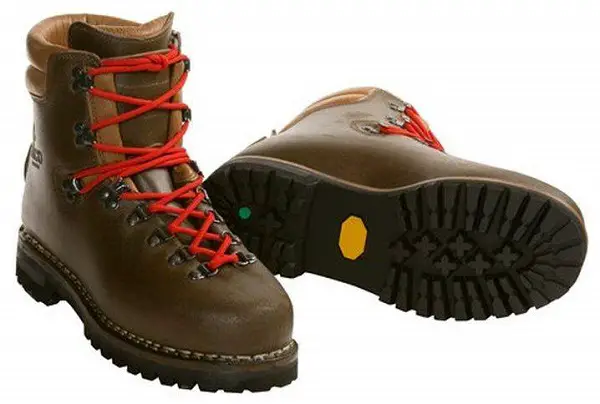
Similarly, a heavy leather backpacking boot, like Alico New Guide, pictured below, will normally take longer to break in than a mid sized leather day hiking boot, like the Alico Tahoe hiking boots.
Of course, as with everything on this beautiful planet, there are always exceptions to the rule 🙂 I have purchased heavy leather hiking boots before that I expected to take a few weeks or even months to really break in, but they were comfortable from the get go.
Although they probably didn’t need it, I still followed the same break-in steps listed below. However, I had every faith that I could have went on hikes of 20 plus miles in them after only a few times wearing them.
It’s Good to Have Confidence in Your Boots
It is nice when you feel that confident about a pair hiking boots from the start and it does happen but in the majority of cases, a reasonable breaking in period is required and advised.
So, with all the preamble above said, the tips I list below are valid for boots made from either leather, synthetic materials or a mixture of both. In fact, this general process really can be adapted and applied to most types of boot or shoe.
Wear Them at Home
When you buy a new pair of hiking boots, you normally have at least a 30 day period in which you can return them to the store as long as you don’t wear them outside.
Assuming you’ve spent time getting a good pair of boots and getting a good fit, you are now in the latter stages of confirming the suitability of your boots for the longer term.
What I mean by that is, there is only so much you can do within the buying and fitting process to ensure you get a good pair of hiking boots. The proof is always in the eating so to speak and your only real guide is wearing them over a period of time.
In truth, that also means wearing them out on actual hikes where they are tested on various different types of terrain and so on. However, as already mentioned, as soon as you do that, you’re stuck with them whether your feet adapt to them or not.
So, the next best thing is to wear the boots in your house as often as possible. So, when you come home from work of an evening after having just bought your new hiking boots, get them on.
If you don’t normally wear shoes inside your home, this isn’t a problem as these boots have never been worn outside so they will be factory fresh! Be sure to wear your hiking socks with the boots as well so it will be exactly as you would have them while wearing them out on the trail.
Although this sounds simple, it is really important. You will only get a feel for the little rubs and nuance of the boots after wearing them for a longer period of time as you would out in the field.
Put Them Through Their Paces
Push them a bit too, for example walk up and down your stairs a few times in them to try and get a feel for a bit of up and downhill. Of course this doesn’t and can’t ever replicate the trail or the mountains but it is the best you can do before committing to them i.e. taking them outside.
All this talk of commitment and all this effort may sound daft to some but if you’re spending $200 to $400 on a pair of hiking boots, you want to be sure you’ve got the right ones. I don’t know about you but I don’t take that kind of investment lightly so it’s worth spending a bit of time on this!
Wear the Boots out on Short Walks
OK, so you’ve made the decision that the boots are for you. It’s time now to move to the next stage of the breaking in process. As soon as you do this next stage, all thoughts of backing out, refunds, etc. are gone out the window, as at this point you need to take them outside!
I recommend you start wearing them out on shorter walks, say 2 to 4 miles at first. If you take your dog for a short walk in the local park at night, that’s a good example of where to take them out for an initial test run.
However, play it by ear when you start. If your feet are starting to feel a little tired or sore after one mile, then stopping and heading for home calling it a day at a two mile round trip is wise.
Then, all you do is just build the distances up over time up. Move to 4 miles, then maybe 6 and so on. At this stage, you”re walking on normal roads and flat enough terrain so you’re not pushing things too hard. So now you can …
Wear Them on Short Hikes
When you’re happy your boots are comfortable for 4 to 6 miles walking in your local neighborhood, it’s time to take them to the mountains and onto the trails. This is wear they will get the tougher tests but as they’re probably more or less broken in at this stage, you should be good to go.
The extra breaking in comes in the form of the more challenging terrain you hike over which you won’t get in a local park e.g. rocks, marsh, etc. This all puts different stresses on your feet than a flat local road or path in a park would.

As indicated above, I recommend that even if your feet are feeling great in your boots out on the trail after a shorter hike than you’re normally used to, still call it a day at a shorter distance.
I must confess that I have not always done this but I do believe it is the best way to go. Give your feet all the time you can to let them adjust to the new boots.
Ideally you still have your old hiking boots while you’re going through all of this breaking in process so if you need to go on a longer hike for a day, you can revert to the older boots while you’re breaking the new ones in.
All of this attention and effort is just to give your feet the time to really adapt well and the hiking boots to mold to your feet that bit more. As alluded to above as well, if you get a blister or another problem on your feet, you won’t get too much further so it is wise to take all the time you can to break your hiking boots in.
How to Stretch Hiking Boots – Additional Options
Sometimes you may find that the above works just fine, especially if you take plenty of time to stretch your new hiking boots little by little. However, sometimes you might need to resort to other methods, or you may want to try to speed up the stretching process.
If you need to break in your hiking boots quickly, then trying out these hiking boot stretching solutions could make getting your new boots trail-ready and more comfortable with less chance of blisters.
Localized Stretching
Sometimes with new, stiff boots you may find it is much easier to stretch them by hand to reduce the rigidity. Bend your boots by hand to encourage the creases that should form with wearing them where your toes meet the ball of your foot.
This will improve flexibility and also help to make the soles bend a little, as well as giving your feet more room to move.
Use a Boot Stretcher
If you need more space around your foot you may wish to use a boot stretcher for some extra slack. However, if you are really lacking on space, verify that your boots are the correct size for your feet.
You don’t want boots that are too small as not only do feet swell with exercise and heat, you’ll also need space in your toe box to prevent your toes from becoming squashed on steep descents.
If you’re not sure what a boot stretcher is, ask the all knowing Google 🙂
Heat
Heat is great for stretching boots, but be careful to use it in moderation as not to damage or weaken your new hiking boots. You could use a hairdryer on a low setting to help to stretch your boots.
Put on your hiking boots with hiking socks and gently blow them with a hairdryer, flexing your feet as they heat up. Start on low and if you are not seeing any results gently increase the heat or blow closer to the boot.
You could also put your hiking boots in a warm, but not too hot, place for an hour or so before walking around the house in them. This will also improve stretch and flexibility.
Again be rally careful if you resort to using heat, as it can easily go wrong and cause damage! It is another option that may help though.
Alcohol
Some people swear by dabbing a little alcohol on tight spots on their new hiking boots. Once dampened lightly in tight areas, walk around and flex your feet for added stretch where you need it.
While using rubbing alcohol on boots will help to stretch them, you’ll probably need to test how this affects their waterproofing and maybe re-treat them before wearing them out to make sure that they are fully waterproof.
I’ve never tried this so can’t vouch for this, so do some research first and be sure to do it in moderation and see how it impacts the boots.
Extra Socks
If you have sensitive feet or feel like your boots really need all-over stretching you could try wearing an extra pair of socks inside your boots around the house.
While it’s not going to be comfortable, at least at home you can take them off as needed. Wear a soft, silky inner sock if possible to prevent chafing and then a pair of thick hiking socks or a standard pair of socks followed by a thick pair.
Walking about will probably be unpleasant, but you could flex your feet while sitting down and watching TV or reading. Try this after heating up your boots if they are resisting all your stretching efforts so far.
Other Suggestions
Still struggling? Want to see how it’s done? Check out this helpful video on YouTube to get some good tips and tricks on how to get your new hiking boots stretched and ready for use out on the trail.
Conclusion
I hope you found this post on how to break hiking boots in useful. It’s not a complicated process by any stretch of the imagination but it is worth paying attention too and doing right.
As mentioned at the start of this article, from my experience, leather hiking and backpacking boots, usually take longer to break in than boots made from synthetic materials but that is not always the case.
Overall, it is sensible to break any pair of hiking boots in and build up to full regular use over a period of time. Even if they feel great from the start, it will do your feet no harm to take a bit of time in the adjustment process.
As a hiker, as far as your feet go, your primary objective is comfort and avoidance of any sores, mainly the dreaded blister. Taking simple steps like these can go a long way to keeping you in good shape on the trail so it’s worth taking the time to do it.
Finally, remember, if you’re in the market for a new pair of hiking boots, you can find our top hiking boot recommendations for men here and our top hiking boots recommendations for women here.
Happy hiking!
