In this post I want to look at some of the key differences between an internal frame backpack and an external frame backpack and review what type of hiking or trekking trip each of them is best suited for.
I mentioned in a recent post that this year, in June, I will be taking on my biggest hiking challenge to date which is to climb Mont Blanc in the Alps. This is a big undertaking by anyone’s standards and preparation for it is key. Right on the top of the preparation list is of course equipment.
Equipment for the trip can be split into two broad areas. The first area is gear I already have and use regularly. The second area, as this is not your average hike, is some very specialized gear that’s required for an undertaking of this kind. For example, a good rain jacket would fall into the first area while very specific hiking boots that can be fitted with crampons which enable you to comfortably walk on ice would fit into the second.
A further way to distinguish this is that for gear in the first area, I either already have it or will purchase it as I will use it in the future for other hiking treks and trips. While gear in category two, is gear I will have to hire when I get there as it will be very specific to this particular challenge and I will have no immediate future use for. The aforementioned boots and crampons being a good example.
While looking through the equipment list for the trip, which is extensive by the way, I came across the requirement for a 40 to 60 liter backpack. This makes sense as we will be staying in huts along the way as we trek up to Mont Blanc so we will need to carry about 2-3 days of gear with us. I currently only really have day packs which of course aren’t suitable for this adventure and so the search for a suitable backpack began!
Almost as soon as I started to look one of the immediate distinctions I came across was that you can have backpacks or rucksacks which have either an internal or external frame. Although I had an idea, I wasn’t 100% sure what this distinction meant so after investigation, I thought it would be useful to add what I’ve found to a post that people can reference if they come across the same problem of deciding which one is best for them.
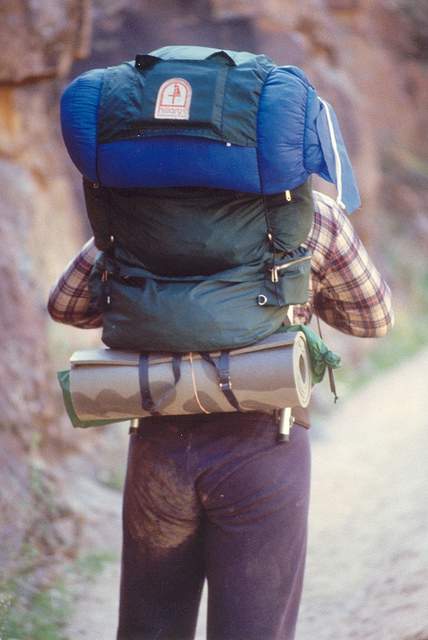
External Frame Backpack
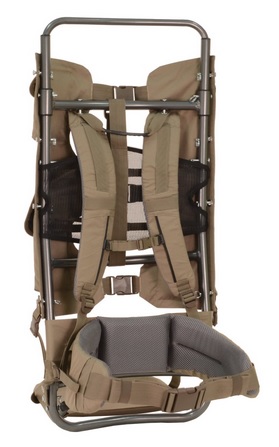
An External Frame backpack, for all intents and purposes, seems to be the less popular of the two and, from my research, the less commonly used these days. However, they can still be purchased and are still very, very popular with many hikers. With an external frame, the rucksack itself hangs from the frame which is exposed on the outside. See the picture of the inside of an external frame back pack below as an example.
Advantages of an External Frame
Below are listed some of the main advantages of using an external frame backpack:
- Generally speaking, from what I could see, external frame packs are cheaper
- They can carry more gear by providing more opportunity and capability to hang things outside of your pack on your back along the frame e.g. sleeping bag, a cooking pot, etc.
- Allow much better ventilation to your back while hiking
- External frame Packs usually have multiple large storage areas as well as side pockets
OK, so having had a quick look at an External Frame Backpack, now let’s move on to the Internal Frame Backpack.
Internal Frame Backpack
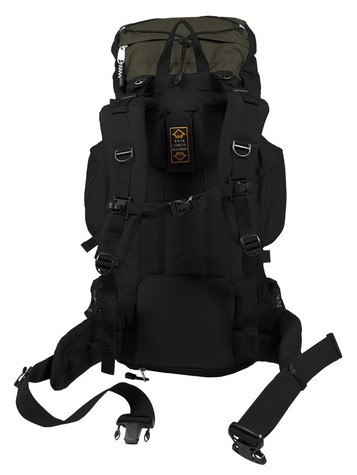
An internal frame seems to be the road that most backpack manufacturers have went down over the last decade. That is, more focus seems to have been invested in developing the design and capabilities of the internal frame as opposed to the external frame.
With an internal frame the pack is compacted in, more or less, one main closed unit. See the picture below of the inside of an internal frame back pack as an example. As you can see, there is no visible frame on the outside.
Advantages of an Internal Frame
Below are listed some of the main advantages of using an internal frame backpack:
- Internal frame packs tend to have larger interior volume but in one single compartment
- Allow more freedom of movement while hiking as the pack is more compact and secure to your body
- Can be better and possibly safer to use in a wider range of environments e.g. areas prone to thunderstorms – not likely a good idea to have the metal poles of an external frame exposed in those conditions
- More and more, internal frame packs are being built with better ventilation to your back but they’re probably not as good as the external frame in that department
Which is Better?
There are many arguments that I came across as to which one is better. First and foremost, it is of course down to personal preference but from most of my research, internal frame backpacks seemed to be the more popular and the better choice.
From my reading of it, an external frame backpack is good if you’re trekking for long periods but out on open trails where you will not have to do any awkward maneuvers or walk through difficult bush and trees. They seem to be able to carry that bit more gear and so are better at carrying tents, sleeping bag, etc.
Another advantage of the external frame in this area is that not much consideration has to be given to how you pack your pack, so to speak, in that it is far enough away and sitting higher on your body to not be an issue if you have an awkward cooking pot sticking out.
The internal frame can of course be used for the same long trekking purpose too but you will of course need to pay that bit more attention to how you pack your pack as all your gear will be packed away with bits on top of each other. Therefore it will be harder to access something at the bottom of your pack. In saying that though, many modern internal frame backpacks come equipped with easy access pockets so you can access the contents from the front of the backpack.
From my reading of it, an Internal frame also seems to be that bit more versatile as it can be used in a wider range of environments. For example, as mentioned above, you don’t want to be hiking in a thunderstorm in the Rockies with a metal pole from an external frame back pack attached to your body pointing up to the sky above your head. Definitely doesn’t seem like a good idea if lightening bolts start shooting around!
Also, if you were to undertake a trip like what I will be doing in June, an external frame pack would seem to me to be too bulky and cumbersome. The internal frame holds the weight in a more compact manner and holds it closer to your center of gravity and so would therefore seem to be better for walking across steep open mountains off trail.
A narrower profile to the internal frame also helps to give it a snugger fit on your back. This in turn enables more maneuverability which is necessary for those tight spots or if you have to do a bit of scrambling.
Conclusion
I have decided that I will be purchasing a 50 to 60 liter internal frame back pack for my trip to Mont Blanc. I haven’t decided which exact make and model I will go for just yet but I will be sure to do plenty more research to ensure I get a good one and will also be sure to post my findings up in a detailed review.
An internal frame backpack definitely seems to be the more appropriate of the two options for that kind of trek as I will be off trail, hiking over tricky terrain, hiking across ice and will likely have to do a bit of scrambling. Therefore balance will be key and so a low center of gravity with a snugger fit and narrower profile on my back seems the way to go!
I don’t however write off the external frame. It definitely has it’s place and I think I will continue to do more research into them. I’m sure the time will come for me when going with an external frame is the better option for a particular type of hiking trip.
Do you use an internal or external frame backpack? Which one do you prefer? I’d love to hear about it in the comments below!


 counted paces, it takes you to walk from point A to point B across an exact distance of one hundred meters. (you can in theory use any distance measurement, the principles are the same, but for ease of use I am sticking with one hundred meters).