coolhikinggear.com

  • Men’s
    • Best Hiking Rain Jackets for Men In 2024
    • Best Men’s Hardshell Jackets Of 2023
    • Best Hiking Pants For Men In 2023
    • Best Ultralight Rain Pants For Men
    • Best Men’s Daypacks For Hiking In 2023
    • Best Backpacking Backpacks For Men In 2023
    • Best Base Layers For Men In 2023
  • Women’s
    • The Best Hiking Rain Jackets For Women In 2023
    • Best Women’s Hardshell Jackets Of 2023
    • Best Hiking Pants For Women In 2023
    • Best Ultralight Rain Pants For Women
    • Best Daypacks For Women
    • Best Backpacking Backpacks For Women In 2023
    • Best Base Layers For Women In 2023
  • Hiking Accessories
    • Best Hiking Poles
    • Best Trekking Pole Monopod Camera Mount
    • Best Hiking Headlamps
    • The Best Hiking Watches In 2023
    • The Best Hiking Gloves In 2023
    • Best Hydration Bladders For Hiking In 2023
    • Best Compass For Hiking Our Top Picks
    • Cool Hiking Gadgets
  • Footwear
    • The Best Men’s Hiking Boots In 2024!
    • Best Hiking Shoes For Men In 2023
    • The Best Women’s Hiking Boots In 2023!
    • Best Hiking Shoes For Women In 2023
    • Best Hiking Sandals
    • Best Hiking Sandals For Women in 2023
  • Hiking Guides and Resources

What Are Contour Lines On A Topographic Map?

Continuing on in the navigation series I’ve been writing about recently, today I wanted to look at Contour Lines.

We started with Map Reading Basics and then moved to Setting a Map so I thought moving into some of the main map features would be a logical place to move to next.

What are Contour Lines?

Contour lines are wavy circular lines employed on a two dimensional topographic map that depict elevation on the ground. The distance between each contour line is set to represent a certain level of elevation with zero being sea level. Most maps I use, the distance between the contour lines represents 10 meters.

Contour Line

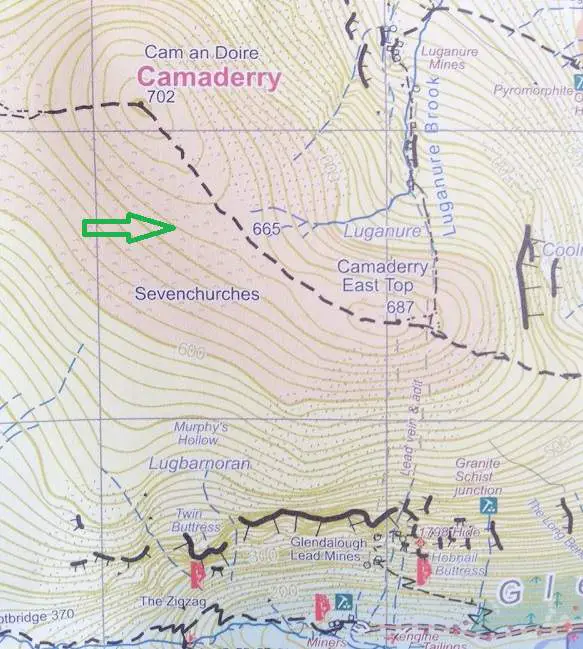
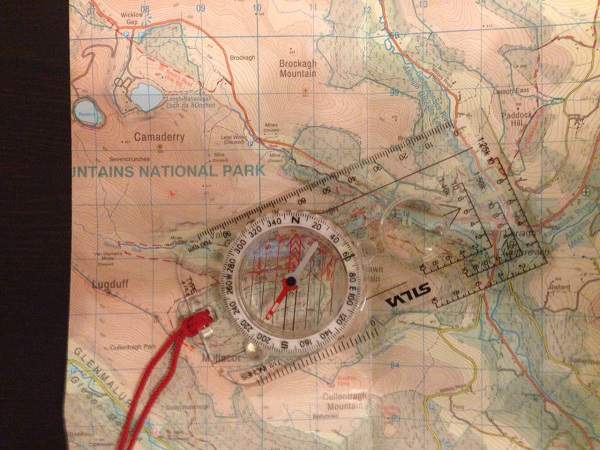
So, if we look at the picture above, you can see a contour line highlighted by the green arrow. You can also see the wavy circular type lines get smaller and smaller as they reach the top of the mountain where it says ‘Camaderry 702’.

Remember, a topographic map depicts a three dimensional space in a two dimensional format. So if you imagine the top of the mountain being squished downwards from the top into the ground, that’s what you have above. The contour lines depict the height of said mountain in the two dimensional space.

Using Contour Lines in the Mountains

So, now we have an idea of what contour lines on a map are. So what can you use them for when hiking? Well, in short, they help you plan your hiking route safely and to take alternative action on a route should you need to.

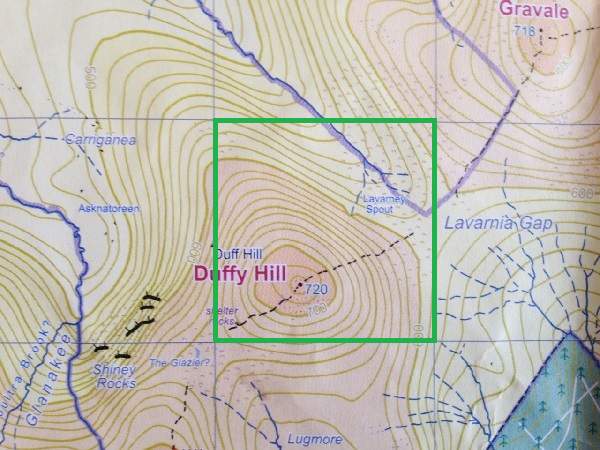
What do I mean by this? Well, say I’m sitting the night before planning my hiking route for the following day. I can use my map to measure distance and height to a particular point. Distance being the length of space across one square in the example below and height being the amount of contour lines in the same space.

In the example below, we can see there are 13 contour lines from the bottom right corner, lets call it point A, of the square highlighted in green to the ‘720’ peak of the mountain, let’s call it point B. As we know the distance between each contour line is 10 meters, we know that from point A to Point B there is an elevation of 130 meters, 13 * 10 meters.

As well as that, this map uses a 1:25k scale. So, one square, 4 cm’s in length on the map, depicts 1 kilometer (4*25,000cm’s) on the ground.

So, if I also measure the distance on the map across from point A to Point B, I get approximately 2.5 cm’s. So, if 4 cm’s represents 1 km, that means the distance on the ground is about 625 meters.

Next Step

So now I know from point A to point B there is an elevation of 130 meters and a flat distance of 625 meters. Therefore, I can now tell that to get from point A to Point B I need to travel 755 meters in total.

Col Picture

So now that I can measure distances and height, using route planning methods I can also start to make an estimation of how long it will take me to travel that distance. If I use 5 kilometers per hour as a walking speed, I know it will take me 12 minutes to walk across 1 box, 1 km, on the flat. Next up we need to account for the height element.

A generally accepted rule, although it is open to adaptation based on various factors like group size, speed, etc, is Naismith’s Rule. Part of this rule states that you allow one minute for every 10 meters of elevation.

Using the example above, with 13 contour lines, I allow 1 minute per contour line giving 13 minutes. I add that to about 6.5 minutes, for my 625 meters for walking the distance from point A to point B at 5 km per hour. That gives me 19.5 minutes in total. I can now estimate that it will take me 19.5 minutes to walk from point A to point B.

So, in practical terms I can apply this to my whole hiking route in advance and I can work out a good route for however long I want to be out hiking for.

Other Important Uses Of Contour Lines

As already reviewed, contour lines depict the elevation of the ground on a map. Given that the distance between each contour line is 10 meters, what do the contour lines in the green box below depict?

Col Picture1

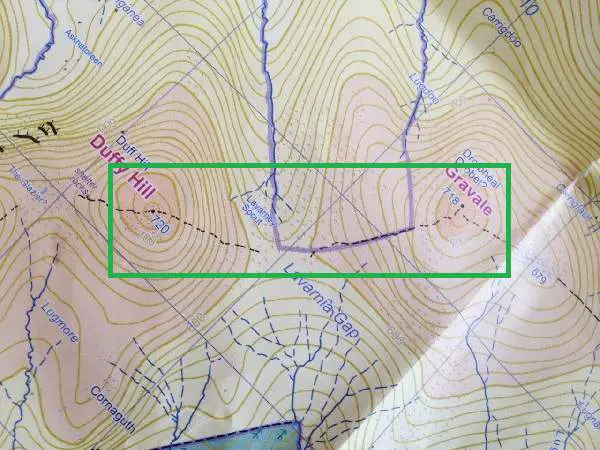
Well, if I start at ‘720 Duffy Hill’ and follow the black dashed line to the right, I can see the circles going down in a nice and similar fashion. In the middle of the box, I can see there is a spot with no contour lines. Then if I keep going right and follow the next black dashed line up to Gravale, I can see a similar set of contour lines rising upwards to the dot at ‘718’ at the top.

So, on the ground I can expect a nice gradual slope downwards from Duffy Hill in to a flat bit in the middle and then the land starts to rise upwards again to the top of Gravale. What does that indicate? This is known as a Col or Saddle and is one of the main recurring features of mountains on maps but we’ll look at that in more detail in another post.

For the purposes of this post, from looking at how the contour lines on the map lie, I can tell that this is probably a very walkable part of the mountain. The wider the space between the contour lines indicates that 10 meters is rising over a wider distance. That show’s that it’s not too steep or dangerous, gently going down into a flat piece of ground and then gently rising up. so definitely a good way to consider for my hiking route.

Another Scenario

Keeping the above in mind, let’s look at another scenario. Looking at the picture below, what do you think the contour lines are telling you?

Steep Drop

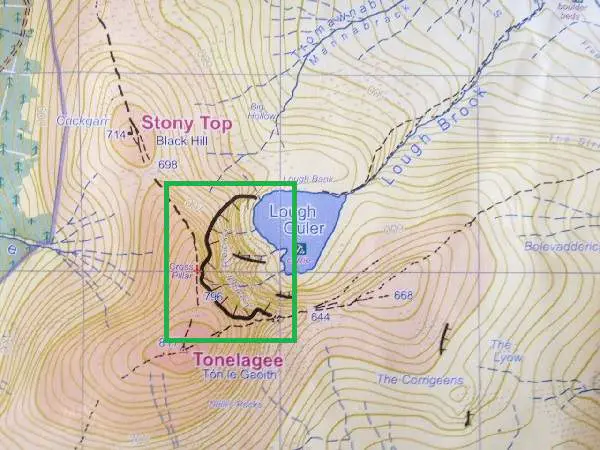
As you can see, this is opposite to the previous picture above. The contour lines are tightly bunched together. We know that the space between each contour line represents 10 meters. Therefore, in this scenario we can see that as the lines are so close together, this area must be very steep.

So, we can say that this is not a good place to walk to as part of your hiking route as it is quite possibly not passable and probably more hazardous.

Summary

So, there you have it. Today we took another sojourn into the wonderful world of map reading and navigation and hopefully you found this introduction to contour lines on topographic maps useful. As you can see, there is a lot to think about and hopefully you get an idea of how maps are so vital to ensure you have a safe and enjoyable hike.

They are vital for planning your route, especially if you plan to hike into open mountain. They’re also a must if you plan to hike into mountains you’ve never hiked in before.

As well as being a critical thing to help you plan your route, they also enable you to adjust your route as you hike should the need arise. Perhaps, the weather turns nasty and you need to change your plans and leave your planned route and get down as quickly as possible. This is again where your map and compass is critical, as without it, you won’t know where to go.

As I have mentioned before on the site, while resources like this post and videos etc. are great to get you started on working with maps for your hiking, it’s important you start your real life practice in very safe areas. That is, start by trying to follow maps on very well marked trails where you can easily find your way back to base should you need to.

If you’re in a hiking club or group, you can probably learn a lot from the more experienced folks in the group who will, from my experience, be only too happy to share their map reading, navigation, knowledge with you.

Conclusion

All the above should get you comfortable with the basics of map reading and navigation over time. However, I highly recommend that if you want to extend your hiking adventures into open mountain, unknown areas, lead groups, etc., that you take the time to take a navigation course with an experienced mountain guide.

Most States and Countries will have some kind of official body that offers an official course so I recommend looking for those if you can get them.

So, that’s it for today. Did you find this useful as an introduction to contour lines on maps? Have I missed anything important? I’d love to hear your thoughts in the comments below.

Do You Need To Buy Expensive Gear To Start Hiking?

Today I wanted to do a short post on a topic that is very close to my heart, hiking gear 🙂 Specifically, do you need to spend a lot of money and buy expensive gear to be able to start hiking. This question was put to me recently by a person, who is relatively new to hiking, in a hiking group I regularly hike with. It is an interesting one to consider.

Money

At the time I said that, from my personal hiking experience, first and foremost, expensive hiking gear doesn’t necessarily mean good hiking gear. It can depend on what your goal is too of course. Some folks just want to be seen strutting about in the latest cool and expensive looking piece of kit. While that isn’t my thing, I guess there’s nothing wrong with it if that floats your boat.

However, I am talking here about functionality first and foremost. Branded gear is fine, but for me it needs to do what it promises to do from the get go!

It can be a bit surprising, when you start to get into it, how much gear you actually need as a regular hiker. If you’re new to hiking and not sure what you may need, check out this day hiking checklist for the whole gambit of day hiking kit. You of course may not need it all getting started but if you become a regular hiker, you will likely need all of it at some point.

Brand Name Hiking Gear

By brand name hiking gear, I mean gear from outdoor gear makers, stuff specifically designed and marketed as equipment and clothes for the great outdoors and hiking in particular. For example, the Salomon Quest 4D 2 GTX Hiking Boots shown below is a good example of a piece of brand name kit specifically designed and made for hikers and backpackers.

Salomon Quest 4D 2 GTX Backpacking Boots For Women

I have had plenty of expensive brand name hiking gear that has really been excellent and I have got excellent value and use out of. Overall, as a general statement, my experience with brand name hiking gear has been very good.

At the same time, it is worth pointing out that I’ve also had my share of experience of big brand stuff coming apart on me after little to no use, or just not performing as it is supposed to. I think every hiker has experienced that to some degree at some point. On the plus side, good brands usually give you a reasonable chance of getting your money back, or at least a replacement, if the gear falls apart. And finally …

Non Brand Name Gear

I have of course bought the odd non brand piece of kit every now and then. While it’s cheaper, I can’t honestly say I’ve had a great experience with non brand name gear. It usually isn’t of a great standard but again, there have been exceptions for sure. I once bought a pair of light hiking boots for summer in a non brand supermarket chain. I only wanted them as a spare pair for a trip I was going on so I wouldn’t use them regularly, kind of a back-up plan if I recall correctly.

As it turned out, I wore them for a hike one of the days and I actually found them really comfortable. I wore them repeatedly throughout the summer that year. While they were very comfortable, they did eventually break open at the seams after about 4 months regular use. Not great in terms of longevity, but for 20 bucks, it wasn’t the end of the world and they did a decent job for a fair few hikes over a four month period.

What I do

OK, from reading so far it seems that I am almost saying it can just be pot luck 🙂 That isn’t what I think though so I will tell you how I do things.

I always use well known brand gear for all my hiking gear. There is the odd exception, for example, a water bottle is sometimes just a water bottle be it €5.00 or €20.00. If the job is done, on something like that, I am happy to run with the cheap version. If however, that was a compass, there was no way I would risk relying on a cheap non brand model as it’s a crucial part of my safety. It would have to be the reputable brand name one. You get the idea.

When it comes to clothes, while I have the odd non brand piece of kit, nearly everything I use is from a well known brand name. One of the main reasons for this is that as these items are more expensive and made by outdoor gear manufacturers, it is simply purpose built and so it has to, generally, be of a decent standard for the company to stay in business.

The next reason is that you can easily find lot’s of information on people’s experience with gear so with brand name stuff, it is quite easy to find reviews and see how other people got on with it. Any dud gear, in terms of performance, will usually be exposed pretty quickly.

Finally, there’s usually some element of guarantee or warranty in terms of performance.

Recommendation

Overall, I would say that what I do is simply the best approach 😉

I’m kidding … In all seriousness, I think if you’re just starting out hiking, it’s fine to go with cheaper gear and to improvise on stuff you already have. I did a series of posts for beginner hikers and gear which goes into this in more detail.

In summary of those posts though, I think you can even get away with non specific hiking gear, in certain cases and in certain conditions when you’re just getting started. When you’re new to hiking, you’re probably not, or at least you shouldn’t, be doing anything too crazy or challenging. So at worst, if you get a bit wet by the time you get back to your car, you’ll be alright.

Branded hiking gear isn’t cheap, but I do recommend it longer term. However, you don’t need to go out and buy a shed load of brand spanking new hiking gear from Arc’teryx and The North Face from day one! You can start out with a  mix of what you have available in your wardrobe and maybe one or two specific items, non branded.

For example, everyone usually has a small standard sports pack of some kind, like one of mine below, which will do fine as a short term daypack in decent conditions. You may also already have a rain jacket from playing golf. While not the best option, it will keep a shower off you for a few hikes no problem.

Standard Pack

As mentioned you may need to buy one or two things from the start. If you don’t have hiking boots, I do think it is better to buy a cheap non brand $20.00 pair to tie you over than to head out on the trail in sneakers.

Over time then, you can start to replace your bits and pieces with the best branded gear that, firstly, meets your functional needs and, secondly, that you’d like to have, wear and so on. There are also options like Gear Trade, where people buy and sell, and even trade I think, second hand branded gear at knock down prices. I’ve never bought anything like that myself but I have come across some good reports on peoples experiences.

Conclusion

In the final analysis, I would say that no, you do not need to buy expensive gear to start hiking. Starting out, you will probably need to buy one or two things, and mix it with stuff you already have, to get you going but you can easily get non branded gear pretty cheap to tie you over in the short term. This of course assumes you’re keeping your initial hikes practical and sensible of course 🙂

If you start to love hiking and want to get into it more and more, I recommend you start to add decent branded gear to your kit to replace your temporary stuff over time. Spend time reading sites like this one and reading user reviews to be sure you get a good piece of kit that you want. When you spend $250.00 on a pair of hiking boots, you want to be sure you got as good a pair as you could possibly find!

Finally, if you’re completely new to hiking, check out the hiking for beginners page. It has lot’s of great information to get you started on the trail if you’re new to hiking.

I hope you found this short post useful. Please like and share it round!

Hiking In Safety – Ten Top Tips!

When you go out hiking you’re going out into terrain in the wilderness. With that in mind, there are certain steps you can take to ensure you have as enjoyable an experience as possible.

Hiking In Safety

While whole books can be, and are, written about hiking in safety, I thought a quick summary post with ten of, what I think, are the main tips you can easily implement to help keep you safe on your adventures out on the trail would be useful.

Every point below is applicable and so I am loathe to put these in any particular order of importance. In short, you need to tend to all of them on any hike you are preparing to undertake.

#1 Wear the Right Gear

This first one is probably one of the ones that is most often neglected. In this day and age, good gear is easily available and while it can be very expensive, there are plenty of reasonable options at reasonable prices available too.

Every other week when I go out hiking, I’m half way up a mountain and I see someone in Nike Air sneakers and jeans. Not advisable in any way. Although trail shoes can be grand on occasion as a general rule I recommend you have proper hiking boots.

As well as that, some kind of breathable warm clothing is advised so base layers (where required) hiking pants, tee’s, etc. should allow you to sweat but let excessive heat out and away from your skin to prevent moisture build up.

You also need to have layers for warmth so a fleece is a good option.

Finally, you need waterproof outer rain gear, so a rain jacket and rain pants. By this I mean stuff you slip on over your pants and top to protect you from heavy rain.

#2 Carry Additional Layers

As with wearing the right hiking gear, you need to carry any extra that you need. So if it isn’t raining, you should have your waterproofs packed away in your pack. You should also have an extra layer or two for warmth and protection in case it is needed.

Hikers In Cold Weather

I didn’t mention this above, as you don’t really wear it, although you do kind of I guess, but you need to have a good day pack with you, to carry these additional layers and your other bits and pieces in while you’re out on the trail.

#3 Leave your Hiking Route with Someone

A simple yet excellent idea! Before you head out on your hike tell one or two people the following information:

  • Where you’re going
  • What time you are leaving
  • When you expect to be back

Ideally, leave them a print out map of the area where you plan to go hiking with the route marked out on it. That way, if you don’t show up as scheduled, they know where to look for you. Also, be sure to leave it with people who will notice you are gone.

Just knowing where to look is a critical piece of information for any search and rescue teams should you have gotten into difficulty.

#4 Take Adequate Food and Water with you

You need to bring supplies of food and water with you, and it’s always good to bring a little extra just in case something should go wrong. There are of course plenty of options depending on what you like to eat, drink, etc.

For some idea on what I like to do, check out the posts the 10 best day hike foods and how much water should I take on a hike, where I cover what I like to do for my hikes.

#5 Take a Mobile Phone

A mobile phone is a critical piece of safety gear. It’s worth noting that even out of coverage for your network, it should still connect to an emergency number via any available network, as long as it can find one, should you need to.

If you’re hiking in a new area or a country that’s new to you, it’s worth checking before you go out on a hike that you know how to contact help and familiarizing yourself with safety protocols if someone in your party should get hurt.

#6 Have a Map and Compass

At the very least you should have a map of your hike and have an idea how to follow it. Ideally you should be versed with using a compass to take bearings etc. but in reality, that won’t be the case for many.

Map and Compass

Take the time to look at your route on your map and pick out landmarks you expect to come across on your way and roughly how long you expect to get to them. That way, if you’re expecting to walk beside a large river in an hours time and you don’t see one, you know you’re off track.

Generally speaking though, if you’re new to hiking, stick to well marked trails which are clearly marked on your map that have easy escape routes back to safety.

#7 Hike with a Group

While I do love to hike solo, I do also enjoy hiking with a group too. The main advantage of hiking with a group in terms of safety? Well, if something happens to one of you, there are enough people to stay with the injured party while others go off to get help should they need to.

Be sure that everyone in the group is of similar fitness so they stay together. If some people are much fitter, a gap will form and people can lose each other, especially in foggy and misty conditions. Not good!

#8 Stay Within your Limits

There are a few points in this with regards to staying safe. Firstly, with regards to fitness, don’t take on something that’s too big a challenge for you. Only you will know your own fitness levels and if you get too far into something very demanding for you, you may not have the strength to walk back out.

As with anywhere, the trail can be a place where macho-ness can come to the fore, especially among men. In short, it’s just daft. If you’re not able for something, better to be honest about it than get yourself into a pickle and have to call for help. Not having the common sense to speak up and stand down from something too challenging for you, is very not macho 🙂 AKA stupid.

The other area of limits are the types of terrain and it’s state when you enter it. For example, if you’re not familiar with hiking in very snowy or boggy conditions, you would be wise to wait to go into that environment with someone who is. You will learn loads in a short space of time and probably save yourself a lot of hassle.

#9 Avoid Hazards

Hazards on the trail, fall into two main categories 1. natural and 2. man made. A natural hazard would be something like a steep cliff. A man made hazard would be an area used for forestry or by the military for shooting practice and man oeuvres.

Again, it’s back to your map and route planning. Most hazards should be highlighted on a good map and so you can plan your route accordingly.

However, many times you may come across a hazard as you hike which you weren’t expecting e.g. a swelled river after heavy rains. Where that occurs, you need to be wise and take appropriate evasive action to avoid the hazard.

#10 Have Emergency Kit with you

Ideally, someone in your party should have a first aid kit and someone else should have an emergency blanket and a bothy bag. Should someone take a nasty fall and get a bit of a gash on their leg, it is much better if you can treat it on the spot with a first aid kit which will have the basics in there i.e. some antiseptic wipes, plasters and tape.

Should someone have a more serious accident, it could be many hours before help can get to them so keeping them warm and protecting them from the elements will be paramount so an emergency blanket and bothy bag are a must to keep them protected until help arrives.

Conclusion

Safety on the hills and on the trail is a big thing for all hikers. If you follow these ten safety tips, you should be well on your way to fully enjoying your hike as much as possible, and also be prepared to act appropriately should a problem arise for you or any member of your hiking party.

I hope you found these hiking in safety tips useful for your adventures on the trail! As always, please leave any thoughts in the comments below.

How Much Water Should I Take on a Hike?

The other day I looked at some of the best foods you can take on a day hike. They’re my favorite ones but they are very common and most regular hikers would be familiar with them.

Loch In The Maamturks

Today I wanted to extend this on to another critical aspect of sustenance while you’re out on the trail, namely hydration.

When you are out on the trail you are of course expending effort while, depending on how long you like to hike for, putting in lots of miles. This of course while mean you sweat and so you need to drink water to replace what you lose as you move

A question that comes up for a lot of folks, especially if you’re new to hiking, is ‘how much water should I take on a hike?’ As well as that, I also often hear ‘What other drinks are good to take with me?

In this post I thought it might be useful to outline what I do and hopefully you can use that to help you gauge what you may need.

How Much Water I Take on a Day Hike

Water is the most important sustenance you have in your day pack, there’s no question about that. You can survive a long time without food. Without food, on a day hike you might at worst be grumpy and annoyed.

Not the same with water as it is of course critical and if you get dehydrated, performance and safety can take a hit quite quickly.

On one of my normal average day hikes, about 15 – 20 km (9 – 12 miles) over 4- 6 hours, I pack away 3 liters (105 fl oz) of water in my hydration bladder. I also, especially in Winter, take a half liter of hot tea in a thermos flask with me. It’s not water of course but it all counts.

As a general rule, I don’t take any other type of drink on hikes with me although I did take a can of coke when I went to the top of Mont Blanc. That was mainly as I needed a fast and easy way to get a quick sugar blast. I would never do this on a normal hike, it was very tasty though 🙂

Now, water is heavy (1 liter (35 fl oz) weighs about 1 kg or about 2.2 pounds) so there are other options you can do to compliment your supply rather than carrying it. If you know there are good water sources on your hiking route, plan your route accordingly to pass them.

Then, using a water purification method, you can fill up from streams and pools. For shorter day hikes, I just carry my water from the start but if I plan to be out for longer times, I will plan to use water I find on the way which I filter before drinking.

Sometimes, if you’re lucky water purification may not be necessary and you can drink straight from the source e.g. a fast flowing river high up in mountains, but be very careful if you do this, you can just get unlucky and drink something  bad. I have drank direct from streams many times but I try to avoid it when I can.

Now, good water sources are not always available on your route. If that’s the case you need to think about how you will accommodate your hydration needs on the way.

For example, you can’t drink snow but, if you pop some into a flask and put it in your pack close to your back, it should melt as you hike and so providing you with drinking water. Remember to still purify it though.

If you’re hiking in a desert, well, that’s a whole different kettle of fish and you’ll need to be very mindful of how you supply your water needs as any error in that type of environment could be swiftly punished by mother nature.

What about Longer Treks?

Similar to longer day hikes, on longer multi day treks I plan to utilize water sources on the route as I go. If I’m camping out, I will have my stove with me to cook so I will also boil water for hot drinks. For water, I filter it as normal or if there’s a good, clean and reliable source nearby, as mentioned above, I’ll drink it straight from the river.

Again though, be very careful if you choose to do this! I generally know the areas and the water pretty well when I drink directly from it and I know it is good. It doesn’t mean I couldn’t get unlucky though!

Conclusion

I am a very thirsty person and so I do drink more water than most. Carrying 3.5 liters (3 liters of water and 0.5 tea) on an average day hike, can seem like a lot and there is no doubt it adds weight. However, purely for convenience, and probably a healthy lump of laziness too 🙂 , I am happy to do it.

It’s important to remember that everyone is different. I hike with a few folks and they’re very light on the water consumption front. Where I drink 3 liters, 1.5 liters would do them.

Take some time to learn what your needs are on shorter hikes. After you get more experienced you’ll know how much water you’ll need based on your planned hike.

As I mentioned, for longer hikes, I’ll utilize a filter and top up from water sources as I go. Another really important aspect for me is how I carry water on my hikes.

For me there is no contest on this and I use a hydration bladder to drink as I move, by far the easiest way to travel in my opinion. In truth, sometimes I’ll still carry a bit more spare in water bottles though too lol 🙂

I hope you found this post useful. I think you need to work with a few different things to find what fit’s your style and needs best i.e. how much water you need for the type of hiking you do. When you know that, you can use a combination of the methods mentioned in this post to help you plan accordingly.

What are your thoughts on carrying water? Do you filter as you go? I’d love to hear your thoughts about it in the comments below.

The 10 Best Day Hike Foods!

For a day hike, you want food that is nutritious, tasty, can be carried cold, provides energy and isn’t too bulky. When I got out on a day hike I am normally out anywhere from 5 to 12 hours doing distances of about 9 miles (15 km) to 18 miles (30 km), so the amount of food I take can vary.

Food

On a longer day hike I will stock some extra food in my day pack than on a shorter one. I also take the type of hike into consideration too.

If I know I will be doing 15 miles up and down very steep and rocky terrain, I know I will need some extra fuel as I will be burning up much more energy than if I was on a nice gradual and soft rise or the flat. In summary, it varies.

The Good News

I think for a day hike, as you’re probably only out for a third of a day on average, you have the luxury of taking a bit more of what you fancy with regards to food.

That is, as you’re only out for the day, factors like weight and bulk, although still important, aren’t as big a factor as if you were out on a longer trek.

This is of course within reason. Carrying Chinese takeaway food from yesterday’s dinner, or chocolate eclairs from the bakery fresh that morning probably still isn’t a good idea 🙂

The 10 Best Day Hike Foods

OK, now to get to the core of what this post is about. I have listed below, in no particular order, what I think the 10 best day hike foods are and why. These are my top foods and I commonly see most of them quite regularly on the trail so I think it’s safe to say they’re a good bunch to go with.

Nuts

I’ve put nuts first. This quiet little category isn’t very bling at first glance but there is an impressive selection of nuts available which are great for the trail.

A mix of nuts is fine, whatever ones you enjoy the most. For me, I like almonds so they’re my main stay as far as nuts go.

Almonds

They’re light, easy to carry and provide a good punch on the energy and nutrition fronts. For a day hike I add a handful of almonds into my lunch box.

You can learn more about the nutritional value of Almonds here.

Fresh Fruit

This is another mainstay of mine. They’re a bit bulkier but again as you’re on a day hike, weight and freshness shouldn’t be issues here so it’s very feasible to carry fresh fruit in your day pack on a day hike.

For me, on an average day hike I take an apple and a banana. Handy to carry and easy to eat. They’re a winner for a day hike!

Fruit

What’s great about fruit is the variety plus there is high water content which all helps as you sweat and lose water on your hike. Everyone has their favorite and, again within reason, you can carry what you like to eat.

You can learn more about the nutritional value of different fruits here.

Dried Fruit / Trail Mix

This is another one I often turn to too for handy, lightweight and nutritious snacking. Dried Fruit is of course a much less bulkier version of the fresh variety and has a much longer shelf life.

Trail Mix

My preference is again banana and apple but whatever you prefer is fine. Trail mix is also a popular choice and I do use it from time to time. A mix of dried fruit and nuts, a handful here and there is a tasty little power pack while out on the trail!

You can learn more about the nutritional value of dried fruit here.

Chocolate

Ah, how can anyone not like chocolate. I think as humans we’re hardwired to enjoy it. Hiking out on the trail is one of the few places where I really feel you can snack on some chocolate and have a very clear conscience about it.

Chocolate is a great little energy booster. It works very fast and so if you’re approaching the end of your hike and you come up against a final steep peak but you’re not feeling 100% up to it, a bite or two of chocolate can do the trick to give you that little boost to push on.

Chocolate can also generate a nice bit of heat in the body too so can be good if you’re feeling cold.

Chocolate Bar

On top of that, there is a psychological thing with chocolate. Not 100% sure how it works but there is something comforting about eating chocolate. I guess it sparks off some happy receptors in the brain or something but in summary, it is psychologically pleasing as well as being functional.

Finally, chocolate is easy to carry and pack away. A standard bar isn’t heavy or bulky either. I always stash a bar or two away for emergencies. I take 70% cocoa dark chocolate on my hikes most of the time but milk chocolate is fine too.

You can learn more about the nutritional value of chocolate here.

Boiled / Jelly Sweets

Again, in a similar ball park to chocolate, these are really just for little blasts of sugar. They’re functional and they score highly on the psychological side too.

Sweets

Not heavy or bulky, they’re also nice to be able to share around with your fellow hikers. Again, a little blast of sugar now and then can be just what you need on a longer day hike.

You can learn more about the nutritional value of boiled sweets here.

Granola / Cereal Bars

These are another regular in my pack. They will vary in nutrition value and you should watch for sugar content. With these I prefer to aim for more cereal as opposed to sugar.

Granola

There are lots of organic varieties of these which are usually made with more of a focus on nutrition. Don’t get me wrong, a bit of sugar in them is fine and can serve a similar purpose as chocolate in that regard.

However, I find that some of these things are just bars of refined sugar when you look at them in detail so it’s worth taking a good luck at the ingredients. Again, packable, lightweight and not bulky so all good on that front.

You can learn more about the nutritional value of granola here.

Seeds

Similar to nuts, you can just take a handful when you fancy and eat them. Again, very nutritious and tasty. Many varieties pack a really good energy punch too.

Seeds

I mention this in the sandwich section below as that’s how I normally factor these in i.e. by adding them to a sandwich but they’re perfectly good to have in a separate container.

You can learn more about the nutritional value of lots of seeds here.

Cheese

I love my cheese and I think it’s a great addition to your food for a day hike. Normally, this goes in with my sandwich but it’s perfectly good to go into your lunch box on its own.

Cheese

I should add that a doctor hiking friend of mine told me that cheese isn’t ideal for hiking but hey, I like it too much to not allow a bit in there 😉

You can learn more about the nutritional value of some well known and loved cheese here.

Cold Meats

If you’re not a vegetarian, there’s a wide variety to select from here. Ham, bacon, chicken, turkey, beef, etc. This will normally accompany me in the form of a sandwich on a day hike. Whatever you prefer really.

Salami

Salami is another good one that can also be very good on its own. Lots of fat in it to provide energy and nutrition. A chunk of salami and a chunk of cheese of your choice is a nice combination.

You can learn more about the nutritional value of some typical cold meat cuts here.

Hard Boiled Eggs

I’ve done this a few times and enjoyed it immensely. A couple of hard boiled eggs thrown into my lunch box. When ready, just peel the shell off and enjoy!

Boiled Egg

Egg’s pack a lot of protein so good for long term energy and should keep you fuller for longer. They can also be added into a sandwich or mixed with vegetables, nuts, cheese and seeds to make a nice veggie salad if meat isn’t your thing.

You can learn more about the nutritional value of boiled eggs here.

Sandwich / Main Meal

I’m finishing with this as it isn’t really a ‘food’ per se but a combination of many of the above and it is something I do on all my day hikes.

I usually have a main meal as I will start out in the morning on my day hike and have a good 15 / 20 minute break for lunch at some point. I think you can be as inventive as you want here. I sometimes take rice with chicken and vegetables and I’ve seen many variations of pasta salads while out on my hikes.

Generally though, I opt for the easy option of a sandwich. You’re as free as you please to add whatever contents you enjoy really.

Lunchbox

For me, I normally use whole meal bread. I will spread it with Mayonnaise and then I will sprinkle some seeds onto it (sunflower, pumpkin, chia, etc.) These add a nice bit of extra nutrition and flavor to a sandwich I find.

Next up I’ll add up a couple of slices of cold meat. Can be anything from ham to salami, or chicken to turkey. I’ll compliment the meat with a little bit of coleslaw or salad, usually lettuce and red onion.

Finally, I layer on a bit of cheese on top (I use Cheddar, Edam, Camembert or Gouda but whatever you prefer) and that’s me pretty much good to go!

Now, I don’t mean to give a lesson on sandwich making 🙂 what I want to illustrate is that you can put a bit of variety in there.

Conclusion

So, that’s it, my 10 best day hike foods. I use all of these in some form on every day hike I go on. As you can see there is a lot of variety and option to choose from and you can be as inventive as you like as you long as you keep it sensible i.e. nutritious and practical.

On a day hike, you have the benefit of not having to worry about food going bad or attracting animals so you have a lot of freedom to take fresh food that you enjoy. If you’re going on a longer trek, it is a different story and factors like weight, ease of preparation take a front row seat but we’ll look at that in another post.

For now, enjoy your day hikes and eat well on them 😉

Have you any special day hike foods that you like to take with you on a day hike that I haven’t listed here? I’d love to hear about them in the comments below.


How To Use Iodine To Purify Water

Last week I took a look at how to make river water safe to drink. One of the main methods mentioned in that post was to use iodine to purify water.

J.CROW'S® Lugol's Solution of Iodine 2% 2oz

Today I thought I would take a closer look at the actual steps you would take to use this method when out on the trail. This is fresh in my mind as last weekend I did a challenge hike and there were fell runners at it.

One guy was talking about how he carries minimal water with him but instead takes enough to get him to pools of water that are dotted across the mountains.

When he gets there he fills up a certain amount and that does him till the next one. He doesn’t treat the water in any way which is fair enough, just drinks it straight from the pools. I don’t recommend doing this but it should be safe enough to drink it that particular location.

I don’t know if he experienced any problems but either way, a little bit of iodine would ensure he would have none.

What you will need

A Water Bottle – this can be a standard plastic bottle from the store or any container you use for carrying water.

Iodine Tincture (Pictured above) – This is a small bottle of iodine that you can mix with your water. This is important, you want to be sure you get a solution that is suitable for purifying water. Ideally you need an eyedropper with it so you can easily put droplets into the water.

Step One – Find a Good Water Source

I mentioned above that the Guy was drinking water from pools on the mountains. That can be fine depending on the location but pools can also be ripe for stagnant water, something you should avoid.

River Water Bottle

If possible, fill your water bottle up with water from a fast flowing stream as pictured above. The clearer the water, the better.

Step Two – Remove any Gross Matter

This may or may not be required, depending on how clear your water is from dirt, stones etc.

A do it yourself way of filtering water is to run it through a tee shirt to ensure there is no lumps of dirt etc. in it. you may need another water container for this though, one to filter into. Remember, if there’s too much stuff in the water, it is probably not suitable.

Step Three – Add the Iodine Tincture into the Water

This should only require 5 or so drops for about 1 Liter (35 oz) of water. However, be sure to read the application instructions on your tincture bottle to get the exact quantity to volume ratio correct and apply accordingly.

This is why you need a dropper which, if it is appropriate for water purification, should come as standard with the tincture bottle.

Note: Mentioning this again … make sure you get iodine tincture that is suitable for water purification. There are other variations which are just not suitable for this purpose and could cause other issues.

Step Four – Leave to Work For a few Minutes

When you have your bottle of water mixed with iodine, put the top on, give it a shake and leave it for a few minutes. The iodine will start killing off any unwanted bacteria.

Step Five – Drink and Enjoy (Kinda)

The final step is to drink your water. My experience of water with iodine is a chlorine type taste which I wouldn’t class as enjoyable lol 🙂 However, it is fine and does the trick for the main purpose of ensuring you have water to drink with no nasty’s in it!

Conclusion

So that’s it for how to use iodine to purify water. As you can see, it’s pretty easy to do. It is also quite economical too as a bottle is pretty cheap. Another great advantage of this method of water purification is that technology is not required and it isn’t bulky or heavy.

Water purification tablets work in pretty much the same way, you just follow the instructions and add them to water to purify.

There is one final thing I want to add here for folks in the EU. To the best of my knowledge, this method has been banned in Europe so trying to get your hands on iodine tincture for water purification purposes within Europe could be tricky.

It seems the folks in Brussels are recommending to use chlorine tablets instead of Iodine for some, no doubt overly protective, reason.

I hope you found this post on how to use iodine to purify water useful. If you’re going out on the trail for a long trek, and you will have suitable water sources on the way (and you can get your hands on suitable iodine), it is a viable and easy way in which to purify your drinking water.


How To Prevent And Treat Windburn

I mentioned last week that last weekend I was going on my first challenge hike or challenge walk as they’re popularly known as. It was in the Maamturks in Connemara in the West of Ireland, see a shot from the day below, and I have to say it was the toughest hike I have ever done.

Maamturks Picture

Stunningly beautiful mountains but very rocky and steep. Loads of sharp up and down. I made it round successfully though so all in all it was a great experience.

The weather was all in all pretty good on the day. The sun was shining a lot of the time and the views were spectacular. However, it was cloudy at times and there was also a strong wind blowing throughout which, generally, I quite enjoyed as it kept me cool.

Anyway, as we were walking round a fellow hiking friend in our party happened to notice my neck was getting very red and told me to cover up as I was getting windburn.

That put the idea into my head to do a short post on windburn as it is something I have experienced many times, and most hikers will likely come across it at some point.

What is Windburn?

While this is not the main driver of this article, when looking into it, it was quite interesting, as it may not be as straightforward as it at first seems. So I thought some background on it, to provide context, could be useful.

Most people have experienced being out on a cold windy morning, doing some kind of activity, and felt their skin burning up, especially people who ski, hike, etc. However, most people have likely also stood out on a stormy day in the wind, and not had their skin ‘burn’.

The definition of windburn provided by the Oxford English Dictionary is:

Reddening and soreness of the skin caused by prolonged exposure to the wind.

It’s interesting, as in that definition while there is reference to soreness and redness, there is no reference to ‘burning’. That could be neither here nor there though, aka irrelevant.

However, according to Wikipedia, windburn is a misnomer and a popular misconception. In actual fact, windburn is sunburn caused by exposure to UV radiation from the sun.

They reference experiments done in 1936 by English skin specialist Howard White of Cambridge and an American Physicist called William Henry Crew. I found a fun video on what these gentlemen got up to with regards to investigating this way back in the day.

So, while it seems that you don’t get ‘burnt’ by the wind per se, the wind, of course though, does play a role in any resulting discomfort and inflammation, under certain windy conditions.

First off, the skin has things called lipids in it. Without getting too ‘sciency’ about it, lipids perform a barrier function for your skin, to protect it.

When skin is dried out or damaged, say by cold heavy wind, this layer of protection is weakened. While that in and of itself can lead to inflammation and soreness, things like UV can also get through to burn the skin much easier as the protective layer is weakened.

The wind also has a cooling effect on the skin and so, especially when hiking, can lead to an incorrect perception of the temperature to be cooler than it really is.

As your skin feels cool, you are less likely to notice that there might be a problem, and so you don’t take any action to protect yourself.

‘Windburn’, or sunburn, can also be acquired during cool and cloudy conditions. People don’t expect to get sunburn when it’s cloudy and windy, so it’s easy to see how it could be wrongly attributed to the wind rather than the sun.

UV levels can also increase by up to 10-12% with every 1000 meters increase in altitude, especially as you get higher up and the air gets even thinner. So there is more chance of you getting more exposed if you are hiking up to a high peak.

Anyway, as mentioned, I thought a brief summary of the background of what windburn is would be interesting.

However, whatever the exact scientific background is, windburn still hurts, and our primary aim in this article is to look at prevention and treatment, so let’s get on to that!

How do I Prevent and Treat WindBurn?

Well, in short, you take very similar precautions as you would to protect yourself from the sun.

Similar to sunburn, the best way to protect your skin from the wind, and prevent windburn, is to cover up with adequate protective clothing. A suitable hat and sunglasses can be important too if required.

Using sun screen and UV lip balm and so on are also recommended. That will help protect the aforementioned lipid skin barrier by keeping it moist and protecting it from the sun.

Failing that, try and keep your skins moisture at a good level by utilizing skin moisturizer. However, be careful with that approach as moisturizer alone won’t protect you from the sun.

After the fact, if sunburn has played a role, after sun can be used to treat the skin. If you don’t think you have been burnt, again use moisturizer on your skin to help get its protective balance back.

Conclusion

In summary, windburn is something that is very easily prevented. You just need to be aware that in the right conditions, even when it feels cool in the wind an even if the sun isn’t shining, you may still need to cover up and / or put on adequate protection, clothing and sunscreen, before heading out on the trail.

It’s one that can easily be forgotten which I have done myself on many an occasion and ended up with quite a red face, arms, etc.

If you’re heading out on a day hike or a longer trek soon, be sure to add sunscreen to your hiking checklist anyway. I always have a small tube tucked away in my day pack so I will never be without it should the need arise, and it often does.

I hope you found this short post on how to prevent and treat windburn useful. As always, a bit of good preparation goes a long way to ensuring you have as enjoyable a hiking experience as possible while you’re out on the trail!

What Is Challenge Hiking?

Well challenge hiking is exactly what it says on the tin, a hike that is a challenge and, more importantly, a significant one at that.

Steep Mountains

This weekend I am heading away to do my first challenge hike. It’s known as a very grueling hike in a mountain range called the Maamturks in Connemara on the West of Ireland. It’s very rocky terrain and very steep throughout so I can expect a lot of up and down.

The distance is approximately 24.3 Km’s (15.1 miles) with 2.3 Km’s (1.4 miles) elevation so, a pretty tough day hike by anyone standards.

Why Do a Challenge Hike?

I had never really thought of doing a challenge hike until the New Year when a hiking friend suggested it to a few of us. I thought why not and signed up.

What has been interesting is that as I learned more about the hike, I actually found that there are loads of challenge hikes on all over the place all year round. Seems like a pretty popular thing.

Preparation

To prepare for this one, I’ve have had to do a fair bit of preparation as the more I heard about the actual hike, the more it seemed to be a really tough one to complete. I found a video on YouTube of the route which I’ve added below. as you can see, very steep in places!

With that in mind, myself and some of the group did some very long hikes with good elevation in them the last months. Two weeks ago I also went to two steep mountains about an hour from my house and basically went up and down them. I was on top of one twice and the other five times lol 🙂

I know, it all sounds a bit mad but I wanted to mimic the elevation we will be experiencing this weekend and that seemed to be the only logical way to do it.

The hike starts between 5am and 7am so you have to get going early! To try and prepare for that, I have been getting up early every day this week, at 5am, to help ensure I get to sleep early tonight. I definitely would like a good night’s sleep before we head out on this.

Rules and Guidelines

I guess every challenge hike will have their own unique and specific set of rules and guidelines.

As it’s a challenge hike you have to sign up for it officially, There was a small payment to do that, to get a walk card which you have to get stamped at a few checkpoints along the route. You must also reach those checkpoints within a certain time frame.

There are about 200 people signed up for it I believe so there should be a good bit of a celebration afterwards I would imagine.

The other main criteria are to do with having to have the right gear for the hike, having a map and compass and knowing how to use them, supplies etc. so all good on that front.

Conclusion

So, that’s it for today. I’ll be hitting the road in a few hours to get out to the mountains, should take me 3 hours or so to get there. I’m booked into a guest house for the weekend so hopefully that will be nice too.

Apparently this hike can take anywhere from 10-14 hours, which is pretty long. I guess we will see on the day. The weather is looking pretty good at the minute which is a real bonus. I assume doing it in bad weather really lessens any enjoyment from it.

I’m not 100% sure what to expect but I guess I will know very soon. Will I get bitten by the challenge hiking bug? Who knows, maybe I will. I do like a good challenge 😉

Have you done any challenge hikes? Any you’d recommend anywhere in the world? I’d love to hear about them in the comments below.

Can’t I just Use Any Old Day Pack For A Day Hike?

Well, yes, you probably could. Is it the best idea to take your extra gear and hiking sustenance with you? Most definitely not!

I’ve taken a picture of one of my many old day packs that I use for the gym, book carrying, that type of thing to give you an idea of what I am referring to. It’s a great little pack that has done me well for all the above but I don’t use it for hiking.

Standard Pack

I often see folks out hiking and they have a standard sports pack that they would normally use to carry college books or gym gear in. That’s all fine when your setting out on a hike and the weather may be fine. But after a while, as your hike progresses you quickly start to realize that a gym or day pack like this probably isn’t best suited for the job.

Weather

A standard pack will have no specific protection against the weather. I am thinking of three things here.

Firstly, the material used for a standard pack, will not be as resilient to rain and wind as a hiking day pack. The material will be manufactured to be more weather resistant i.e. rain resistant.

Secondly, the various features that a hiking day pack has, for example storm flaps over the zippers, secure buckle fastening, etc. these are standard on a hiking day pack but not required on a day-to-day pack. Again, these all add up to making your hiking experience vastly more comfortable in challenging conditions.

Thirdly, a feature in many day packs will be a built in rain cover. When the heavens open, you simply open up the relevant pocket on your day pack and slide out the rain cover. This will go a long way to helping keep your kit inside your hiking day pack dry which is really important!

You can see the rain cover on one of my day packs in the picture below.

Day Pack With Rain Cover On

Now you can buy separate rain covers for packs which you tie to your bag. These are better than not having one but in a hiking day pack, a rain cover will be attached, as in the green square in the picture below, to the actual pack so much less chance of it getting blown away should heavy winds develop.

Day Pack with Rain Cover Out

Now, I should add that rain covers are not the be all and end all when it comes to protecting your gear in your pack from getting wet, the best way to do that of to use dry bags in your pack. However, some people like the convenience of a rain cover.

Hydration

Now, this is ultimately down to preference but as I wrote a few weeks back, I think the best way to carry water on a hike is by using a hydration reservoir. In short, you can drink as you hike, no need to stop to get a water bottle out of your pack.

Water bottles are fine and I utilize those too, mainly as I can only get so much into my reservoir, but my main drinking water comes via my water reservoir.

As per the post referenced just above, a hiking day pack comes purpose built with what is called a hydration sleeve. This is a sleeve at the back of the pack where your reservoir can easily slide into. A hiking pack is also built with a hole for the drinking tube and a catch to have it sit just in front of you as you hike.

I’ve never tried to do this with a normal day-to-day pack but I assume it would be very awkward to get the hydration sleeve to sit properly in it without a sleeve and you would have no tube holes or catches to keep the drinking tube securely in place for easy access. In short, I don’t think it would work very well, if at all.

Now, maybe water bottles are your preference and this wouldn’t apply, but for me, it’s a big one. I drink a lot of water when I hike so I don’t want to be stopping to take a water bottle out every time I need to take a drink.

Ventilation

Good hiking day packs usually come with some form of air mesh netting and padding on the shoulder straps and back panel. This comes in a myriad of designs and technologies but the main point is, it is purpose built to let air get in and around your back.

Day Pack with Ventilation

This is important as without it, as you hike, you quickly find that sweat builds up on your back and as there’s no ventilation, well, it’s got no place to go. Hot spots can also develop. At best uncomfortable, at worst it can easily aggravate your skin leading to a rash or such like.

A standard day-to-day pack doesn’t account for the kind of heavy duty trudging you do when you’re out on the trail scaling peaks. That’s a different kind of exertion to walking across town altogether and with that comes a lot more sweating.

Design

I already touched on many of the features that are generally standard in a good hiking day pack that you wouldn’t get on a day-to-day pack.

However, one other thing I think is worth mentioning is design. A hiking day pack is purpose built to fit your back better. It will have a lot more flexibility and versatility in it’s fitting and adjustment options.

It’s shape is built to work with the shape of your back and to be more aerodynamic, as such, than a standard day-to-day pack. What does all that mean? One thing, more comfort.

Conclusion

Well, today I wanted to run through some of the main reasons why it’s a very good idea to get your hands on a proper purpose built hiking day pack as soon as possible.

Now, I should add, if you’re new to hiking and you’re just trying it out for a bit to see if you like it, don’t go investing in a hiking day pack. It is perfectly fine to use any old day pack at first to get a feel for it.

This may sound contrary to what I’ve said above but it makes more sense to wait and see if it’s a pastime you’d like to take up on an ongoing basis before investing in specialized kit.

If you go down this route, just be very mindful of the weather on your first hikes out and try and avoid any deluge! Don’t be going too crazy on distance, elevation etc. either. Going out deep into open mountain is not advisable on your first hikes anyway, get a feel for it some place safe and easy to get around first. Check out more on that on the hiking for beginners page.

However, once you’ve got a few hikes under your belt and you are confident that it’s a pastime you want to take up, try and get yourself a proper hiking day pack as soon as you can. You can check out some top recommended options on the day pack page. There’s also a day pack buying guide here.

So, that’s it for today. If you’re new to hiking, I hope you found this post useful. If you’re experienced, I hope you agree with my thoughts on this. If not, please do share your thoughts below. I’d love to hear them.

  • « Previous Page
  • 1
  • …
  • 8
  • 9
  • 10
  • 11
  • 12
  • …
  • 16
  • Next Page »
  • Facebook
  • Pinterest

What are you looking for?

Copyright © 2025 · Cool Hiking Gear

Cool Hiking Gear is a participant in the Amazon Services LLC Associates Program, an affiliate advertising program designed to provide a means for us to earn fees by linking to Amazon.com and affiliated sites.

  • About This Site
  • Privacy Policy
  • Affiliate Disclosure Statement
  • Contact