A recent post, called Map Reading Basics, was the first in a series on all things to do with Navigation. At some point as a hiker, you will probably need to consult and follow maps so it’s a good skill to learn and get familiar with using out on the trail.
In that first post we looked at some of the basics about a typical map. Today I want to take that forward and start to look at how best you should use a map.
With that in mind, let’s look at setting a map.
What is ‘Setting a Map’?
In brief, setting a map is aligning what is on your map to the surrounding landscape. For example, when you lay your map out in front of you, you will normally naturally point the top of the map, grid north, out directly to the front.
However, you are most likely not facing North while standing on the ground and so your map will automatically be out of sync with the surrounding area.
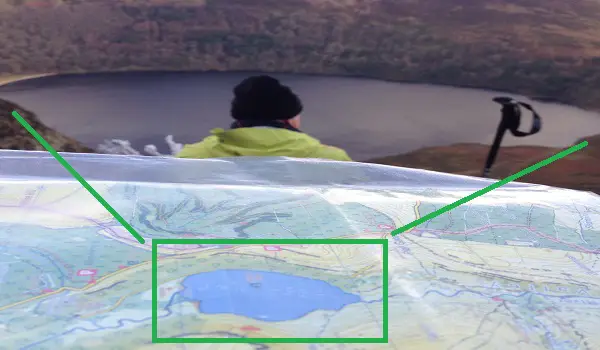
To rectify this, simply look at your surroundings and match them to what’s on the map. Then move your map to align to those landmarks. An example of this is outlined in the picture below (Please ignore my friends head in the middle of the picture below 🙂 ).

If you’re sitting reading this in your living room you may find this hard to relate to and odds are that you haven’t got a mountain range in your back garden as well as an accompanying map 🙂
To try and give you a feel for this, follow the steps below. They list out a simple way you can get a feel for setting your map and can be easily set up in your back garden or a park. Someone did this with me once and it is effective to get the fundamental idea across if you’re starting from zero.
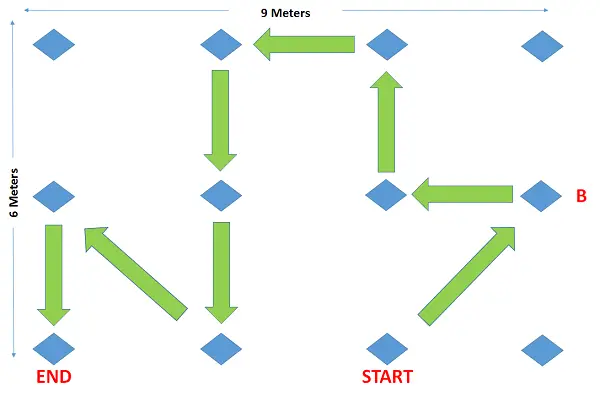
1. Draw out the diagram below as well as the green line in it.

2. Replicate the diagram on the ground in your back garden or in a park by using three meter spaces between each of the blue diamonds on the map. Each diamond represents a feature on the ground. To do this, place an object at each blue diamond measured three meters apart. Anything will do for this, you will need twelve objects in total.
3. Stand at the start as listed on the map. Now align your map to the objects on the ground. You now have your map set.
4. When you are happy with all that, follow the route of the green line in the direction of the arrow. Remember that all the while that you move from one object to the next you need to keep your map set. To do this you need to remember that when you turn the map needs to stay in the same position!
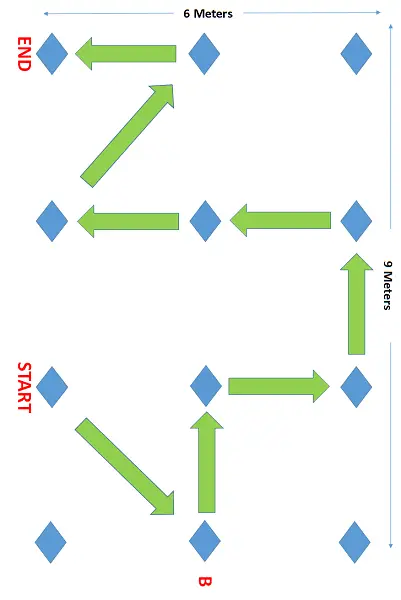
5. So when you to get to point B, What should your map look like as you hold it ? See below.

6. When you’ve followed this the whole way round, draw out another route on the map and follow it again while keeping your map set as you go. So, how did you get on? Could you follow it easily? Although that is basic, it gives you an idea of what you need to do when out on the trail.
You set your map in line with the features you’re looking at and from there, you can start to follow your planned route on your map.
Why is ‘Setting a Map’ Correctly Important?
Well, it’s important as the fundamental principle of map reading is that in order to get to another place, you need to establish where you are first. In normal conditions where visibility is pretty good, setting your map is the first port of call to doing that successfully. As simple as this sounds, it does take practice to get naturally good at it.
What if Visibility is Poor?
Of course, it isn’t always nice, sunny and clear when you’re out on the trail and sometimes you have lessening degrees of visibility. To help you set your map there is a simple trick you can use to confirm you at least have it pointing in the right direction.
Simply hold your map out flat in front of you and drop your compass onto it. When your compass settles, move the map to align it in the same the direction of the North pointing direction arrow on your compass.
You’ve now aligned the top of the map, which you know to be grid North, to Magnetic north. This will give a rough approximation of which way the map should be set.
This little trick can be used in both good and bad weather if, for any reason, you want to doubly confirm that your map is set in the correct position and alignment.
Conclusion
OK, I’m going to stop here for now. Today we took another step into the world of navigation in the hills. It’s a relatively simple one but I highly recommend you give it a try in the real world.
Ideally, a clear day is best to give this a go as a try out. If you can, do it with an experienced hiker who knows a bit about navigation as they will be able to correct you if you are on the wrong track or if you have any questions.
I suggest you first set your map by matching the surrounding features of the landscape to your map. When you’re happy you’ve done that, orientate your map to align to the features of the land. Then, to confirm your results, drop your compass on the map. Magnetic North on the compass should be pointing in, more or less, the same direction as grid north on your map.
I hope you found this post useful. This is the second in a series on Navigation. The first post on map reading basics is available here. More posts will be added in this series in the future so do stop back for more. Next time, I think we’ll take a look at contour lines.
Do you have any questions on how to set a map? Please post them in the comments below and I’ll be happy to answer them as best I can 🙂