coolhikinggear.com

  • Men’s
    • Best Hiking Rain Jackets for Men In 2024
    • Best Men’s Hardshell Jackets Of 2023
    • Best Hiking Pants For Men In 2023
    • Best Ultralight Rain Pants For Men
    • Best Men’s Daypacks For Hiking In 2023
    • Best Backpacking Backpacks For Men In 2023
    • Best Base Layers For Men In 2023
  • Women’s
    • The Best Hiking Rain Jackets For Women In 2023
    • Best Women’s Hardshell Jackets Of 2023
    • Best Hiking Pants For Women In 2023
    • Best Ultralight Rain Pants For Women
    • Best Daypacks For Women
    • Best Backpacking Backpacks For Women In 2023
    • Best Base Layers For Women In 2023
  • Hiking Accessories
    • Best Hiking Poles
    • Best Trekking Pole Monopod Camera Mount
    • Best Hiking Headlamps
    • The Best Hiking Watches In 2023
    • The Best Hiking Gloves In 2023
    • Best Hydration Bladders For Hiking In 2023
    • Best Compass For Hiking Our Top Picks
    • Cool Hiking Gadgets
  • Footwear
    • The Best Men’s Hiking Boots In 2024!
    • Best Hiking Shoes For Men In 2023
    • The Best Women’s Hiking Boots In 2023!
    • Best Hiking Shoes For Women In 2023
    • Best Hiking Sandals
    • Best Hiking Sandals For Women in 2023
  • Hiking Guides and Resources

Best Sleeping Bag For Hiking The Appalachian Trail

Hiking the Appalachian Trail is the experience of a lifetime for those lucky enough to have the opportunity and the time to complete one of the nation’s most popular thru-hikes.

But how do you set yourself up for success with such a physically and mentally challenging experience? Finding the best sleeping bag for hiking the Appalachian Trail, is one of the more important aspects to help ensure your success.

The importance of a good night’s sleep on a such a long thru-hike cannot be overstated for both your physical and mental recuperation.

Hiking the AT

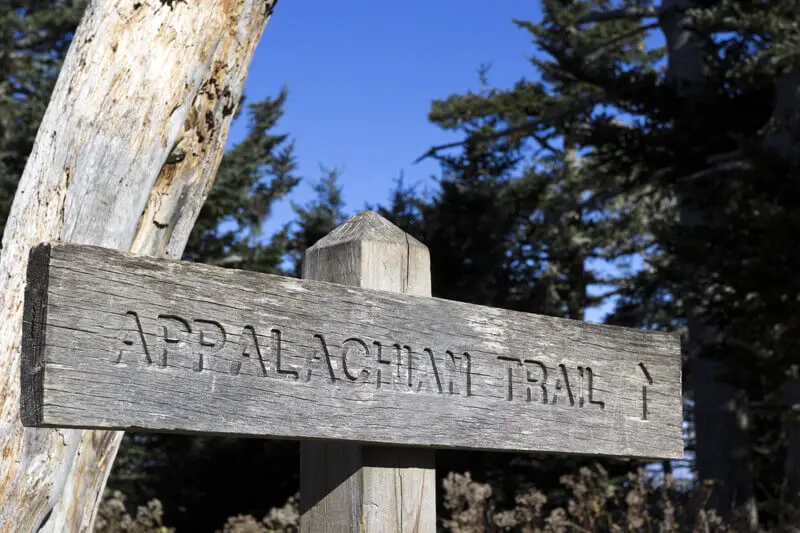
The Appalachian Trail is one of the most famous long-distance hiking trails. Passing through 14 states over approximately 2,185 miles between Georgia and Maine.

The average thru-hiker takes around 165 days to complete the Appalachian Trail from start to end, on average anywhere between five to seven months.

As you can imagine, over this huge distance, weather conditions and terrain vary enormously. The vast majority of hikers attempt the Appalachian Trail northbound in springtime and aim to finish before winter hits in Maine, potentially closing the Mount Katahdin finish point.

Leave early and you’ll be faced with low starting temperatures or leave later and risk missing the finish due to winter weather. Late March through early April is the optimal period for departure, although this is peak season on the trail.

If that bothers you, you may want to try to depart earlier or later depending upon your hiking style, level of fitness and weather conditions.

What to Expect

The AT varies in elevation from 124 feet at its lowest point in Bear Mountain State Park, New York, up to 6,643 feet at Clingmans Dome in the Great Smoky Mountains National Park and you can expect subfreezing temperatures.

Daypack On The Trail

Completing the AT in the recommended spring, summer and early fall window, should, however, rule out some of the more harsh weather conditions.

In spite of its length and reputation, the AT is not a wilderness trail, with the exception of the 100-mile Wilderness Section, you will cross a lot of roads and are able to stop at local towns usually just a short distance away.

These nearby towns are essential for food stops but also enable you to simply take a day’s break, pick up mail, replace any broken or unsuitable equipment and to mail unwanted stuff home.

Although it is recommended you take a suitable tent, there are also around 260 shelters spaced along the trail. Available on a first come, first served basis, you cannot rely on shelters alone.

Your choice of sleeping bag for the AT should take all of these points into account. If you do not already have a suitable sleeping bag, or are thinking of upgrading here’s a breakdown of some of the essential qualities you need to look for in a sleeping bag for hiking the Appalachian Trail.

Choosing the Right Sleeping Bag for Hiking the AT

The main choices you’ll need to make when choosing your sleeping bag for the Appalachian Trail thru-hike, are what type of material and how warm.

Before you decide, it may be best to consider whether or not you wish to change your sleeping bag for summer, by mailing one home and having a lighter one sent out. Or you could also consider using a substantial liner to increase warmth and using it alone at the height of summer.

Down or Synthetic?

In general, down sleeping bags are preferable to synthetic bags for several reasons, there are, however, circumstances where synthetic bags can prove preferable. Down bags are lighter, keep you warmer and are more compressible, meaning they take up less space in your pack.

On the other hand, down bags are more expensive than their synthetic counterparts and are not suitable if you’re planning on sleeping in environments which may be damp, such as a tent without a ground sheet.

Wet down bags can lead to hypothermia as all heat produced is absorbed by the damp down, unlike quicker drying synthetic. There is, however, a range of damp-resistant down sleeping bags.

In these bags, the down is treated with a hydrophobic coating, meaning it repels water on a molecular level rather than absorbing it. Naturally, this comes at a price.

Whether an adventure of a lifetime, such as an AT thru-hike, merits the extra cost is a personal decision. Sleeping well and waking feeling refreshed is extremely important to completing a long thru-hike.

Temperature Rating

A spring to early fall thru-hike on the AT encompasses a wide range of temperatures. If you’re just planning on sticking with the one bag throughout your hike then a 20 degree F (about minus 6 C) rating is probably going to be your best bet.

The rating will be listed on the outside of the sleeping bag and also on the bag itself. It’s easy to follow and pretty much self explanatory, see the example below.

Sleeping Bag Label

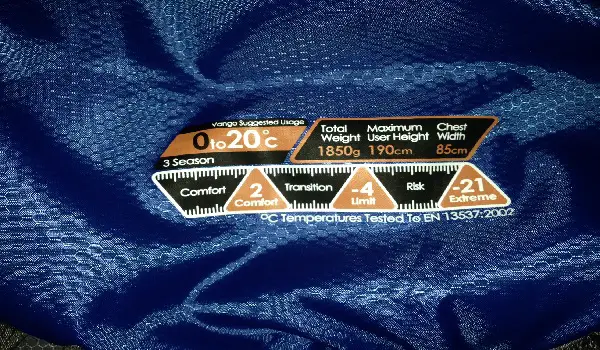
If you tend to feel the cold, go for a warmer one. In either case, if you can, taking a liner will add a little warmth and if the summer does get pretty hot, you can always use the liner alone for the hottest nights.

If you’re planning on mailing home your winter sleeping bag and getting a lighter one sent, then you can choose two bags with a greater temperature difference. Just remember, depending on your altitude, it can still get pretty cold even in summer.

In general, it is important to ensure that you will be warm enough and feel comfortable enough to sleep well and to complete your thru-hike. Try out your sleeping bag before leaving, sleeping well is essential to maintaining the positive mental energy needed to succeed.

Weight

Ideally the lighter the better, but do not sacrifice comfort and warmth for weight alone or you’ll soon be struggling to carry your lightweight pack due to lack of sleep.

Around 3 pounds is a decent weight to aim for, although ultralighters will probably aim more around the 2 pound mark.

Shape and Style

There are lots of different styles of sleeping bags. For the AT you’re going to be best looking at maximum heat retention and mummy-style bags with their built-in hoods are possibly the best option.

Snugpak Chrysalis 3 Sleeping Bag

However, you need to be comfortable and choose what works for you depending upon your sleeping style. Some people move around a lot in their sleep and prefer roomier bags, others less so.

There are advantages to using hiking sleeping quilts and some people use them on thru-hikes.

If you don’t want to go with a traditional mummy-style choice then try out several different designs, but remember if you opt for a quilt style you may have to bring along extra layers and headwear to increase heat retention.

If possible try sleeping in a few different types of bag before committing to a purchase.

Price

It’s definitely worth spending a maximum on quality. Not everyone has the option of spending half a year on the trail and for most it is the opportunity of a lifetime.

A good sleeping bag will last and will serve you well for future trips, so it really is worth making the investment. When the going gets tough you’ll be glad you spent the extra.

As with anything you can spend a lot, or a little, or somewhere inbetween. As always, the general rule is that, broadly speaking, the more you spend on a bag from a good outdoor brand name, the better quality bag you are going to get.

Recommendations

We like the Western Mountaineering UltraLite 20 Degree Sleeping Bag. A 20 degree down sleeping bag for colder temperatures.

Check out the Western Mountaineering Ultralite 20 Degree Sleeping Bag on Amazon

This ultralight, highly compressible, down sleeping bag from Western Mountaineering is a top pick with thru-hikers. Special features include a heat retention collar and a special coating to keep the down filling dry, whatever conditions you may find yourself in. Find out more on Amazon

For warmer temperatures, we recommend the Marmot Never Winter Sleeping Bag.

Check out the Marmot Never Winter Sleeping Bag on Amazon

Marmot have created the Never Winter summer, down sleeping bag to ensure that you stay warm even on those unexpected colder summer nights.

Highly compressible and lightweight, this bag also has a fold down second zipper for added ventilation, while the treated down ensures maximum water resistance. Check out all of this bag’s extra features here.

Additional Resources

Check out the official national park website as an excellent starting point for researching your At trip!

Conclusion

The best sleeping bag for hiking the Appalachian Trail depends upon a lot of factors. However, where possible look for warmth, light weight and packbility.

Whether you change part way or stick with the same one will influence your temperature rating, as will how warm you like to sleep. If you’re unsure try several models, this is the hike of a lifetime so make sure you’re as prepared as possible to succeed!

How To Buy Hiking Shoes

Hiking shoes, also known as trail shoes, are a fairly recent phenomenon, although people have been hiking in lightweight sporting footwear for a long time.

How to buy hiking shoes

Thanks to their popularity, technological innovations and the move towards more increasingly hybrid models designed for greater versatility, experienced, new and casual hikers are increasingly turning to hiking shoes instead of traditional hiking boots.

However, as with any relatively new product, it’s well worth considering how to buy hiking shoes before making your purchase. It is important to consider the different styles of hiking boots and your requirements before committing to a specific model.

Many hiking shoes can also double as work or about-town shoes, wherever you’re likely to be most active and on your feet, as they are generally quite stylish.

With so many different types and models to choose from, let’s take a look at some of the most important factors that determine how to buy hiking shoes.

If you would like to learn about the top hiking shoe models that we love and recommend, then please check out this post on the best hiking shoes for men an this post on the best hiking shoes for women. There are loads of great options available there!

If you are looking for advice on how to buy ‘hiking boots‘, as opposed to shoes, please check out our hiking boot buying guide.

OK, let’s get to it!

Different Styles

Hiking shoes are available in a wide variety of different styles, each intended for different types of hiking. In general two main distinctions can be made, hiking shoes that emulate a hiking boot style and those that have adopted a more lightweight, sporty aspect, with of course varying degrees in between.

Merrrel Moab Gore Tex Hiking Shoe

Hiking shoes have become increasingly popular thanks to their light weight, breathability, out-of-the-box-comfort and durability. Those that align themselves more closely to a traditional hiking boot style tend to offer greater protection from the elements and make for better use at colder times of the year. They are also a better choice for carrying more substantial loads and tend to have better ankle support.

Lighter weight, more sports-style hiking shoes are often compared to trail runners as they allow faster-paced hiking. However, although they may have many features in common, hiking shoes tend to have a much more rigid, durable sole in order to protect your feet from miles of uneven terrain, whilst providing the necessary grip and traction needed out on the trail.

While they are less suited to carrying a heavy pack, they do nonetheless provide good stability and a secure footing. Lighter weight hiking shoe models tend to be more breathable, to allow for quick drying and greater perspiration during faster paced and strenuous hikes.

In between these two extremes, there are many models that use aspects from both ends of the spectrum, however, whichever style and features you decide upon will need to match your needs and hiking style.

As always, you need to very clear on what you need your hiking shoes for, so getting your specific requirements down is critical before you invest.

Materials & Construction

The best type of hiking shoes feature a strong, durable rubber outsole with multi-directional lugs for extra traction. You will need a outsole that can grip to the terrain and prevent slips and falls.

Obviously depending upon your anticipated use, the importance of the outsole can vary. However, bear in mind that a good rigid outsole will provide extra comfort by protecting you from uneven trails, stones and rocks.

Vibram rubber outsoles are considered to be one of the best outsoles available, offering enhanced grip over all terrain and in all weather conditions. This has been borne out in our experience too.

The midsole and shank, often overlooked by those with less hiking experience are also top priorities. They provide extra cushioning and protection from the terrain below. Lightweight nylon is a popular shank construction material as is EVA for the cushioned midsole.

EVA is also often used in hiking shoe footbeds, which may or may not be treated with a form of odor control, something to look out for depending upon how much your feet sweat, your anticipated level of exertion and the breathability of your shoes.

Uppers

Leather uppers are a popular choice, thanks to their fit-enhancing flexibility and long lifespan. Mesh panel inserts and mesh liners are also popular with the aim of increasing breathability.

Some hiking shoes feature an internal waterproof membrane. It’s worth noting that it’s very difficult, which often means expensive, to create a membrane that repels external water while allowing internal moisture to pass.

Also, waterproofed shoes have a tendency to take a long time to fully dry out once they have been soaked. Not unlike traditional hiking boots.

You’ll need to carefully weigh up the pros and cons and consider which is most likely to be practical for you, more breathability and faster drying, or a shoe that is more waterproof, but takes longer to dry when it does get wet.

Breathable mesh uppers, rather like running shoes have become popular for hiking during warmer seasons as they dry quickly and allow your feet to breathe.

However, in colder, wetter seasons hiking shoes in general offer less protection from the elements. So you may wish to use boots for severe weather, and decide between a mesh shoe for fair weather and a waterproof shoe for showers.

If you are a regular hiker who enjoys mixing it up, we do advise that you have different footwear for different types of hiking, different times of year, etc. It’s a good way to cover all bases.

Support

Traditionally when we think of hiking boots we tend to see the ankle collar and think of ankle support. However, support is mainly provided by the stability of your footwear.

If you have a good gripping outsole and a snug, well-fitting shoe with stability provided by an internal shank and midsole, you’re less likely to sprain an ankle than by having a high collar alone.

Some hiking shoes have higher collars while others are low cut, in either case it is a matter of personal preference, although higher collars are useful for waterproofed shoes, where you want to keep the water out as much as possible, they are also useful for trails where there is plenty of debris, gravel, sand, vegetation and so on.

You’ll also appreciate ankle protection a bit more if you’re heading out into the undergrowth. However, if you’re planning to hike mostly on well-traveled trails, the choice depends mainly on your preference. One further point to note is that a higher tying lace can help prevent heel slippage in shoes that are less than a perfect fit.

Weight

Weight is another important aspect to consider. There’s less advantage to wearing a hiking shoe over a boot if it’s not much lighter. However, you still want a good durable pair of shoes and cutting back on weight can often mean cutting out important features or else using lighter weight, much more expensive versions.

If you’re not into fast packing or ultralight backpacking, it’s reasonable to assume you’re going to be carrying some weight with you on extended trips, or even on a day hike and a more robust, slightly heavier hiking shoe can feel much more stable with a pack on your back.

So in summary, lightweight is good, but stability and durability are more important. You don’t want to prioritize weight over comfort.

Although you may think lighter weight equals more comfort, lighter weight also equals cutbacks to cushioning and protective features. Yet more things to bare in mind depending upon your individual circumstances.

Waterproofing & Breathability

Waterproofing and breathability, as touched upon earlier, are slightly contentious issues. Unless you’re prepared to spend big, it’s a difficult combination to get right.

Again, as stated earlier, once you get waterproof hiking shoes thoroughly wet they then tend to take several days to fully dry out. They are also less breathable than shoes that don’t have waterproofing.

On the other hand a pair of breathable mesh-upper hiking shoes will keep feet dry from perspiration and if wet through they will dry quickly. However, depending upon where you are going to be using them most, apart from in summer, you’re likely to often come across mud and wet vegetation when out on the trail.

For some, the answer is to favor a waterproof membrane with breathability if you live in an area with high levels of precipitation, whereas others prefer to use hiking boots for colder, wetter periods and to use lightweight, breathable mesh hiking shoes over warmer drier periods.

As recommended above, about having more than one pair of boots or shoes for different hiking, I use a combination of this myself, so lighter boots and trail shoes in Summer, and heavier and sturdier boots in Winter. It all depends upon your individual circumstances and needs.

How to Choose the Right Hiking Shoes

Firstly, there is no one “right” pair of hiking shoes. Which pair is right for you depends upon your individual circumstances.

Lowa Mens Renegade II GTX Lo Hiking Shoe On the Trail Side Shot

Start off with basic questions about what you need your hiking shoes for. For example, what are you looking for in a hiking shoe? What are your needs? Where and when do you intend to be wearing them most?

To find your ideal pair it’s important to have your answers to these questions upmost in your mind whilst making your decision. As mentioned at the start, it’s critical that you have your requirements down clearly before parting with any cash.

Requirements

Consider your requirements. Are you looking for a versatile all-rounder you can wear about town after your day hike around Yosemite Falls? Or are you looking for a durable, rigid sole to get your feet through a long distance thru-hike?

We all have different requirements, hence the huge variety of hiking shoes available. Here are some popular requirements you may wish to prioritize depending upon your circumstances and anticipated usage:

  • Waterproof capability
  • Breathability
  • Weight
  • Rigidity
  • Traction and grip
  • Lacing systems
  • Fast drying

Prioritize those that are important to you and add on any other particulars for your needs and situation.

Price

The price of hiking shoes and boots can vary hugely. Hiking boots are usually much more expensive than hiking shoes. There is of course more in them in terms of construction, but hiking boots tend to have more functional capabilities.

With either boots or shoes, the general rule applies i.e. normally you do tend to get what you pay for, although if there are certain features that you don’t need, you can explore getting cheaper pairs without losing any quality.

If you’re just starting out or are simply looking for a versatile outdoor shoe, maybe to wear on vacation hiking when around town, look at previous models that may be on sale. You can get a good pair at a better price even if you may miss out on a more recent upgrade.

By upgrade, we are referring to a further model of the same shoe e.g. Lowa Renegade GTX III. This of course implies that there is Lowa Renegade GTX II version, and usually there is, and oftentimes you can get it at a good price in comparison to the latest model. Many times the broad capability of the new model of the boots are the same as the older model.

Features

The features you’ll need to look for will depend upon what you need. Here’s a selection of some of the most common important features to consider.

Vibram Rubber Outsole

Designed to provide grip and traction on all terrain no matter what the weather, a Vibram rubber outsole is considered to be one of the most durable, offering above average traction.

Lowa Renegade GTX Mid Hiking Boot Vibram Sole

We have found this to be the case and think Vibram outsoles perform very well, in most cases. I have personally had good experiences with Vibram.

Nylon Shank

Shanks provide much needed support and rigidity to protect your feet from bruising and aching after many miles over uneven ground. Without a shank your comfort will suffer severely. Nylon is strong, durable and lightweight.

EVA Midsole

An EVA midsole provides your feet with cushioning and shock absorption for increased comfort. It will also provide foot support. EVA foam is lightweight and springy.

Contoured Footbed with/without Odor Treatment

A contoured footbed, an insole that molds to the foot, will help support your feet and improve your comfort levels. Certain foot beds provide additional arch support.

Odor protection can be useful if you have feet that are prone to sweating or waterproofed shoes with low breathability. Pictured below are an old pair of hiking boots of mine, not hiking shoes but the principle is the same, you can see how worn the soles got, but they were still quite comfortable to wear.

Old Insoles

Leather (& Mesh) Upper

Leather is flexible and durable. It can be treated to repel water, although it does take some maintenance. Leather hiking shoes often have mesh panels for improved circulation.

Leather is also a good choice for colder months and travelling over rough terrain with a lot of abrasive elements.

Rubber Toe Cap

Essential for protecting your feet on rocky terrain or from sharp obstacles. Toe caps also provide protection and extend the durability of your hiking shoes.

If you plan to head into rockier terrain where you have a chance of stubbing your toes, these are a very good idea!

Bellows Tongue

A bellows tongue folds in on itself keeping dirt, debris and moisture out of your shoes. Useful for trails over sand, gravel, scree and vegetation.

Speed Lacing System

Some people like them, others prefer a traditional lacing system. Either way, it’s worth checking what kind of system is used in your hiking shoes, to prevent unwelcome surprises when ordering.

Bare in mind that the majority of untraditional lacing systems offer an even hold, but are not capable of tightening one specific area, as can be done with traditional laces.

Your individual requirements will depend upon your foot shape and how well your hiking shoe fits. Personal preference plays a large part here too. I prefer the traditional lacing myself.

Lowa Mens Renegade II GTX Lo Hiking Shoe On the Trail Single Shoe Shot

GoreTex/Other Waterproof Membrane

A waterproof membrane will allow you to keep your feet dry in wet conditions. Depending upon the quality of the membrane, some also offer enhanced breathability.

Not all membranes are equal, some struggle to keep feet dry in more than damp conditions. Most waterproof shoes take longer to dry out completely once wet than breathable mesh shoes do.

Heel Brake

This feature is useful for steep descents so if you’re likely to be using your hiking shoes over mountainous terrain, this is a bonus. Make sure your outsole also offers good traction (which should always be the case anyway).

Fitting

You’ll need your hiking shoes to have a good, snug fit for maximum stability. While fit can be a matter of personal preference, you need your feet to feel securely held and comfortable at the same time.

Shoe Measure

When deciding on fitting, you may be best trying more than one size. In any case, try your hiking shoes towards the end of the day when your feet are going to be slightly bigger, and remember your choice of socks will affect how your hiking shoe fits, and that is a combination you need to get right.

Style

There are a wide variety of hiking shoe styles available. Some considerations such as shoe height can have practical implications concerning which types of terrain you’re likely to hike over.

Low rise styles offer less ankle protection and may be less suited for colder, wetter weather conditions.

Other style considerations may enable the occasional hiker to find a more versatile hiking shoe they can wear about town or to work, such as color and the style of the outsole.

We think style, as in how the design, etc. looks, is a big one when choosing hiking shoes, as those factors, as well as function, play a big part in choosing hiking shoes, mainly as you are far more likely to use hiking shoes for casual use, than hiking boots..

Washing & Care

Washing and maintenance is an important part of hiking shoe ownership. Unfortunately many people don’t check the recommendations until several weeks or months into purchase.

How To Clean Leather Hiking Boots

If you don’t inform yourself prior to purchase, then you deny yourself the choice of low or higher maintenance hiking shoes.

Leather shoes generally require more care, and being more durable, you will probably end up cleaning them more often than say a mesh style shoe that is not likely to last as long.

Leather hiking shoes will also take longer to dry after a full clean and need specialist cleaning and reproofing products. Full grain leather shoes may require a conditioning treatment from time to time, to keep them at their best.

Conclusion

As you can see, there are many things to keep in mind when considering how to buy hiking shoes. Most importantly, you need to consider your own needs and which features and construction will be of most use to you, most of the time.

When you’re planning on wearing them, where you’ll be hiking and your hiking style will all influence which hiking shoes will be right for you, so plan carefully and prioritize your needs.

We’ll mention it one more time as a final takeaway, but if you are regular hiker and enjoy varying terrain, all year round, hiking shoes should just be one part of your hiking footwear.

You don’t have to go all Imelda Marcos on it and get oodles of pairs of shoes, but a good of hiking shoes, a lighter weight pair of hiking boots for spring and summer, and a heavier and sturdier pair of hiking boots for Autumn, Winter and backpacking, should cover most bases for most people.

We really hope you found this guide useful. If you did, we would be really grateful if would share it or link to it on your networks.

Happy Hiking 😉

How To Keep Drinks Cold In A Backpack

Nothing quite beats a refreshing ice cold drink after a few miles hiking in the summer heat!

If you’re wondering how to keep drinks cold in a backpack, or asking yourself if it’s even possible, read on for some top tips on how to keep your drinks cooler for longer while you’re out on the trail.

Staying Hydrated

It’s important to drink regularly when you’re out hiking in the heat. While you will naturally become thirsty as your body seeks to replace moisture lost through exertion and to cool down, it can be pretty unpleasant drinking warm water on the trail.

You will probably find that keeping your drinks cooler in your backpack will encourage you to drink more regularly and in consistent quantities, which in turn means you’re less likely to dehydrate.

The Science

To stand a chance at keeping your drinks cool, or at least not too unpleasantly warm, it helps to understand why hot drinks cool down and cold drinks warm up.

Basically, both drinks adjust to the ambient temperature. A cold drink will absorb energy from its environment, while a hot drink loses it to its environment.

In a closed system, the second law of thermodynamics ensures that a thermal equilibrium is reached between an object and its surroundings. Under normal conditions heat flows naturally from an object at a higher temperature to another at a lower temperature.

So, basically speaking if we want our cold drink to stay cold, we’re going to need to minimize the difference between its temperature and its surroundings. This will limit the amount of heat that will be transferred to our drinks. Science lesson over, let’s put this into practice!

Preparation

As with many things in life, preparation is key. Start by getting your drinks as cold as possible. If you’re setting off from home or somewhere with access to a freezer, then put your drinks in to freeze. Remember water expands as it freezes so don’t overfill!

If you’re in a hotel or hostel, your best bet is probably going to be to purchase your drinks from a nearby store as you set off. If possible select the coldest at the back of the cooler.

If possible grab an ice pack or two and stick them in to freeze. Stores may have disposable thin plastic ice packs ready to go in the chiller cabinet.

Insulation

Once you’ve got the coldest drinks you can get your hands on, the challenge is to keep them that way, for the next few hours at least. As you can’t take the fridge with you, you’re going to have to find a way to keep the drinks surroundings, i.e. your backpack, as cool or cooler than the drinks to prevent them heating up.

Insulation is the key here to minimize any difference in temperature. Put your cold drinks with an ice pack, if possible, in a plastic bag. Depending on your circumstances an insulated thermo bag would be ideal, however, if you don’t have one to hand, use any plastic bag to protect the rest of your gear from any water.

Wrap this inside your sleeping bag, spare layer or any other insulating gear you’re taking with you and place it at the bottom of your backpack. The more insulated they are, the longer your drinks should stay cooler. Just be sure to not get anything wet if you need to wear it or sleep in it at night!

Freeze Some Water

I personally prefer to freeze a plastic water bottle or two overnight, and then pack them away, wrapped to keep them as cool as possible for longer. I’ll ensure the water in my hydration bladder is cold, see below, when I start out so I have cold water for the first hour or two.

This gives me easy access to cold water early on my hike, while keeping the interior of my backpack a little cooler too. I then replenish my bladder with the water from the bottles when it melts. Remember they were frozen, so they will be colder for much longer.

When the day is at its hottest, your drinks should remain cool in your backpack. As you consume them and with the passage of time, they will inevitably heat up, however, they will be much more pleasant to consume than warm, tepid water.

What About my Hydration Bladder?

If you prefer to use your hydration bladder in hot weather, I would recommend putting some ice directly into the bladder and insulating it well in the center of your pack.

Bear in mind you won’t be able to freeze it as you’ll risk splitting the tubes. Also any water in the tube is going to warm up when you’re out, so either take large gulps or remember to drink more regularly to avoid it becoming too unpleasant.

Cold Drink Cheats

Make the most of your surroundings. If your hike passes any creeks plan to stop off to eat nearby. On arrival place any warm drinks in the cool waters and let them cool for at least 30 minutes.

By the time you’re good to go, they should be cool for later on. Wrap them in a wet item, then a plastic bag and insulate inside your backpack. If it’s really hot you’ll want to take a dip yourself or wet your clothing and headgear.

If you have a Lifestraw or similar, you could drink the cold water directly from the creek itself. If you know that there will definitely be water in the creek at that time of year, then this could allow you to reduce your pack weight by carrying less water. Note: Always be sure to check in advance if it’s OK to drink the water, even with a filter.

If your hike itinerary passes near any small towns or villages, check ahead to see if there are any nearby convenience stores that wouldn’t require much of a diversion.  This can also help to keep your pack weight down, as you won’t need to pack as much water at the start. Carrying less weight, you’ll exert yourself less and perspire less.

Recommended product

One product I’ve used non-stop over summer is my Aquatix stainless steel sports water bottle, pictured below. If you’re looking for a hassle free way to grab a cold drink and head out the door, this takes some beating.

I use it for the first few hours of my day hikes and it’s really handy for keeping a cool drink to hand, without opening and warming up the rest of my drinks.

It has a lock feature and a flip top so you don’t have to worry about soaking the rest of your gear. It’s also excellent for keeping your drinks warm in winter, so you can use it year round. Check it out here.

Conclusion

How to keep drinks cold in a backpack – start with ice cold water and use plenty of insulation. If possible make use of any possible resupply points on the go and invest in a specialist insulated sports water bottle, you can also use it in winter to keep your drinks warm.

Remember too that freezing good old fashioned plastic bottles overnight before your hike, can help to keep your water colder for longer, but on a really hot day, this will have limited use.

If you’re heading out far in the heat, don’t forget to keep drinking water regularly. Even if you don’t succeed in keeping your water as cool as you’d like for one reason or another, remember,  drinking warm water will still keep you hydrated.

So, whether it’s refreshingly cold or bordering on unpleasantly warm, keep drinking and stay hydrated!

Best Hiking Boots For El Camino De Santiago

Choosing the best hiking boots for El Camino de Santiago is not an easy, straightforward decision. If you are about to take on the full Camino, it is a serious undertaking, taking up to 6 weeks on average to complete.

Best Hiking Boots For El Camino De Santiago

If you don’t currently own a pair of hiking boots, or if you’re looking to upgrade, then there are plenty of variables that need to be considered, not least of all your own personal preference.

If you’re in a rush, we want to give you the best hiking boots for the Camino. We think of this in two ways. Firstly, if you’re backpacking (carrying your pack yourself) the whole Camino, then a pair of very sturdy boots like the Salomon 4D GTX for men and for women, are a good choice.

Secondly, if you are planning to get most of your gear transported between places you are staying (This is another common way for people to hike the Camino), so you’ll only have a light day pack when you hike, then a light pair of lighter boots are a good option. We like the Lowa Renegade hiking boots for men or for women for this, and they are an excellent pair of all round hiking boots to tackle the Camino with.

If you want some more options, check out our best hiking boots for men and our best hiking boots for women, for some more great hiking boots, all of which will cover what you need for the Camino.

El Camino de Santiago

El Camino de Santiago is one of the world’s most popular long-distance trails, that is increasing in popularity year after year, with just over 300,000 recorded completions in 2017.

It consists of a huge network of paths across Europe that have been followed since the Middle Ages on the Saint James Pilgrimage. All culminate at the shrine of the apostle Saint James in the beautiful Santiago de Compostela cathedral in northwestern Spain.

Solo Pilgrim On The Camino

The majority of people completing El Camino de Santiago do so in northern Spain from France, or from Portugal. Although there are connecting trails that cover the majority of European countries, with Le Puy Route starting in the French Massif Central being one of the most popular extended trails.

In Spain itself there are five different caminos, plus one from Portugal. Which one you choose to take will affect your choice of footwear, as will the time of year.

The duration, length, terrain and level of difficulty can vary greatly from one to another. Let’s take a look at some of the most important factors to consider when you are choosing a pair of hiking boots for your Camino.

Comfort

First and foremost, your hiking boots will have to be comfortable. For each and every one of us, that means worn in. Do not attempt to start El Camino de Santiago without having thoroughly broken in your boots first.

In all other respects, comfort depends upon the wearer’s definition. Some people like lighter weight boots, others a heavy more supportive base.

Bare in mind that with the many dedicated hostels and other sleeping arrangements along the way, combined with the fact that much of the land bordering the caminos is privately owned, the vast majority of people do not camp. This may affect your choice of footwear, as with a lighter pack you may not need the full stability and support of a heavy-duty hiking boot.

The best hiking boot for El Camino de Santiago will also strongly depend upon the route that you choose. In the vast majority of cases, especially if you are intending upon doing the full Camino Francés, you will benefit from a boot with a more rigid midsole.

This will help to provide stability on the steep mountain ascents and descents, and comfort by protecting your feet from bruising and discomfort. This is true even on the flat after miles of gravel tracks. Bear in mind that a rigid midsole is going to provide your feet with much needed protection over some of the longer routes.

Traction

An outsole with good traction is essential if you’re going to be undertaking a camino that covers mountainous or hilly areas.

Not only the Francés and Norte Caminos involve steep ascents, you also need to bear in mind that depending upon the season and the number of other walkers, that there may be muddy, slippery sections on what would usually be classed as easy-going terrain.

Although there will be paved paths and tracks, you will also be faced with a huge variation of terrain on any route and having a solid outsole with good grip can help to prevent a slip on ascents or descents, whether short or extended, as well as providing grip in the wet and over rocky terrain.

Waterproof Upper

It is recommended to go for a decent waterproof upper for El Camino de Santiago during the wetter, colder months.

In warmer months, you may be tempted to go with a more breathable lighter weight upper, however, there are plenty of solid reasons to stick with full coverage hiking boots. Not least that when I did the Camino myself (July) there were a few downpours. Northern Spain has temperamental weather, so you can get a very sunny morning, followed by an hour long downpour over lunch!

Ankle height hiking boots will help you to make the most out of your journey by supporting your feet. They will also offer extra protection against the elements and keep any vegetation and gravel from entering your footwear.

Even the short Camino Ingles at 119 km (74 miles) features a mixture of challenging steep ascents and rocky tracks from which your feet will need adequate protection.

Marshland and beaches along the Camino Norte will likely leave you with wet feet if you don’t have sufficient waterproof protection. Rain can and will fall at nearly any time of the year and when you have several hundred miles ahead of you, it’s best to stay protected. 

An element of good Breathability in your boots is also important. You will be more or less walking 6 to 8 hours a day, so your feet need to breathe as well stay dry.

As a final note, the socks you use with your boots are really important as well, you will be spending a lot of time in them 🙂 so make sure they are a good compliment to your hiking boot.

Conclusion

When you’re searching for the best hiking boots for El Camino de Santiago, it is important to ensure that your feet will be adequately protected for the whole of your journey.

That generally means a sturdy pair of boots that are fitted with rigid inserts for protection. However, given the huge variation of the terrain over single trails and the length of time taken, if you are considering doing a long trip, you will probably want to take more than just one pair of boots.

Depending upon the season, the state of the trail and your fitness you may decide to change footwear for different sections, especially if you wish to take an occasional “day off” with less distance to cover and a gentler pace.

In short, the best hiking boots for El Camino de Santiago are firstly well worn-in, comfortable boots that will provide support for your feet over the many miles you will cover, with adequate protection and grip to prevent accidents and make tough sections easier, for an incredible journey that will be memorable for all of the right reasons.

As mentioned at the start, if you’re backpacking the whole Camino, we think the Salomon 4D GTX for men and for women, are a good choice. For travelling lighter we think the Lowa Renegade hiking boots for men or for women are the way to go. Check out our best hiking boots for men and our best hiking boots for women for some excellent options that will tick the box for the Camino.

We hope you found this useful! Buen Camino 😉

Fastpacking Gear List

Fastpacking is an increasingly popular type of backpacking that involves covering long distances at speed. A day’s fastpacking will usually comprise of sections of running, hiking and rest stops as necessary.

Fastpacking Gear List

Although certain trails might not lend themselves to actual running, especially at the start when your pack is fully loaded, fastpacking generally involves progressing at a faster than backpacking walk, with stretches of faster progression as and when you can.

In order to keep going at a brisk pace over several days your pack of course has to be light. However, heading out into the backcountry with just the bare essentials is dangerous and you’ll need to thoroughly plan where and how you can cut back weight.

Aside from meticulous route planning, you need to come up with a tried and tested fastpacking gear list. This will enable you to ensure that you have everything you need to stay safe and enjoy your time out on the trail.

Gear List

When you’re trying to cut back your normal backpacking gear list to go fastpacking, you may find you need to invest in more than just a new pack. It is essential that your pack for fastpacking is also durable as well as lightweight.

Presuming you have your pack already sorted, let’s take a look at what should be on your fastpacking gear list, to help you to lighten your load without compromising on your comfort and safety.

Note where possible, pack items that are dual or even multiple-use. If there are two of you or more, you will be able to split the weight of some of the heavier essentials between you, and may be able to take an extra luxury item or two.

As always, stay safe and test any new gear extensively before relying upon it out in the backcountry.

Weight

As a rule of thumb, 6-17 pounds (approximately 3 to 8 kg) is the general range of base weights for a three-day trip. Depending upon your location and time of year, you may need to add on a couple of extra pounds.

Typically on a backpacking trip, your pack is more like 24 to 35 pounds ( approximately 11 to 16 kg), so you can see the difference.

If you’re just starting out fastpacking we recommend doing a couple of local overnighters to see how you find the pace with the weight, which items you can live without and those you can’t.

Remember it’s important to be able to sleep comfortably to fully recharge for the next day, so if you think you’ll be fine without a sleeping pad, you would be best trying it out first, before committing to an extended trip.

Certain other items may also be season and location dependent, such as groundsheets, waterproofs and bear canisters.

Tarp or Tent

If the weather and terrain allow it, then you may be comfortable sleeping under the starry skies. However, in most cases you’re going to want to take some sort of lightweight, easy to set up tent or tarp.

ENO Pro Fly Rain Tarp

These can also be essential for areas prone to mosquitoes. Choose the most lightweight and least bulky. A tarp with trekking poles is a great space saver and allows a lot of flexibility in terms of set up. Tarptents are also excellent options reducing time needed to set up and providing greater protection.

Small two-person tents, at around 3 to 4 pounds (1.5/ 1.8 kg) in weight, can be great if you’re traveling with someone else and can split the weight. Get one complete with mosquito protection and groundsheet for an all-in-one sleeping solution. 

Sleeping Bag

Down is a popular choice as it is lightweight and easily compressed. Investing in an ultralight down sleeping bag will ensure your comfort, while keeping both volume and weight to a minimum.

While not good if it gets wet, you are unlikely to be going minimalist in poor conditions, better to keep your fastpacking for when the weather is favorable, at least when you first start out to get a feel for whats involved.

Check out our sleeping bag buying guide to learn more about the ins and outs of sleeping bags.

Sleeping Pad

If you’re planning on going ultralight, you may want to try sleeping without a pad. However, if you sleep much better with one you should get a lightweight, mini one designed specifically for fastpacking.

If you’re expecting cold weather, you will need a sleeping mattress for extra insulation from the ground, it’s the primary job of a mattress or pad.

Water & Purification

This depends on your location and resupply points. Fastpacking relies heavily upon planning to take the minimum amount necessary, without risking going short.

Drinking Water In The Heat

Start out with a full one-liter plastic water bottle and smaller drinking bottle and refill along the way. If you’re heading off into the backcountry, pack water purification tablets, a filter if needed and a collapsible water reservoir.

Always be sure to suss out in advance what the dos and don’ts are with regards to drinking water from rivers, etc. in the area you fastpack in. Be sure you follow guidance from knowledgeable local resources on how to treat water appropriately. Nothing will end your trip faster than drinking bad water!

Food

You’ll need a lot of calories fastpacking. Dehydrated meals offer high calories at a low weight and are easy to prepare. You’ll also need snacks to keep you going.

High energy bars and dried fruit are popular choices. Once again, know your route, if you’re passing near civilization for part of your journey you can stop to grab some quick food, meaning less packing and a lower weight to start with. 

Stove or Other Food Heating Equipment

If you’re in a group and can share the weight, then a small stove is an option. However, if you’re going solo, you may want to give it a miss, or try a water heater like the Jetboil for rapid hot water to heat and rehydrate ready meals.

You will have to pack fuel canisters too, however, its ease of use and speed is great when you’re tired after a long day’s fastpacking. Useful for boiling water too of course.

Clothes

Pack a change of clothes for the trail as well as another set for around camp with a warm layer. Clothes should wick well as you’re going to be sweating a lot.

Depending upon where you’re going and the time of year, you’ll probably want to pack a lightweight waterproof too. This can also double up as on-the-go mosquito protection.

Basic Essentials

Now that we’ve covered some of the key main items, below is a list of other basic essentials you should consider taking with you:

  • A map and compass are essential, even with today’s technology
  • You’ll also need a knife
  • Basic first aid kit
  • Bug spray
  • A headlamp plus spare batteries
  • Trekking poles if using a tarp or tarptent
  • Lighter or matches
  • Cell phone (depending on network coverage)
  • Eating utensils
  • Gaffer tape for emergency repairs
  • Cash
  • Basic toiletries.

Seasonal and Location Extras

If you’re heading out into bear country, you’ll need to pack a bear canister. Check area regulations about safe sleeping distances. Some trail camping areas provide bear lockers.

Rain wear, warm layers, a hat and mosquito netting may be advisable depending upon location and season.

Conclusion

Fastpacking requires a lot of planning and you’ll need to tailor your fastpacking gear list to your individual needs, and what’s available at your location.

Planning ahead is essential and can save you from carrying additional weight, whilst helping you to stay safe. Fastpacking is an excellent way to cover long trails in a shorter time, although it can be dangerous heading into the backcountry with only the bare minimum for survival.

As tempting as it can be to cut right back your load, pack responsibly and plan your fast packing gear list with care.

How To Clean Leather Hiking Boots

Good quality leather boots are definitely worth the investment. They keep your feet comfortable and offer great support over miles and miles of trails.

How To Clean Leather Hiking Boots

Leather hiking boots can last for years provided you take good care of them. However, if you don’t know how to clean leather hiking boots, you may find that they become brittle, lose their waterproofness and crack, drastically reducing their lifespan.

Keeping Your Boots in Good Condition

To keep your leather hiking boots in prime condition, take the time to regularly keep them free of dirt and prevent it from building up. Trapped dirt particles can have a highly abrasive effect, rubbing the surface of your boots like sandpaper, drying them out and breaking them down.

Always chose a recommended leather cleaner that is appropriate for your type of leather hiking boots. This is extremely important as other cleaners that aren’t specifically made for leather can cause irreparable damage, severely weakening the leather, removing its flexibility and waterproof capabilities.

Sometimes your boots will need a little more TLC than a quick hosing down. If you find that they’re starting to let in a bit of water, you can reproof them, so they’ll feel as good as new. After all, dry feet are happy feet.  Any scratches will need to be inspected for deeper damage and you can have any tears repaired by your local cobbler.

For worn out, tired-looking leather boots, try conditioning the leather after washing to soften it. This will restore moisture levels which will help the leather to remain flexible and waterproof.

As mud dries, it removes moisture from leather causing it to dry out. If you do a lot of muddy hikes and haven’t always rinsed your boots off, they’re probably going to need a good conditioning.

meindl-vakuum-gtx-hiking-boots-for-men-in-the-field-1

Cleaning Your Leather Hiking Boots

Below we list out the step by step instructions on how best to clean your leather boots, please note, we don’t recommend you do this every time, this is for a deep clean.

Typically, after an average hike, a good rinse and dry will be enough. A deep clean will only be needed from time to time though, use your best judgement to decide when.

1 – Remove laces and insoles

Before cleaning your boots, it’s essential to remove the laces to ensure you can get any trapped dirt out, an thorough all-over clean and the chance to wash your laces too.

Remove your insoles and wash as recommended if necessary. Even if your insoles don’t need cleaning, you’ll want to remove them anyway as this will speed up the drying process by preventing them from getting wet if left inside. 

2 – Brush off dirt

Take a shoe brush, an old dish brush or, my implement of choice, a toothbrush and remove any loose dirt from your boots before washing. Pay particular attention to any caked-on mud and the soles.

This step will make cleaning your boots much easier and allow the cleaner to take effect. It’s much easier to flick off dried dirt now than when moistening your boots.

This is also an ideal opportunity to inspect the condition of your leather hiking boots close up. Look for any damage, scratches that might worsen, or cracks and folding in the leather. If the leather seems dry and looks like it could be deteriorating, you’ll need to condition it after washing.

This will prolong your boots’ lifespan and keep them in good condition. Note, mud is the main culprit for dried out leather as it sucks moisture out if left on your boots for any length of time.

If possible give your boots a quick clean and rinse after each use, or at the very least, try walking through long damp grass or puddles to remove the worst of the dirt on extended trips.

3 – Moisten

Dampen a clean cloth or sponge and moisten your leather hiking boots. It makes sense to start higher up where they tend to be cleaner and work your way down to the soles. It can be quite difficult to get the surface thoroughly moist, so you might have to spend some time going over them slowly.

This is a good point to check if you’ll need to reproof. If you notice that the moisture is no longer beading or its seeping into the material as you start to dampen your boots, it’s probably time to reproof them after washing.

4 – Apply Cleaning Gel

Clean out your cloth or sponge and apply a leather cleaner like Gear Aid Revivex to your boots. Some come with inbuilt brush heads for convenience, but don’t forget to rinse it through after use.

Rub the cleaner into your boots and make sure that you cover all of the surface. If they are still pretty dirty you may need to use a nylon brush on them and maybe even rinse off and wash again.

5 – Rinse

Rinse off your boots, either with a cloth, sponge or slow running water. Be sure to remove all of the cleaning product. 

6 – Reproof or Condition (Optional)

If you noticed that your boots were in need of reproofing or conditioning, now is the time to do so, while they are clean and damp.

Reproofing

Apply your leather waterproofing solution to your boots following the instructions. Reproofing products vary depending upon the type of leather your boots are made from, so be sure to choose one that is specific to your type of leather hiking boots.

Typically, there are two main types, one for nubuck and suede-type leathers and another for full-grain leather. For maximum efficacy, be sure to apply the product all over your boots.

It helps to work all the way round continuously, for all-around protection. Leave to set for five minutes, or as recommended by the manufacturer, and wipe off any excess.

Reconditioning

Using something like Nikwax conditioner for leather is not required to be done after every use, but it is good to do this from time to time to keep your boots in tip top shape.

Leather conditioner will help to restore tired, dried out leather and prevent it from cracking. However, do not over-condition your leather hiking boots. Only condition them when they appear dry, as too much conditioner will make them soft and thus reduce the level of support they offer you. Note, only full-grain leather requires conditioning.

If you have new hiking boots you’re trying to break in, conditioning can help make them more supple and more comfortable during the first few hikes. Obviously, you aren’t going to need to wash them, so just dampen your boots until thoroughly moist before conditioning.

Apply the conditioner to your damp boots and rub it in with a cloth in small circular movements. Allow a few minutes for maximum absorption before blotting away any excess.

7- Dry

Once your boots have been washed, rinsed, and if necessary, treated, leave them to dry. To protect the leather and ensure that they remain in excellent condition for many years, it’s important to leave them to dry at a normal room temperature, preferably in an area with low humidity.

Do not use any form of direct heat source to speed up the drying process. Doing so can damage the leather and can cause it to crack, age and become brittle.

If you want to speed up the drying process or just get your boots out of the way quicker, place scrunched up newspaper inside them and remove and replace every couple of hours to absorb extra humidity. A fan can also help to decrease drying time.

Once your boots have thoroughly dried, replace the insoles and re-lace. If you’re not rushing to get back out on the trail in them, be sure to store them somewhere that temperatures remain stable. Avoid any hot, damp or unventilated storage places to keep them in their prime for longer. 

Check out the excellent video from REI below to see the whole process in action!

Conclusion

Good leather hiking boots are a worthy investment and with a little care, they can last for many years. It is pretty quick and easy to give your leather hiking boots a good clean over after a day of hard hiking, the only downside is the drying time if you’re looking to use them soon afterwards.

Regular cleaning will prevent dirt building up and damaging your boots, both through abrasion and removal of moisture, causing cracking. Now you know how to clean leather hiking boots and protect them from drying out, time to hit the trail and get them thoroughly dirty 😉

Strength Training For Hiking

Hikers tend to get good at hiking by hiking, you just get more accustomed to it over time. However, for anyone who’s ever struggled through a hike that was above their capacities or who doesn’t have the opportunity to hike as often as they would like to, strength training for hiking offers you a way to improve your capability away from the trail.

While you may think that you need to go to a gym to start hitting the weights, that isn’t the case. You can do a lot of very effective strength training using your own body weight.

Before continuing, it’s worth stating that for many reading this who are regular gym bunnies, all the stuff discussed will be nothing new to you.

However, if you have never done any strength and conditioning training before, please do take the appropriate precautions and discuss it with your health professional if required.

Please also note, that getting a personal trainer or signing up to a course in a gym that teaches you how to exercise properly, is a really good idea. Learning how to do body-weight exercises properly will not only make them more effective, but will also help ensure you don’t injure yourself from bad form.

I know they say ‘no pain no gain’, but keep that in context. Always remember, if you feel real pain, stop! It ain’t worth the risk of injuring yourself long term. OK, so with the health and safety piece out of the way 🙂 lets crack on!

Why Strength Training for Hiking?

There are many reasons you may benefit from strength training as a hiker. For a start, not everyone is lucky enough to live near a state park.

Big city dwellers may wish to improve their stamina for hiking while on vacation, but be unable to get to the great outdoors for regular sojourns into the hills. Relying upon hiking alone could leave them sorely out of shape and ill prepared.

Improving overall fitness and in particular cardiovascular endurance, alongside balance will enable you to safely take on more extreme terrain with confidence. Strength training can also improve joint integrity, essential for those difficult descents.

It can also improve confidence, balance and coordination. If you’re out of shape but are planning on a vacation with plenty of walking and hiking involved, strength training can really help you to get out there so you can experience the beauty and peace of nature with confidence.

Whilst, as referenced above, it’s true that there is nothing better than hiking itself, to train you for hiking, as nothing can replace experience, strength training combined with hiking can help you to really make the most of your time out on the trail.

It can help to push your boundaries further and condition you for challenging thru-hikes or for taking on one of the 58 14ers.

Strength training will also make you feel great in general, helping you to get in shape and build up your core. You’ll also be much less likely to get injured or take a tumble when out on the trail if you have a good level of core strength.

Cardiovascular Training

In addition to any strength training that you do for hiking, it’s important to also do a moderately intense activity 3-4 times per week for at least 30 minutes. This will help to build up your stamina.

You could go swimming, biking, running, as well as hiking. Variety will help you to stick it out and will engage different muscles.

To combine strength training with cardiovascular, make two of your four weekly activities hikes or brisk walks with a lightly weighted backpack. You can add more weight to your pack over time so that you’ll be able to carry your pack with ease out on the trail.

Exercises for Hiking

In this section we look at some exercises which are not only great for general fitness, but will also help with prepping for hiking trips.

Pull-ups

Pull-ups work out your core and abdominal muscles. They improve general strength and will help you to support a heavy backpack.

Make no mistake, these are hard! you may not be able to get one in the first time out. Don’t worry, you can build up using the support of a resistance band to get you there.

Basically you use a pull up bar and using your abs, raise your knees upwards towards your chest until your thighs are parallel with the ground.
It’s a really good idea to get help from a professional trainer if these are new to you.

Push-ups

If you can get to doing a few pull-up reps, you can nicely compliment these with a few push-ups to have a push pull thing going on, which is very effective.

Doing this, you will help you build up excellent strength!

Body-weight Squats

The trusty Squat is a great exercise, well known for it’s help in building core strength and strengthening leg muscles.

Stand with your feet shoulder width apart. You can place your hands behind your head or out front. This is your starting position. Begin by flexing your knees and hips, sitting back with your hips. Continue down to full depth and then reverse the motion until you return to the starting position. As you squat, keep your alignment good and push your knees out.

Mountain Climbers

Mountain climbers are a great all-body workout that will improve your core, back, arms and legs. This will improve your core and leg strength, making pack carrying and ascents easier.

Adopt a push-up position with your hands flat to the ground. Bring your left foot forward until it’s is just off touching your elbow. As you go to place your foot back, at the same time, all in one movement, bring forward your right foot so it nearly touches your right elbow. Repeat and slowly increase your time limit.

Lunges

Lunges are excellent for hikers, as they work out the quads. Strong quads are essential for those tricky descents. Lunges also work out all of your lower body, improve balance and coordination.

For a thorough workout complete 50 yards of lunges, then progress to doing it wearing a weighted pack, or incorporate lunges into your hikes for on-the-go strength training.

Find a gentle downhill slope and stand with your legs slightly apart. Take a large step forward with your right leg and make a 90-degree angle with your knee whilst almost bringing your left knee to the ground. Straighten up and bring your left leg forward to return to your starting position.

Step-ups

Step-ups primarily work out the quads and glutes which will greatly assist your ascents, descents and anywhere where the going is tough. They are also great for balance and coordination.

Using a sturdy box or bench, place your right foot on it. Then using your muscles in your right leg, bring up your left leg so you’re now standing on your box or bench. Step down with your right leg then your left. You can do 8 to 10 reps on one leg and switch, or continue alternating.

Balance Exercises

Balance is extremely important for hiking, so why not slip a few balancing exercises into your routine. These exercises will help improve your ankles and lower legs.

For optimum results, practice them out on the trail if you get out often or else work them into a walk, anywhere where the terrain is soft or uneven will add difficulty and greater efficacy. You might get a few raised eyebrows, but the results will be worth it.

Leg Swings

These are great for warming up and loosening out, as well as helping with balance.

Standing on your left leg, raise your right one a few inches off the ground. Swing your right foot forward then backwards, then to the right side, using your left arm for balance if necessary. Repeat with your right leg. You can experiment doing these side to side as well.

Jump Squats

These are a complimentary exercise for squats. Do these sparingly, definitely not every day! If you have any issues with them at all, stick with basic squats.

It might help to think of doing a slow-motion frog impression. Start with your feet apart in a squatting position, with thighs parallel to the ground. Keep your knees above your toes and chest up. Come up out of the squat and in doing so push up and jump. Land softly, regain your squat position and continue.

Conclusion

Strength training for hiking is an invaluable way to build up your muscles so you can really make the most of your time on the trail. It is simple, easy and free to do, and can also help to greatly improve your coordination and balance, minimizing the risk of injury.

Whether you want to get more out of your hikes or are planning for a thru-hike or long expedition, strength exercises will definitely improve your experience, confidence and ability.

Best Shirt For Desert Hiking

Hiking in the desert comes with its own unique set of challenges. Whether you’re planning a Death Valley trek, climbing at Joshua Tree National Park or even going overseas to places such as the Atacama Desert, you’ll need to be physically prepared and make sure that you have the correct gear.

If you’re not familiar with hiking in the desert, you may well struggle to find the best shirt for desert hiking. You’ll need to dress appropriately for maximum water retention, protection from the sun and to attempt to maximize your body’s ability to cool itself down.

Read on to find out what you need to wear and how your choice of shirt can help you to avoid overheating.

If you just can’t wait and want to know our recommendations fast, we recommend the Columbia PFG Tamiami II Long Sleeve Shirt and the Super Bonehead Classic for Men, as well as the Columbia Silver Ridge shirt and the Super Bonehead II Shirt for women. Note that the Bonehead shirts are made from cotton.

Desert Hiking

Deserts are very different to most other climates you’ll encounter when hiking. It’s not only the high heat that you will need to cope with, but also the low humidity.

When we get too hot we perspire. This layer of sweat on our skin cools us as it evaporates, however, with the combination of low humidity and high temperatures in the desert, sweat will vaporize almost instantaneously.

You will, therefore, not benefit from the cooling effect of sweating as you will not have the layer of moisture over your skin to evaporate, cooling your body as it does so.

As any sweat produced will be immediately vaporized, your body will not feel the benefit and continue to produce more sweat attempting to cool down, leading to extra water loss without effective heat loss.

Your clothing for hiking in the desert will, therefore, need to fulfill two main objectives: protection from the sun and maximizing the efficacy of perspiration.

Regular hiking clothes usually tend to wick moisture away from the body, to keep you dry. However, not only can this be somewhat unnecessary in the desert, but also a bit counter intuitive, as you really want to retain a maximum amount of water next to your skin to mimic the regular way in which you sweat in normal conditions.

Shirts for Desert Hiking

Shirts can be a good option for hiking in the desert, as they can fulfill several functions. For example, it’s easy to increase ventilation in a shirt, simply roll up your sleeves, or open a few buttons.

Shirts can also have specific functions built in to the material, like UPF protection into the material and so on. Let’s look at some of the main aspects you should consider, when looking for a suitable shirt for your hiking adventures in the desert.

Material

Contrary to regular hiking rules, cotton is in fact a good material for a desert hiking shirt. This is precisely so for all of the reasons that we are generally advised not to wear cotton in normal hiking conditions.

Cotton holds moisture and will therefore holds your sweat much longer in its fibers, than any man-made materials that have good wicking qualities.   

In the desert, this moisture retention can be used to our advantage. A cotton shirt, either soaked in an available water source, or wet through perspiration, will hold the moisture and allow the skin to cool off.

Hiker In The Desert

Moisture will evaporate allowing cooling of the skin through evaporation to take place, thanks to the cotton’s retention qualities. By holding moisture against the skin for longer, the conditions created will mimic those of sweating in a cooler climate, and reduce the amount of perspiration required to regulate body temperature.

On the downside, some people may find that the damp material against their skin can lead to chafing, or they may just find it uncomfortable. If this is your experience, you may want to experiment with cotton or non cotton blends (Nylon, polyester, elastane, etc.), which may still offer some moisture retention, although not to the same extent as 100% cotton.

This should keep you drier although warmer. In any case, as with any trek that ventures into a hostile environment far from civilization, you’d be well advised to take spare items of clothing and a change.

Other Things to Consider

Also, remember that it can get very cold very quickly in the desert when the sun goes down, so a wet cotton shirt could quickly become a liability if you have to stay outside overnight. Again, a change of top can help with this.

As already alluded to, you will also want to make sure that the shirt you’re looking for has a good UPF rating for protection from the sun’s rays. Cotton that has not been treated with UPF protection has a low UPF protection score, so be sure to check the manufacturer’s information for details of any additional treatments.

Fabrics with a dense, tight construction will reduce the amount of UV light that can pass through, as do certain chemicals and dyes that have been proven to absorb UV rays.

Breathability

You will need to look for lightweight, breathable desert clothing to keep air circulating. This will help your body to regulate temperature and stop your clothes from sticking to you.

As the body cools by moisture evaporating from the skin, you will need the fabric to breathe, to allow air to circulate to evaporate the dampness provided by your cotton shirt.

Fitting and Features

When you’re choosing a shirt for desert hiking, you should go for one that has a loose, baggy fit. This will encourage air to circulate and help your body to cool down.

When you have a good cotton shirt that retains moisture, you still need this moisture to evaporate so that your body can perform its regular cooling process by evaporation. The moisture that is held against your skin by the cotton will need air to pass to cause it to slowly evaporate.

Hikers In The Desert

When you’re picking a shirt for desert hiking, make sure that it has long sleeves. You will need maximum protection from the sun to stay cool and avoid the damage that the rays can do to your skin.

Any sleeveless tops and shorts can be worn, but be very careful, as you can get cooked very quickly in the desert sun! Better to keep them for when you’re back in civilization. As a general rule, cover as much of your skin as you can when hiking in the desert.

Remember, the more coverage you have, the safer and the cooler you will be. Make sure that the collar and neckline of your shirt will provide adequate protection. Ladies, in particular, pay attention to any lower fastening shirts.

You will need to apply sun block to any exposed areas and will definitely want to protect your neck with a bandanna or Buff, as well as a good sun hat. Choosing a shirt with a higher fastening neckline and collar will help to maximize your protection against the sun and prevent burning.

Ventilation

One very useful feature found on shirts for desert hiking are hidden air vents. Hidden air vents allow air to circulate without exposure to the sun, nor having to rely upon a large weave fabric, which will let in a large amount of UV rays. Combined with a loose fit, air vents will help you to stay cooler and more comfortable.

Color

Apart from being a matter of personal choice, color has an important role to play in keeping you cool. Lighter colors tend to reflect the sun’s rays, rather than absorb them, like darker colors do. The more light that an object absorbs, the more heat it will absorb, as light is essentially energy.

Black colored shirts will absorb all wavelengths with zero reflection. At the other end of the spectrum, white reflects all light wavelengths and therefore absorbs a minimum amount of heat.

Your back, chest and shoulders, along with your head of course, tend to get the most sun exposure depending upon the time of day. Selecting a light-colored shirt for your desert hiking trip is an easy, foolproof way to keep a little bit cooler with no effort or discomfort involved.  

However, do bear in mind that it is a good idea to have some part of your gear to be extremely bright, for emergency search and rescue, so if you have a great cotton shirt that’s a desert-like tone, make sure you pack, hat, or pants that are extra bright to compensate.

Your warm evening or overnight clothes you pack, could also be bright and used to draw attention in case of an emergency.

Recommendations

Below we list some shirts, all of which happen to be from Columbia, that offer all of the features you’ll need for effective protection in a harsh desert environment.

We’re giving two options, the first is the non cotton option, and our favorite, mainly as they’re more versatile for all types of hiking. The second shirt listed is our favorite cotton option, which is definitely worth a look too.

Our #1 Hiking Shirt Option For Men

This comfortable and airy Men’s PFG Tamiami II Long Sleeve Shirt from Columbia is a great choice for a desert hiking shirt. It has long sleeves and UPF 40 for added sun protection.

Its soft and functional construction will prevent sweat from quickly evaporating, helping to stop you from overheating. Vents enhance air circulation and ventilation, helping to keep you cool and comfortable as you hike.

Our #2 Hiking Shirt Option For Men

This comfortable and airy Super Bonehead shirt from Columbia is a great choice for a desert hiking shirt. It has long sleeves and UPF 30 for added sun protection.

Its soft, 100% cotton construction will prevent sweat from quickly evaporating, helping to stop you from overheating. Mesh-lined cape vents enhance air circulation for evaporative cooling.

Our #1 Hiking Shirt Option For Women

This Women’s Silver Ridge shirt from Columbia is a great choice for desert hiking. Comfortable and lightweight, it is made from Elastane and Polyester providing a comfortable fit.

The stretched fabric will ensure air flow for enhanced cooling through ventilation. It is available in a range of colors.

Our #2 Hiking Shirt Option For Women

This women’s Super Bonehead fishing shirt is another great choice for desert hiking. Comfortable and lightweight, it is made from 100% cotton.

The hidden back venting will ensure air flow for enhanced cooling through evaporation, as the cotton will retain the moisture from perspiration against your skin. Available in a range of colors.

Conclusion

When you’re looking for the best shirt for desert hiking, it’s important to go for one that will help prevent you from losing too much moisture too quickly.

Cotton, which holds sweat for longer, will help you to stay cooler, however, many people don’t like the feel of damp cotton and so nylon or polyester can be a better choice for them. The ideal desert hiking shirt will also be loose fitting, light in color and have a high UPF rating.

Don’t forget that although cotton is recommended for hiking in extreme heat with a very low humidity, in almost all other circumstances you’ll want to avoid wearing it for hiking.

Once the sun drops, be sure to change quickly into a dry, warm outfit as desert temperatures drop extremely low overnight and any dampness will very quickly lead to you getting cold.

How To Prepare For High Altitude Hiking

Whether you’re planning to tackle one of the 14ers or heading overseas to even higher elevations, it’s important to know how to prepare for high altitude hiking if you plan to head higher than where the human body is comfortable.

How To Prepare For High Altitude Hiking

Preparation is key and involves much more than just being in good shape. An appreciation of the dangers, an understanding of altitude sickness and knowing how to acclimatize are all essential knowledge you need to be familiar with.

High altitude hiking is a dangerous and difficult activity that is becoming increasingly popular, if you prepare correctly you can minimize the risks and savor the challenge.

What is High Altitude Hiking?

High altitude hiking is generally classed as hiking above an altitude of 8,000 feet (2,400 m). Air pressure is created by the weight of the air above it. The higher you go above sea level, the lower the air pressure becomes. This means there is less oxygen in every breath that you take.

At 8,000 feet the air pressure is sufficiently reduced that it can start to cause altitude sickness problems for those accustomed to living at sea level or low altitudes. Of course, the higher you go, the harder in can get as they oxygen gets less and less.

What are the Risks?

If you don’t prepare yourself correctly for high altitude hiking, it can be extremely dangerous and even life threatening. Extreme terrain, cold and isolation are just some of the factors that make these inhospitable altitudes dangerous.

You will be relying upon your fitness and judgement for your survival. Add a dose of altitude sickness, that can confuse and fatigue in its mildest forms, and the dangers become hugely multiplied.

One small mistake could cost your life. While not everyone is affected in the same way or severity, altitude sickness is most probably going to affect you at some point during your ascent even with careful acclimatization strategies.

How to Prepare Yourself

Although it’s difficult to really prepare for high altitude hiking without actually being there, there are several things that you can do before departure to ensure that you make the most of your time at the top, enjoying the views, rather than collapsing part way up.

Know your Limits

No one likes to waste a dream opportunity especially when it may involve wasting a lot of money on travel, but if you are not able to continue on all the way to the top on that trip of a lifetime to the top of Denali, you need to know when to stop.

Not only could you be putting your own life in danger, but also the lives of those with you and those of any rescuers. Spend more time acclimatizing and try again if possible, or enjoy a lower altitude hike. High altitude hiking is not for everyone and it should not be taken lightly.

Boost your Fitness

Hikers are generally very fit, however, when preparing to hike at high altitude there are certain workouts you should be doing in addition to regular hiking or other exercise to boost your cardiovascular performance.

Cardiovascular workouts improve the amount of blood pumped by your heart with every beat. This will maximize your use of the decreased amounts of oxygen you will be breathing at high altitude. Incorporate a moderate intense cardio activity into your exercise routine.

Another highly effective training method to combat the effects of high altitude is interval training. Interval training pushes you to your maximum heart rate for several minutes duration followed by a rest period. This will boost the maximum amount of oxygen your body can make use of during exercise.

Breathing Exercises

Finally, practice breathing exercises. It is important to be able to control your breathing at high altitude. When you’re out on the trail, some recommend practicing deep breathing to match your gait.

Having a deep breathing pattern can help you at high altitude, where you may have to coordinate smaller steps with deeper breaths as you’re acclimatizing.

Interestingly, I just finished a book called the Oxygen Advantage. There are very specific breathing exercises in this to mimic for high altitude training. I tried these out before heading to the Andes in Peru this year, and I think they helped. The interesting thing though, is that the authors advice runs contrary to the recommendation in the last paragraph re: deep breathing.

I’ve also just started a course to learn about the Wim Hof Method, which also employs deep breathing and, to the best of my knowledge, can help with hiking at high altitudes.

Confused? 🙂 Yes, I was too, but I am open to experimentation, and that’s what I recommend for you when it comes to breathing exercises for high altitude hiking. Have a go at a couple of different things like I have, and see what works best for you.

Acclimatize

Tempting as it may be to get going, it’s important to take plenty of time to acclimatize. This will help combat altitude sickness and give your body the change to adapt to the change. If you live at sea-level you’re more likely to be adversely affected than someone who lives in the hills.

Over time, your body will increase your breathing and heart rate, increasing the amount of oxygen you breath in and how fast it is pumped around your body.

Your cells will also slowly change to maximize their oxygen use. However, you will need to be patient. Not everyone adapts at the same rate, some people take much longer than others.

A successful strategy to combat altitude sickness without remaining stuck at the same level is to climb high and sleep low. This will allow you to make progress with your ascent, whilst descending to a safe height to sleep, giving your body the time it needs to adapt.

Using this strategy, you can climb higher than you would if you were going to make camp at that altitude and it is also safer as you already have camp set up at an altitude you’re acclimatized too, so you can descend to safety should you need to.

Precautionary measures

Make sure that you are psychologically and physically prepared. Check all of your gear over thoroughly and make contingency plans, in case of emergencies. Remember to find your pace and take it slow.

Get to know the signs of altitude sickness and the effects it can have upon you and your decision making. Remember when faced with an isolated, often hostile environment you’ll be relying upon your wits as much as your stamina to survive.

Headaches are often the first sign of altitude sickness and you may also experience fatigue, loss of appetite, difficulty sleeping or nausea. It is important to listen to your body and slow down sooner before these symptoms progress and you risk aggravating your condition. Returning to lower ground will completely stop the sickness at an early stage.

Medication

To help to alleviate the symptoms you may wish to take Diamox (generic name Acetazolamide). It comes with its own set of side effects such as tingling fingers, increased urination and in rare cases, blurred vision. However, it will acidify your blood, stimulating breathing and thereby increasing your oxygen levels.

You can get Diamox on prescription before leaving for your high altitude hiking and it may be worth trying it out first to see how the side effects are for you.

Normal painkillers can also help to relieve the headache you experience whilst acclimatizing, although they will be less efficient than usual and will not help with the actual problem unlike Diamox.

I have hiked at high altitudes a good amount of times now, and so far I have not had to use Diamox, so can’t comment from a personal point of view. That isn’t to say I wouldn’t use it, absolutely I would if it meant I could continue on a trip I have probably spent a lot of time and money to do.

Conclusion

Preparing correctly for high altitude hiking could save your life. It is important not only to be fit and healthy, but to prepare your body for a decrease in oxygen levels through cardiovascular and high-intensity interval training as well as breathing exercises.

If you still have any questions about how to prepare for altitude hiking, especially if you have any preexisting medical conditions, it is very important to have your concerns addressed by a health professional before you go. Remember altitude sickness can even kill if you are not sufficiently prepared and ascend too quickly without sufficient acclimatization.

It’s really important to stress again, that even with the best preparations, sometimes your body just reacts badly to altitude, and there is no set pattern.

What I mean by that is that, the first ten times hiking at high altitude you might be fine and have no issues, but on the eleventh time, you might react badly to it. There is no logical pattern to it, so always stay aware and put your health and safety first!

  • « Previous Page
  • 1
  • 2
  • 3
  • 4
  • 5
  • …
  • 16
  • Next Page »
  • Facebook
  • Pinterest

What are you looking for?

Copyright © 2025 · Cool Hiking Gear

Cool Hiking Gear is a participant in the Amazon Services LLC Associates Program, an affiliate advertising program designed to provide a means for us to earn fees by linking to Amazon.com and affiliated sites.

  • About This Site
  • Privacy Policy
  • Affiliate Disclosure Statement
  • Contact