coolhikinggear.com

  • Men’s
    • Best Hiking Rain Jackets for Men In 2024
    • Best Men’s Hardshell Jackets Of 2023
    • Best Hiking Pants For Men In 2023
    • Best Ultralight Rain Pants For Men
    • Best Men’s Daypacks For Hiking In 2023
    • Best Backpacking Backpacks For Men In 2023
    • Best Base Layers For Men In 2023
  • Women’s
    • The Best Hiking Rain Jackets For Women In 2023
    • Best Women’s Hardshell Jackets Of 2023
    • Best Hiking Pants For Women In 2023
    • Best Ultralight Rain Pants For Women
    • Best Daypacks For Women
    • Best Backpacking Backpacks For Women In 2023
    • Best Base Layers For Women In 2023
  • Hiking Accessories
    • Best Hiking Poles
    • Best Trekking Pole Monopod Camera Mount
    • Best Hiking Headlamps
    • The Best Hiking Watches In 2023
    • The Best Hiking Gloves In 2023
    • Best Hydration Bladders For Hiking In 2023
    • Best Compass For Hiking Our Top Picks
    • Cool Hiking Gadgets
  • Footwear
    • The Best Men’s Hiking Boots In 2024!
    • Best Hiking Shoes For Men In 2023
    • The Best Women’s Hiking Boots In 2023!
    • Best Hiking Shoes For Women In 2023
    • Best Hiking Sandals
    • Best Hiking Sandals For Women in 2023
  • Hiking Guides and Resources

How To Use Backpack Loops

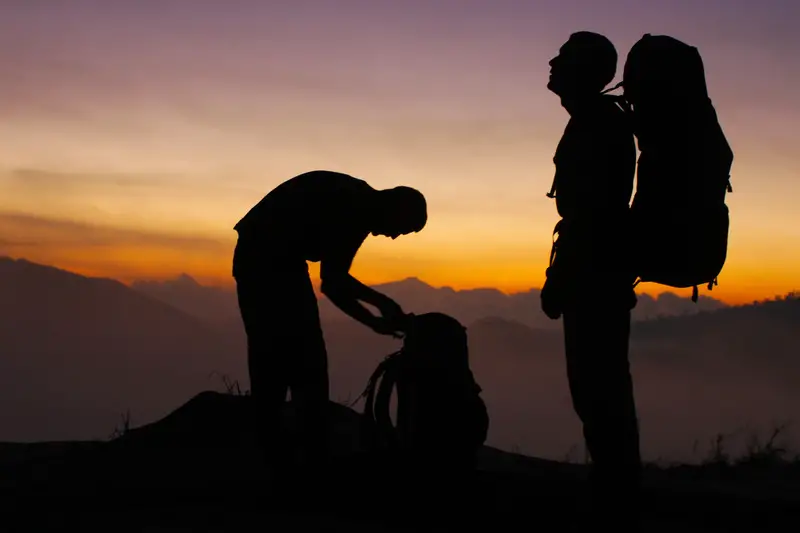
Once you know how to use backpack loops effectively, you can increase your backpack’s volume and prevent wet, smelly or dirty items from spoiling your clothes, sleeping bag and other gear.

How To Use Backpack Loops

Backpack loops are a great way to carry extra items, yet they should be used sparingly, you don’t want a huge extra weight sat at the back of your pack, nor any items that swing and could potentially cause a fall. Let’s take a look at the best uses for backpack loops and how to use them to your advantage.

If you are interested in learning about our top backpack suggestions, then please check out the best backpacking backpacks for men and the best backpacking backpacks for women. There are loads of excellent options available there!

What are Backpack Loops?

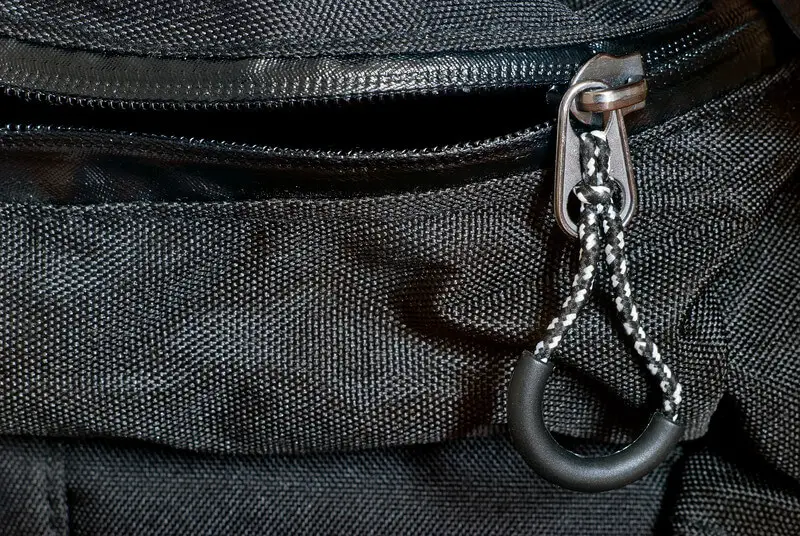
Backpack loops are webbing loops that are securely stitched into your backpack, allowing you to attach a variety of objects. Backpack loops can come in a series, known as daisy chains or they can also be individual loops located at various points around your pack.

Although reinforced nylon webbing is by far the most popular choice of material, thanks to its strength and durability, you may also come across finer plastic loops.

Backpack loops also come in a variety of sizes, some are large, ideal for attaching bulky heavy items, while others are very small and can be used for smaller items or to construct your own rigging to hold items in place.

How to use Backpack Loops

Most standard backpack loops allow you to simply clip on extra gear with a carabiner or a webbing strap. If you’re attaching heavy items it’s important to ensure that they are well attached and stable. It makes sense to attach heavy items to at least two backpack loops so they do not swing and put you off balance.

Some manufacturers include a series of small backpack webbing loops designed to be used with cord. If you’re looking to use them to carry soft bulky items, simply tie on some elasticated cord and interlace it across your pack.

This will create a custom rigging that will securely hold extra layers or other voluminous, squishy items. You can still clip them on for maximum security.

To create a custom rigging for heavier items, which will help stop them from swaying and bring their center of gravity a little near to yours, attach heavy items as per usual with carabiners or straps.

Then use a non-elastic cord to securely strap them in place by interconnecting your small backpack loops with the cord. Basically, this is like having an extra-strong, very large-weave, customizable mesh pocket, that will work with any item.

What can I use them for?

Backpack loops are designed to carry anything you don’t want to put inside your pack. This includes items that may be pointy or have sharp edges such as trekking poles or ice axes.

They are also ideal for reducing bulk within your pack, saving precious space for items that require more protection. Backpack loops are also great for attaching helmets that would otherwise take up an enormous amount of space in your backpack.

Attaching dirty items to your loops will prevent you from getting your gear inside your pack dirty. This also saves on time as you may need to reuse dirty gear several times before washing it, so you won’t have to stop to rinse it off and dry each time before repacking.

Obviously, the same goes for wet items. Attaching them to the outside of your pack will not only keep your other items dry inside, but it will also enable them to dry and prevent bad smells and bacteria from building up inside your pack.

This is a common site on the Camino de Santiago for example, where people often attach washed socks and so on to their pack, to dry as they hike. Dirty or wet items may include clothing, footwear, accessories and anything you may have just dropped in that muddy puddle.

You may also want to attach any items that smell strongly in your backpack, rather than placing them inside with your clothes and sleeping bag. This is especially true for stoves that may have retained some fuel residue, saving you from having to pack extra layers around it to contain the smell.

Frequent Use Items

Backpack loops are ideal for attaching frequent use items. One quick clip and your hands are free, yet gear such as your trekking poles or ice axes are just to hand when you need them.

Laminated maps, external pouches containing smaller items or snacks and water, even messenger bags are all typical examples of items you may want to attach to the outside of your backpack.

You may also find that any last minute, nearly forgotten items from camp are more conveniently clipped on and repacked later when stopping. Especially when travelling in a group and everyone’s ready to go. The same goes for shared items that you’re taking in turns to carry.

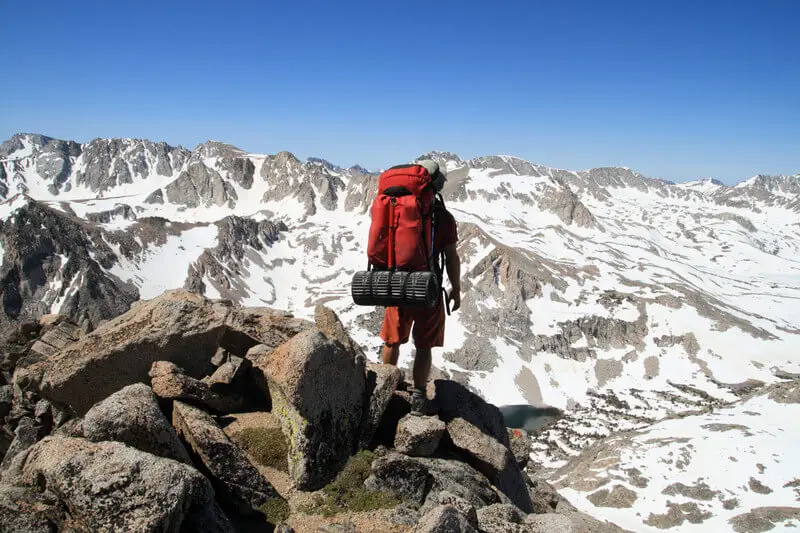
Many people also tie parts of their sleeping system, like a roll mat, to the outside of their pack as they can be quite bulky to carry and won’t fit inside a backpack well, if you use one.

Apart from attaching dirty, bulky, pointy, smelly and frequent-use items, backpack loops can also come in use to tie down your pack securely when traveling.

You’ll feel much more secure knowing your pack and gear are tied down on to a luggage rack for example or the back of a pickup. Heavy falling backpacks are not likely to damage your stuff, but they could concuss somebody or fall off a moving vehicle.

Disadvantages

Before you start attaching items to your backpack, it’s important to remember that heavy items need to be properly secured. Heavy items should really be carried inside your pack, close to your back and center of gravity.

Having a heavy item attached to the rear of your back is going to pull down on your shoulders and tip you back. So, if you’re thinking of going for any distance with a heavy item clipped on, you may want to think again.

Also, items that are clipped on, are prone to swinging and can destabilize you. This is especially true for heavier items. Apart from being irritating, this can be dangerous when you’re faced with narrow paths, inclines, descents and rocky, crumbling terrain.

Aside from causing slips and falls, swinging items can also cause your pack to chafe or give you shoulder ache.

Any bulky or pointy items that you have attached to the outside of your pack can also prove hazardous for other people hiking in your group and will most definitely slow you down.

This is particularly true in wooded, dense areas or narrow sections of trail where you may end up tangled up in the vegetation.

In summary, be sure that anything you attach to your backpack using backpack loops is secure and is not freely moving about.

Conclusion

Once you know how to use backpack loops correctly, they will become an invaluable feature that will save you time and hassle, keeping your pack better organized, cleaner and allowing you to fit in what you need most.

Whether you choose to attach gear such as helmets or ice axes, wet or dirty clothing, even other attachment points, the real benefit of backpack loops is their flexibility and ease of access.

Just make sure that you’re comfortable with any extras attached before setting off, rather than having to stop early on to attempt to repack stuff, that’s always a pain 🙂

Newdora Camping Hammock Review

Imagine you’ve been hiking all day and your legs and feet are throbbing to the point where they need to be elevated and rested. However, sitting down on a tree trunk or amidst the forest floor simply isn’t going to be comfortable enough.

This is where a hammock would come in handy, especially one designed as well as the Newdora Camping Hammock.

Newdora Camping Hammock Review

This unique device not only gives you a comfortable place to rest when you’re hiking on a trail, but it can also transform your backyard into a comfortable oasis where you can enjoy a book and the sound of nature.

Newdora Camping Hammock

With several different advantages, many unique features, and a few concerns to take into consideration, the Newdora Camping Hammock could easily become your most used item in your hiking gear.

Check out the Newdora Camping Hammock on Amazon

Check Availability on Amazon.

Pros:

  • Easy to set up, pack, store, and wash
  • Phenomenal for children
  • Lightweight and breathable
  • Easy to use in sandy and wet landscapes
  • Very high-quality stitching
  • Fits into a regular sized backpack or rucksack
  • Great for people six feet and under
  • Hanging accessories are included

Cons:

  • Hanging accessories may damage trees
  • Ropes are too short for wide set trees
  • Not recommended for two large adults
  • Stains fairly easily
  • Not recommended for nighttime use

Features:

  • Approximate Weight: 17 ounces
  • Color: A mix of sky blue and gray
  • Soft and silky material
  • Holds up to 600 pounds
  • Included carrying pouch
  • Multi-versatile design
  • Designed for one or two adults
  • All-year-round use
  • One set of steel carabiner
  • Two-meter long rope

A Detailed Look at the Product

  • Quality construction: One of the first things you’ll notice about the Newdora Camping Hammock is how soft and silky the material is. It’s constructed out of high-quality nylon parachute material, similar to the majority of high-quality hammocks on the market.
  • Highly portable: If you’re looking for an easy-to-carry hammock that can easily be packed up and won’t add weight to your existing hiking items, this entire product weighs only 17 ounces, making it quite easy to bring along on outdoor excursions.
  • High weight limit: Similar to other high-end hammocks on the market, the Newdora Camping Hammock can easily hold up to 600 pounds, as long as it is installed properly.
  • Included carrying pouch: The carrying pouch not only gives you an easy place to store the hammock when it’s not in use, but it can also be used as a beach bag, or a place to store your belongings while you’re asleep at night or taking a nap in your backyard.
  • Multipurpose: You’ll never run out of new and exciting uses for the hammock as it’s not only a necessity for hiking enthusiasts, but it can also be a great addition to your backyard. Not only is it something that adults will enjoy since your kids will love having their own place to relax outdoors or to hang out with their friends after school.
  • Designed for one or two adults: Depending on height and weight, this hammock can comfortably fit two adults side-by-side, but it’s the perfect size for multiple children as well. Depending on the amount of extra material you’d like to have, it can also be a phenomenal option for single users.
  • All-year-round use: Due to the high-quality nylon parachute material used during construction, you can guarantee that the Newdora Camping Hammock is easy to use during every season of the year. However, when it starts to get cooler, you might want to consider adding a sleeping bag or a thick blanket for added warmth.
  • Hanging accessories: Instead of having to buy all of the basic hanging materials needed for a hammock, they are included with your purchase. You’ll be able to take advantage of a rope and steel carabiners to assist with the hanging process. With that being said, it can be beneficial to buy a couple of extra pieces of hanging gear such as tree straps (to protect the trees) and reinforced carabiners (for added weight protection).
  • Set-up: Even individuals who have never had the opportunity to use a hammock before will find that the Newdora Camping Hammock is relatively easy to set up. It also comes with instructions to help guide you through the whole process so you can make sure the hammock is safe and secure.

Comparison

The performance of the Newdora Camping Hammock is surely put to the test once you compare it to another model on the market, such as the Winner Outfitters Double Camping Hammock. Although both models offer the same amount of comfort, there are a couple of differences to take note of before deciding between the two.

  • Double hammock design: The Winner Outfitters Double Camping Hammock is larger than the Newdora Camping Hammock, which makes it easier to hold more than one person at a time. Though the larger the hammock is, the larger it will be when packed away, and it also means that it will be heavier. Depending on your needs, you might want to choose a larger hammock for more than one person or a smaller one that’s more lightweight.
  • Weight restrictions: The Newdora Camping Hammock can hold 100 pounds more than the Winner Outfitters model, which is ideal for larger hikers or campers that need a comfortable place to relax.
  • Attached carrying case: One of the most convenient features of the Winner Outfitters Double Camping Hammock is that the carrying case is attached directly to the hammock, whereas the Newdora Camping Hammock’s bag is separate. An attached bag makes it easier to store your belongings in a convenient place, and it also helps make sure that the carrying case doesn’t get lost while you’re out on the trails.

Verdict

As a hammock that is designed for every member of your family and has multiple uses throughout the entire year, the Newdora Camping Hammock seems to be a great purchase.

No matter if you’re a hiking enthusiast or if you’re heading out on the trails for the first time, setting the unit up will be simpler than with other hammocks, especially with the help of the included instructions.

The high-quality parachute fibers and phenomenal stitching give you the durability you would expect from a hammock that you intend on using several times throughout the year, if not more often than that. Also, as it’s a full year-round hammock, you won’t have to worry about deterioration as a result of being exposed to the elements.

For a comfortable place to rest at the end of a long day, the Newdora Camping Hammock is a great option to have in your backyard or amongst your hiking gear.

What’s The Best Sleeping Bag For a Tall Man

The average male height is around 5 feet 10 inches, with the majority of sleeping bags aimed to comfortably accommodate a 6-foot man. So, if you’re taller than this, you may struggle to get a comfortable night’s sleep in a standard sleeping bag.

Sleeping Bag for a Tall Man

Fortunately, there are larger models available, they’re just not always that easy to find. Read on to find out how to evaluate what’s the best sleeping bag for a tall man and make your decision without compromise.

Standard Size Sleeping Bags

As mentioned above, standard sleeping bags for men tend to cater for a height of around 6 feet. However, even when purchasing a standard bag, many people often underestimate the amount of room that they actually need, not only in terms of length, but also width, with extra space on top if you tend to turn a lot in your sleep.

In fact, a standard size sleeping bag aimed at a 6-foot man should really have an actual length that’s around another 6-8 inches longer. This extra length is necessary to accommodate a sleeping person.

Think about it, when you lie down your spine relaxes and your feet point forward, so everybody, regardless of their actual standing height, is going to need at least an extra half a foot in terms of length.

If you’re a reasonably tall person and you’re thinking you will probably just about fit in a standard-size sleeping bag, you may want to do your calculations again, using your lying down length rather than your standing height.

XL Sleeping Bags

There are a number of larger sleeping bags readily available, they’re just not always clearly marketed. It helps to write out the measurements you need before starting your search and to check the manufacturer’s specifications in each case rather than relying on descriptions.

If you’ve now realized that you might need to go in for a larger-size sleeping bag after all, let’s take some factors into consideration to help you to make an informed choice in selecting your larger sleeping bag.

Fit

All sleeping bags are not going to be a perfect fit for everyone, we are all different sizes and have different preferences and styles of sleeping.

However, if you consider for one moment the actual purpose of a sleeping bag, as opposed to a quilt or blanket, you’ll realize it’s designed to keep warmth in by trapping a layer of warm air between your body and its fabric.

If the sleeping bag is too small, you body will crush the insulation and there will be less air storing the heat next to your body, so you’ll not only feel uncomfortable, but you’ll also lose a lot more heat.

If, on the other hand, your sleeping bag is too big, you’ll also lose heat as it will just escape. Ideally for maximum insulation, you need to have several inches space between your body and your sleeping bag to maximize warmth and comfort.

In other words, if you are very tall and the measurements just aren’t adding up, you may want to consider reading some customer reviews to find out how certain bags match up with certain heights. It’s always best to learn from other’s mistakes, when possible.

Value For Money

A larger sleeping bag is going to cost more, as it’s made from extra materials and takes slightly longer to make, whilst taking up more storage space. So, you should expect to pay more.

There’s also not the same amount of choice, and where there’s less competition, prices can be unjustifiably high. In other words, use caution. You’ll have to pay more, but it shouldn’t be a huge amount more, not unless you’re planning to get one made to measure that is.

Features

While there may be less choice than for standard models, you’ll still have plenty of options for different features, such as shapes and styles, fillings, zipper types and so on.

When you’re looking for a suitable sleeping bag and you’re worried it’s going to be a little on the snug side, make sure that you take any extra features into account. For example, a mummy style hood is going to more strictly limit the length of a sleeping bag than one without a hood.

Dimensions

Aside from the length of the sleeping bag, you’ll also want to consider its width. Even if you’re not at all bulky, if you are taking up a few extra inches in height, this is going to have an effect upon the width and the whole shape of the bag. A slightly wider sleeping bag will give you more room to turn over and move about, even if you’re reaching the maximum limit lengthwise.

Another consideration to bear in mind when choosing a sleeping bag for a tall man, is its folded dimensions. As longer sleeping bags will be bulkier, if you’re planning a hiking trip you may find you will need to factor in extra space to carry it, or you may wish to consider using a lighter model or one that stores into a more compact space.

Product Review – Teton Sport Celsius XXL

If you’re struggling to find a larger-sized sleeping bag, we’ve reviewed one of the most popular, reasonably priced ones. While the Teton Sport Celsius XXL is an entry level product, it does offer excellent value for money. So, if you’re hesitating over buying yourself  a sleeping bag because of your height, this would be a great one to start with.

At 90 inches long, the Teton Sport Celsius XXL is recommended for heights up to 6 foot 6 inches. With a width of 39 inches, you shouldn’t have to worry about your above average height restricting your width, even if you’re on the bulky side.

To find out more about its features, pack size and temperature rating, visit Amazon for the full product specification.

Conclusion

What’s the best sleeping bag for a tall man? If you’re over 6 feet tall then your best option is to look for a sleeping bag in an XL range or one created specifically for taller people.

If you are extremely tall, over 6 foot 6, you might struggle to find one suitably long, and you may have to consider camping quilts or a made-to-measure sleeping bag.

We hope you found this article useful. As always, if you did, please comment and share around your networks 🙂

How To Get a Backpack Zipper Unstuck

The humble zipper. Like many other inventions that are practically indispensable to our daily lives, we frequently overlook just how useful zippers are. That is, until they become stuck.

Backpack Zipper

If your jacket zipper starts playing up on the way to work, it’s annoying to say the least, but it’s not such a big deal.

However, if you’re miles from civilization, the weather’s turning and you’re desperately wondering how to get a backpack zipper unstuck, the situation can seem pretty serious. Let’s take a look at what may cause zipper malfunctions and some of the easiest ways to get stuck zippers unstuck.

Why do Zippers Get Stuck?

Zippers are, by their very nature, the most fragile part of a backpack. Backpacks are increasingly made from strong, durable materials, reducing wear and tear and extending their lifespan.

Although certain zippers may be stronger and more reliable than others, the mechanism remains the same, and where there’s a possibility of things going wrong, that possibility often becomes a reality.

Zippers are made up of a series of interlocking teeth on opposite side of the zipper tape. The slider, when pulled up or down, either locks the teeth together or forces them apart.

While the zipper’s design allows for quick and easy opening and closing, it is often subjected to a variety of situations that are likely to cause malfunctions.

Common Zipper Problems

Common zipper problems often come down to faulty manufacturing, or a poor-quality product. With a top-end backpack, this is less likely to be the case.

Zippers may also get stuck due to overstraining, trying to squeeze in that one extra piece of gear that just won’t fit while tugging hard on the slider pull. Over time this can deteriorate the regularity of the teeth’s alignment or the slider’s inner mechanism.

Aside from misalignment from straining, zippers, especially those used in hiking products, can get stuck because of dirt buildup.

Small particles like sand, earth, dust, grit and bits of vegetation can clog up the inner mechanism leading to a malfunction resulting in slider and teeth distortion. Fabric from either side of the zipper can also become trapped with similar results.

Ways to Unstick a Stuck Backpack Zipper

If your backpack zipper is refusing to budge, as tempting as it may be to start pulling hard to release it, it’s important to stop and assess the situation.

Is any of the surrounding fabric trapped? Was the zipper working fine up until now? Are you going to be relying on your backpack for the next few days?

Before possibly irrevocably breaking your backpack, taking the time to examine the problem can help to provide a solution.

Snagged Zippers

If the zipper is snagged on the surrounding fabric, gently try to reverse it. The more gently you can do this the less likely you are to cause any lasting damage.

Sometimes a good deal of patience will be required, holding the trapped fabric a millimeter to the left or right can help to release the slider while slowly reversing it.

Trapped Dirt

If you can’t see any obvious reason for your backpack zipper to be stuck, it could be caused by a buildup of trapped dirt within the slider. Try blowing hard to get any loose particles out before they cause any further problems.

Gently try to manipulate the zipper, stopping immediately if there’s any sign of it straining. You may want to try wetting or submerging the zipper area whilst gently jiggling it to remove any trapped dirt.

Other Scenarios

If the zipper is clean, there’s no trapped fabric (remember this could also be on the interior), then your zipper may be faulty. Some people recommend greasing zippers, and you could try it if you happen to have any kind of lubricant to hand.

However, this can often be a bad idea as it can attract dirt and grit causing them to stick inside the zipper, making the problem worse, or creating a new one. However, this is a great last-ditch option and could save your backpack.

If your backpack zipper is well and truly broken you should consider your options and upcoming needs before breaking it further.

If you’re going to be relying on your backpack for the next few days, you should consider cutting through from another internal compartment with a functioning external zipper if possible. This will maintain the integity and functionality of your backpack, enabling you to continue your hike with the least inconvenience.

If this isn’t possible, decide if you want to rip or cut open your backpack at the zipper opening and try to replace it later upon returning home, or if there’s another more convenient place to cut into your backpack.

This opening should be created in a position where it would be easier to tie or somehow fasten shut for the rest of your hiking expedition.

Replacing and Mending Broken Zippers

It can be a waste to throw away a good backpack because of a broken zipper. Zippers themselves are relatively inexpensive and if you can’t fix the zipper yourself, you should be able to find a local company that can replace it for you.

If your zipper is faulty, you may be entitled to a new backpack under your manufacturer’s guarantee. In any case it’s often worth contacting them, you never know, they might at least offer you a discount even if the product itself wasn’t faulty.

How to Avoid Future Zipper Problems

Zipper problems often occur because of misuse, by taking good care of your zipper you will reduce the chances of it getting stuck and extend your backpack’s lifespan.

Helpful hints to keep your zipper from sticking:

  1. Don’t overfill your backpack. Not only is it going to be heavy, trying to squeeze in extra items will strain the zipper. Plan before packing.
  2. Always open the zipper fully when putting your stuff inside. You may just need to quickly slip a container in, but if the opening isn’t wide enough this will cause the teeth to tear apart and increase the likelihood of your zipper getting stuck in the future.
  3. Don’t ever force your zipper, you will cause it to become (even more) stuck. If you’re not the patient type and you don’t urgently need access to your backpack contents, give it a few minutes and try again later.
  4. Clean your zipper after every hike, especially in dirty conditions. Give your backpack a good shake out and wipe over in accordance with the manufacturer’s recommendations.
  5. Pay attention to the quality of zippers, their positioning and how well they function on future purchases. When possible try before you buy or ask questions online.

Conclusion

It’s not always easy to figure out how to get a backpack zipper unstuck, but a bit of patience and common sense can make all the difference and may save your backpack from unnecessary destruction.

If not, you might just have to make the best of a bad situation and look forward to treating yourself to a new backpack, there are worse things that could happen 🙂

How to Set Up a Hammock: A Five-Minute Tutorial

How to Set Up a Hammock: A Five-Minute Tutorial

If there’s one question among new hiking enthusiasts that folks are not sure of, it’s “How am I supposed to set up my new hammock?” There are over 100 different ways that on how to set up a hammock at home and camping sites, but learning the basics of safety, security, and comfort is the first step before you start to get creative.

With the help of this speedy five-minute tutorial, you’ll finally be able to say you know how to set up any hammock not only in record time, but without any confusion as well.

How to Set Up a Hammock Securely?

Step 1: Measuring Distance

After you’ve found the perfect place to hang your hammock, it’s important that you first measure the distance between the two trees, posts, or whichever you use, that you want to use for the hammock.

This is not only going to let you know whether it’s long enough but also how much sag you’re able to adjust in the bottom of the hammock.

There are two ways that you can measure, and that is either with tape or with your own feet. For a faster setup, you can just take as many steps as necessary between the two ends to determine the distance. For the sake of this tutorial, let’s say you have 10-15 feet of space available to you.

Step 2: Tethering the Straps and Ropes

The next step will be to install the straps and ropes that are responsible for keeping your new hammock above the ground, and this is also where most novice installers might feel a little overwhelmed. In all reality, tethering the straps and ropes only takes two steps and a little bit of attentiveness.

First, you’re going to want to make sure that the straps are secured around a hefty branch or the trunk of the tree or solid posts. It’s recommended that you use the straps and not just the rope as it gives you extra resistance and it will also protect the bark on the tree.

Once your straps are in place, you can then thread the rope through the strap, making sure that you insert the non-looped end of the rope first. You will then bring the non-looped end of the rope through the loop and pull it slightly snug.

The next step is that before you completely tighten the rope, make sure that the straps are at shoulder height, as this prevents your hammock from touching the ground once you get into it and it will also make sure it’s not too high. You will then need to repeat step two for the other tree or post you’ll be tying your hammock to.

Step 3: Installing the Hammock

The vast majority of hammocks will either have a hook or a carabiner at each end which you will use to connect it to the ropes that you have just hung.

If your hammock rope already has notches in it, all you have to do is hook the hammock into the notch. However, if you do not have preinstalled notches, you’re going to need to tie the rope through the hook or the carabiner with a very tight knot, ensuring that there isn’t any slippage or give.

Step 4: Climbing into the Hammock

The next step is when you’ll finally be able to test whether you learned how to set up a hammock correctly, or if you’re going to have to repeat the above steps again.

If you find that the hammock isn’t as stable as you hoped it would be, don’t worry since all you have to do is either follow the previous steps to set it up again and take a look at the tips and tricks for setting up a hammock below.

To get into your hammock, you’re going to want to put your knee in the middle of the bottom curve, balancing on your other foot. You’ll also want to use both of your hands to keep the hammock stable so that you can lower yourself in face down. You can then roll yourself over (gently) until you are lying on your back.

The more often you get in and out of your hammock, the easier it’s going to be to use and eventually you’ll get to the point where you can teach other people how to get in safely.

What are Some Tips and Tricks for Setting Up a Hammock?

Now that you have a clear idea of how to set up your hammock, it’s important to take note of these tips and tricks that can make the process easier.

Tip 1: Finding the Ideal Height

If you’re having a little bit of extra trouble with trying to figure out how high your hammock should be off of the ground, you can boot up the internet and do a quick search for a hammock hang calculator.

There are free browser-based apps that help you to find where you should affix your tree straps so your hammock can sway peacefully in the wind.

Tip 2: Angling the Suspension Rope

Once you have placed the straps and tethered the rope, for even more security while in the hammock, try angling the ropes to where they’re at a 30-degree angle from ground level.

This will help eliminate any discomfort, give you the perfect amount of sag, and protect the integrity of your hammock over years of use.

Tip 3: Achieving a Deep Sag

If you’re worried about falling out of the hammock, it could be as a result of it being pitched too tightly, meaning that there’s little to no material left over to keep you protected.

The deeper the sag of your hammock, the more material you’re going to have to make sure you’re not going to roll out at a minute’s notice. Also, sleeping diagonally can help prevent the likelihood of spinning out of the hammock as well.

Our Final Thoughts

As long as you have a little bit of patience and perseverance, hanging a hammock is as simple as one, two, three, especially once you get a lot of experience with using the one you have.

At first, you’re bound to make a couple of mistakes, but as long as you follow this tutorial step by step, you’ll find that pitching your hammock is easier than you ever imagined, and it’s certainly something that you’ll be able to teach every member of your family to do.

Best Hiking Hammock: Our Top Picks for Outdoor Comfort

If you take the time to imagine a backyard oasis, you’re sure to think of a hammock, but there are plenty of other uses for these convenient pseudo-beds, especially when it comes to adventures in the outdoors.

Best Hiking Hammock: Our Top Picks for Outdoor Comfort

If you’re in the market for the best hiking hammock, you’re going to want to find a model that adapts to your needs in order to experience the most outdoor comfort as possible. In this guide, we’ll review our top three picks for hammocks and what they have to offer.

If you are in a rush and just want to know our top recommendation, we think the Wise Owl Oufitters Hammock is a fantastic choice.

1. Wise Owl Outfitters Hammock

Check out the Wise Owl Outfitters Hammock on Amazon

Check Availability on Amazon.

Pros:

  • High-quality stitching without fraying
  • Extra material can be used for bug protection
  • Thin and breathable material yet strong and durable

Cons:

  • Might feel snug for people over 200 pounds
  • Instructions are difficult to follow for beginners

Product Description

For optimal relaxation and the feeling of stability and safety, the Wise Owl Outfitters Hammock is another one of the best hiking hammock models designed for your rucksack or bug-out bag. The entire unit is constructed out of 210T parachute nylon which helps to add to its resilience without compromising comfort.

Unlike other hammocks, this unit is designed for one person since it is nine feet in length by four and a half feet wide. As an added benefit, it only weighs 16 ounces and can easily be stored, as it resembles the size of a grapefruit when packed.

Another phenomenal feature of the Wise Owl Outfitters Hammock is that it comes with two eight-foot ropes, giving you more than enough space to tie your bed up absolutely anywhere off-trail when you’re setting up camp.

Summary

As an experienced hiker who has used a hammock before, you’ll love the Wise Owl Outfitters Hammock as it excels in comfort, durability, and reliability.

On the opposite end of the spectrum, beginner hikers should try setting the hammock up a couple of times before heading out on the trails to make sure they thoroughly understand the setup instructions.

When compared to other hammocks on the market, this model makes it easier for larger and taller people to fit, but it’s not recommended for all individuals over six foot four and 200 pounds.

In the event that you have extra material on the sides of the hammock, it can easily be pulled over your face for additional bug protection.

If you’re in the market for a compact, durable, and high-quality hammock with no signs of fraying, poor stitching, or loose strings, the Wise Owl Outfitters Hammock is a great option.

2. Legit Camping Double Hammock

Check out the Legit Camping Double Hammock on Amazon

Check Availability on Amazon.

Pros:

  • Comes equipped with all necessary hardware
  • The bag is attached to the hammock for easy storage.
  • Adaptable to many sized tree trunks
  • Comfortable, soft, and lightweight fabric with extra durability

Cons:

  • The rope may fray because of the rough carabiners.
  • Tree straps will stretch with heavier loads

Product Description

If you’re someone who enjoys camping with a companion or even if you want a little bit of extra room at the end of a long day, the Legit Camping Double Hammock is the ideal piece of equipment.

Designed to withstand up to 400 pounds, you’ll easily be able to relax at the end of your hike or if you’re interested in taking a quick break.

What makes the Legit Camping Double Hammock so innovative is its grab-n-go design that includes the hammock, a small sack, steel carabiners, tree-friendly straps, and a rope. Everything can easily be packed into the small sack so that the kit is readily available for whenever you need it.

Another feature you’re sure to appreciate is its easy-to-use design that is incredibly simple to setup and gives you more comfort than you would expect, especially as it’s constructed out of military-grade nylon for extra support.

Summary

The Legit Camping Double Hammock offers comfort and more than enough room for two people to sleep while out on the trail, but the closer the load on the hammock is to 400 pounds, the tree straps are likely to permanently stretch.

With that being said, you will appreciate the versatility of the straps as they can be used separately for thinner tree trunks and used together for larger trunks.

All the hardware that you’ll need for setup is included with the hammock and can easily be stored in the carrying bag that is conveniently attached to the entire unit. Setting the Legit Camping Double Hammock is easier than you would expect, especially as a beginning hiker.

3. WoneNice Camping Hammock

Check Availability on Amazon.

Pros:

  • Comfortable and spacious for people over six feet tall
  • Triple-stitched seams make the material feel more secure
  • Easy to fit two children beside each other

Cons:

  • Doesn’t block the wind
  • Tension is poorly placed in the center of the hammock

Product Description

Constructed out of parachute silk, the WoneNice Camping Hammock is a great choice for someone who is looking for a quick and easy hammock for weekend outdoor excursions or backyard relaxation.

What sets this design apart from the rest is that it’s not only fast-drying and resistant to mildew, but it’s also incredibly breathable.

Aside from the parachute silk used on the body of the hammock, you’ll also have braided nylon rope with a special strengthened inner core that helps to keep the ropes as strong as possible, even with consistent setups and tear-downs.

Also, the WoneNice Camping Hammock is specifically designed to be easy to carry with the help of the compression bag.

When it comes to hiking with people above 300 pounds, you’ll finally have a hammock that you can feel comfortable in as this model can hold up to 500 pounds in the sleeping section, 1100 pounds with the nylon rope, and 880 pounds with the galvanized steel carabiners.

Summary

The WoneNice Camping Hammock is one of the great hiking hammock models that your whole family can use and enjoy as it is not only great for short and tall adults but multiple children as well.

Another feature that sets it apart from the competition is its heavy load-bearing capabilities, making it adaptable to every type of outdoor enthusiast.

The high-quality triple stitching and overall construction make it feel very sturdy and reliable, which is essential for first-time hikers who are setting up their camp. Also, it’s quite simple to install with the help of the included equipment, such as the tree straps and carabiners.

However, if you intend on using this hammock in cooler weather or a windy area, you’re going to need to rely on a sleeping bag or large blanket for additional warmth as the breathable material also lets plenty of wind through.

Conclusion

There’s a high probability that you’re going to use your hammock for more than hiking trips, which is why you need a versatile model that is adaptable to all types of weather and other outdoor conditions.

The Wise Owl Outfitters Hammock is by far the best hammock on this list as it not only excels in build quality, but it also gives you a warm, comfortable, and safe environment to rest your head at the end of a long day.

It’s durable parachute nylon construction with rugged carabiners, and reliable tree straps give you a relaxing yet sturdy build that you can rely on and you won’t have to worry about being affected by cool winds once the sun sets. You’ll also appreciate how simple the hammock is to set up once you’ve used it a couple of times.

For a great family-friendly hammock that can be used for a wide variety of occasions, the Wise Owl Outfitters Hammock is the top-tier choice and recommendation for all outdoor enthusiasts.

Snugpak Chrysalis 3 Sleeping Bag Review

Today I wanted to take a closer look at a very functional sleeping bag I bought a while back, the Snugpak Chrysalis 3. I have used it out in the field numerous times now so thought a review might be useful if you’re thinking of purchasing it.

Please note, this product may no longer be available.

Check Availabilty on Amazon.

Pros:

  • Functional and Comfortable
  • Excellent price and value for money​

Cons:

  • If you need something more specific and specialized, there are better options out there, but more expensive of course

Snugpack Chrysalis 3 Features Summary

  • Outer Fabric: Paratex Micro​
  • Inner Fabric: Paratex Light
  • Filling: Softie and Reflectatherm​
  • Weight: 1600g including compression stuff sack
  • Left hand zip​
  • Built-in LED torch
  • Expansion system adds 12.5 cms width if necessary
  • Clips shorten the bag from 220 cms to 175 cms
  • Mummy shape
  • Weight: 1600g (including stuff sack)
  • Shoulder width: 75 cms (87.5 cms with expander panel)
  • Foot width: 32 cms

Overview

As mentioned, a while back I was in the market for a new sleeping bag. My main priorities were function, comfort, size and price. I do backpack, but mainly over the summer.

However, I needed my bag to be able to handle cooler temperatures for a mountain leader assessment I was doing in late October, so it needed to be able to cope comfortably with 23 degree F (-5C). I wasn’t expecting to be sleeping out in those specific temperatures, but definitely in and around 30 degrees (-1C).

As mentioned, I wanted function and comfort first and foremost. I also had pack-ability high on my list.

That is, I needed a bag that would provide said function and comfort, but without it being too bulky, heavy and awkward to carry into the hills in my pack. To top all that off, in terms of requirements, I didn’t want to break the bank.

There are any number of super sleek and lightweight bags available out there, designed for use in very specific conditions e.g. very cold temperatures. However, that kind of functional capability comes at a cost and you can easily move into the realm of hundreds of dollars very quickly.

So, after some searching, with these requirements in mind, I came across the Snugpak Chrysalis 3 sleeping bag. It had reasonably good user experience reviews and on first view, looked to tick all of my boxes above.

So, with that in mind, I bought it and have been using it for a while now. Let’s take a closer look at it based on the category specific needs I had.

Function and Comfort

Obviously top of the list, I needed a bag that would be functional and do what it says it will. As already mentioned, I needed it to have a decent comfort rating, being able to comfortable handle 30 degrees (-1C)..

The Snugpak Chrysalis 3 has a comfort rating of 23 degrees F (-5C) / low 14 degrees (-10C), so it definitely met my needs. I approach this requirement in a basic way.

If I need 30 degrees F (-1C) I will aim for a comfort rating, comfortably below that, so in this case I need 30 degrees F (-1C), I aimed for 23 degrees F (-5C), giving a decent cushion should I get caught out.

Note, I am referring to the comfort rating here, not the ‘low (aka ‘extreme’) rating. The low or extreme rating is meant to be the absolute maximum you can use the bag in, but I never operate from it.

If you want to learn more about comfort, extreme ratings, etc. check out this post on the basic process of choosing a sleeping bag.

So, to conclude for this sub requirement, the Snugpak Chrysalis met my needs comfortably (no pun intended 🙂

Size and Packability

The next thing, in terms of function, which was important to me was size and packability. The listed weight is 1,600 grams / 56 oz. It does weigh in and around this.

This range is not ideal to be honest, could do with being lower, but it worked well with my other gear when packed into my pack, falling below my overall max target weight for my bag.

Snugpak Chrysalis 3 in Pack 2

The bag comes in a compaction sack, as shown in my one above, which is big enough. However, this works out fine when packing for a trip, as I utilize the grey tighten straps on the compaction sack, all around the sleeping bag pack to pull it down to as small a size as possible.

This means it comes in and around a packsize of 21x21cm, when fully compressed. That is compact enough for me and falls comfortable within my capacity target for my pack.

Snugpak Chrysalis 3 in Pack 3

In terms of size, it’s a one size fits all approach, so it should be good for most folks, as the bag extends out to 220 cms. I’m 6 feet tall, and it works great for me.

The bag itself is a mummy bag, my personal preference for backpacking, so it is tapered at the bottom to minimize the space it needs. It’s shoulder width runs to 75 cms (87.5 cms with expander panel) and foot width runs to 32 cms.

Snugpak Chrysalis 3 Hood

The quilted top of the bag is tailored, pleated, and fitted with a drawcord so it pulls into shape, rather like a jacket hood. The bag is closed up with a zip, as shown in the image below, which is on the left hand side. It works well for me to date and I’ve had no issues with it.

Snugpak Chrysalis 3 Zip

Material

In terms of material make-up, the outer fabric is Paratex Micro which is tough, lightweight, windproof and water repellent. Paratex Micro utilizes closely constructed fabric and is exceptionally hard wearing but still remains soft to the touch.

The inner fabric is Paratex Light which is also lightweight, windproof, water repellent fabric which is also breathable and able to wick moisture away from source. In my experience of it, it’s soft on the skin and pleasant to touch.

The filling is Softie and Reflectatherm, Reflectatherm, and this metallized fabric is designed to retain heat and warmth. It’s also a highly breathable material, which adds little to the weight or pack size.

Softie, is the Snugpak brand name for their exclusive synthetic (Polyester) filling. It utilizes superfine yarns bound with special resins to produce a luxurious down like feel.

It is created from staple yarns which mirror the compositions of natural insulation. In practice, I have found them effective, and I have felt very snug and warm when using the bag.

Snugpak Chrysalis 3 Light

The bag also comes with a built in LED torch. This is a nice idea but not something I needed as I typically use my own headlamp. So, just from force of habit of using my headlamp, I haven’t ever used it in the field as such. It seems to work fine though.

Price

This was what really caught my eye, as the Chrysalis 3 was a wallet friendly price when I bought it.

I think for my basic backpacking needs across the year, the Snugpak Chrysalis 3 is excellent value for money. It is functional and does all the basics well and at that price, I couldn’t say no!

Best Uses

Overall, the Snugpak Chrysalis 3 is perfect for short backpacking or camping trips. It will fit in a backpack and so it’s easy to carry into the hills.

Aside from that, it’s a perfect extra sleeping cover for someone around the house, should you have an extra guest that needs to make use of your couch for example!

User Reviews

Based on various user reviews, as of the publishing date of this review, the Snugpak Chrysalis 3 Sleeping Bag averaged 4 stars out of 5 across various retailers, by my calculations.

Great scoring, and the user reviews I read referenced the same plus points that I found, including value for money.

Our Rating: 4 (Out of 5)

Conclusion

If you’re planning to head off on a 6 week exhibition through the Amazon, the Snugpak Chrysalis 3 Sleeping Bag is probably not going to do the trick 🙂

However, if like me, you like a bit of backpacking across the year, mainly Spring to Autumn, in temperate climates, then the Snugpak Chrysalis 3 could be just the ticket.

It’s a basic but functional sleeping bag that won’t break the bank. It’s sturdy enough so you should get plenty of use out of it, so for $65.00, it’s hard to see how you can go wrong. An excellent and functional sleeping bag, that in my opinion offers great value for money.

If you’re completely new to buying a sleeping bag, remember to check out the article on how to select a sleeping bag. I hope you found this review of the Snugpak Chrysalis 3 Sleeping Bag useful, if you did, please like, share and comment!

What’s the Best Way to Pack a Tent for Backpacking?

A while back I did a post on what I take on a weekend backpacking trip and in that I referred to a simple tip on how I pack my tent which I thought I would expand on more here.

Backpacker Packing A Pack

I often see people when I am out backpacking with tents attached to the outside of their pack. There is nothing wrong with that per se, but there is, I think, a better way to pack and carry your tent for backpacking.

Now, this only really works for a one person tent or an efficient, in terms of size and bulk, two person tent. A Tent will typically come in a package like the one in the image below, pictured below is the Wild Country Zephyros 1 person tent.

Wild Country Zephyros 1 Tent in its Pack

This is oftentimes attached to the outside of a backpack as referenced above. Now, I even did that myself when I first started backpacking but I soon noticed that having it on the outside could lead to potential issues.

For example, walking through trees or bush growth, the tent on the outside can easily get snagged and pull you off balance. Not ideal with a heavy pack, especially if you’re going down or uphill over a tricky area of terrain.

Definitely not the time for taking a tumble due to your pack being caught on a branch and knocking you off balance.

What’s Best to do

Ideally, you want your backpack to be as tight and streamlined, in terms of profile, to your body as possible. The simple reason for this is that enables more stability in terms of your center of gravity.

If you have a tent hanging off the back of your backpack, it can mean more of an off balanced counter weight which can easily knock your center of gravity off should you have to maneuver quickly.

To avoid this, unpack the tent into it’s parts. Take the flysheet and groundsheet (oftentimes these will be one in the same) and stuff them down in the bottom of your backpack.

When you backpack, setting up your tent is likely to be the last thing you do when you get to your desired camping location so you don’t need it before you get there, so sticking it into the bottom of your pack is perfect.

When you’ve done this, pack up the rest of your pack up with the rest of your gear. When that is done and dusted, take the other parts of your tent, typically a pole bag, peg bag and a basic repair kit, and stuff them down the sides of your pack alongside the rest of your gear.

Now you have all your tent nicely packed tightly away into your backpack with no need for an outside attachment. This will only help you in terms of stability by better supporting your center of gravity, and it will help prevent any snagging and the like with trees, bushes, etc.

You also have the added advantage of not carrying any needless tent packing bags which you have no real use for. I of course keep those at home to pack my tent away for storage in my house.

Conclusion

I hope you found this simple tip on the best way to pack a tent for backpacking useful. This is, in my opinion, the best and easiest way to pack a tent for backpacking. I prefer internal frame backpacks, so I am not a fan of having things hanging outside of my pack for the reasons outlined above.

Overall, in my opinion, it provides a more functional and easy way to hike while backpacking and ensures you don’t waste any precious space in your pack.

I have found over the years that backpacking for me, is a consistent exercise in trying to pack less and less, so as to avoid carrying anything that has no specific purpose or function for me in the mountains.

Wild Country Zephyros 1 Person Tent Review

A while back I needed a new tent. I was looking for something I could take with me on hikes so my main requirement was for backpacking.

A decent three season, one person tent ideal for short backpacking trips, the Zephyros 1 is functional and easy to use.

Please note, this product may no longer be available.

Check Availability on Amazon.

Pros:

  • Affordable price
  • Easy to pack
  • Easy to assemble to use
  • Decent stability and weather protection

Cons:

  • Not many features e.g. storage pockets etc.
  • Supporting end poles aren’t great
  • May be too warm for camping in hotter summer temperatures

Wild Country Zephyros 1 Features Summary

  • ​Season Rating Spec: 3 season backpacking
  • Free standing?: No (tent requires guy lines to be pitched)
  • Minimum Weight: 1.41Kg (3lb 2oz)
  • Packed Weight: 1.57Kg (3lb 7oz)
  • Pitch Time (estimate): 5 mins
  • Number of Porches: 1
  • Number of Doors: 1
  • Pitch Type: Fly and Inner pitch together
  • Pack size: 52cm x 14cm
  • Range: 3 Season Backpacking
  • Flysheet: Stormtex P4000mm FR
  • Floor: Aqua Stop P6000mm
  • Poles: 8.5mm Superflex Alloy
  • Pegs: 10 x Alloy V-Angle
  • Guylines: 4 x Black Reflective
  • Inner Door: Half Mesh

Best Uses: Backpacking and weekend hiking trips

Overview

As mentioned above, I typically do a bit of camping throughout the year, but I would not class myself as a hardcore camper. So, I didn’t want to spend a fortune.

With that in mind, it made sense that I was looking for a basic but functional one person tent. I started to research options and I eventually came across the Zephyros 1 and liked the look of it, and the price. It seemed to tick all the boxes.

The Zephyros 1, as already alluded to is a 1 person tent, so it sleeps 1 person. It’s 3 season, meaning that it is recommended to only be used between spring and Autumn, however I did use it in winter, see the picture below, and it was fine. It really depends on the severity of the winter climate you are using it in.

Wild Country Zephyros 1 Winter Camp

Overall, it has been a good buy for my needs. In this review, I will outline more detail about the Wild Country Zephyros 1 tent, the good, the bad and the ugly! Let’s take a closer look.

Space

In terms of space, it is comfortable to lie down in (I am 6 feet tall) with a bit of room remaining at the end of the tent. There is some space on the inside for putting some stuff into, both at the end, of your feet as you lie down, and at the side of the tent. The image below with my sleeping kit gives you an idea.

Wild Country Zephyros 1 Space Inside

Not loads, but enough for my needs and much more may not be practical. I leave my backpack in the porch only taking in, what I need inside the tent, and there is adequate space.

Stability, Durability and Weather Protection

By now, I have used the Zephyros 1 in all types of weather from winter snow, to heavy rain and wind and I have been pleased with it. Overall it has performed well and held it’s own in challenging conditions.

In terms of stability, the tent uses a main pole, image in the next section, made from 8.5mm superflex Alloy. This pole runs across the mid section of the tent as shown in the image below.

The tent is secured using standard guy lines, which are reflective so very handy to spot in bad visibility at night for a headlamp, and pegs. I have found these to be functional and easy to use. Nothing out of the ordinary but it does what it says on the tin and works well.

Zephyros 1 Tent by the Lake

The flysheet is made using Stormtex P4000mm FR … yes, very technical sounding 🙂 I won’t go into the details on that, I will only say that it works well. It has stood up well to any weather stress I have put it under.

To get my mountain guide qualification, I had to camp out in pretty crappy conditions as part of the preparation and training, and so I did put it through its paces on several occasions.

The floor is made using Aqua Stop with a P6000mm rating. Again, I have found this has worked well to date. I have used the tent on snow and very wet ground, and combined with my air mattress, I was dry and comfortable.

Zephyros 1 Inside Floor

Criticism

The one criticism I have of the Zephyros 1 is the two small plastic poles, see image below, that come with the tent which are used to prop either end of the tent up.

I have found these not to be very stable in tougher conditions. However, I have come to the broad conclusion that they are not really necessary for the tent to function well.

Zephyros 1 Tent End Poles

As mentioned, the tent is pitched using standard guy lines and pegs. The tent pegs are sturdy enough although you might need something to hammer them into tough ground, you can see I bent one of them on tough ground in the image below.

You get twelve in total, ten are required to put the tent up and two are spare pegs which is always handy to have.

Zephyros 1 Tent Pegs

Ease of Use

The Zephyros 1 tent is easy to use. It is not a freestanding tent, so it employs one main tent pole (pictured below), guy lines, pegs and two small end poles to stay erect. However, it pitches the flysheet and inner at the same time as they are connected, which makes it very easy to work with.

Zephyros 1 Tent Main Pole

The pole runs through a sleeve at the top across the whole mid section of the tent, as shown in the last section, and is held in using the eyelets on either side of the tent as shown below.

It’s simple but effective but I haven’t managed to get the pole to bend beyond the first hole, too damn hard 🙂 to get it to sit in, although I have no need for that.

Zephyros 1 Pole Eyelet

So all in all, the tent is easy to put up and if you’re not used to putting a tent up, you will soon figure out how. Check the video below for some further guidance on set-up.

All in all, 5 minutes or less to put it up. As referenced above, the flysheet and the inner are attached so it is easy to to put the tent up quickly. When stretched out there is a comfortable distance between the flysheet and the inner but this can also be adjusted using the straps as shown in the image below.

Zephyros 1 Fly Sheet and Inner

Weight

The Zephyros tent listed weight is minimum weight of 1.41Kg (3Ib 2oz) and packed weight of 1.57kg (3Ib 7oz).

I won’t argue with this except to day that when I pack a tent, I do not carry it in it’s normal packed form as shown in the image below. I take the bits out and stuff into my backpack, so only taking the bits that I need which minimises both weight and bulk.

Wild Country Zephyros 1 Tent in its Pack

Features

In truth, there aren’t many to write home about, but that is totally fine. The tent is expected to be basic and functional. The tent features a porch which I found easy enough to cook in from a sitting position in bad weather.

As always, take caution when cooking in a tent … only ever do it when you have no other option. Ideally cook outside and well away from your tent. An errant spark from a stove could send a tent into a ball of flames pretty quickly.

The zips in the Zephyros are all two way i.e. they can be moved in both directions, which is handy to have, and they work well.

The outer doorway also has velcro patches on the entrance so the doorway can be rolled up and secured to leave the main entrance open. The outer door, as in the image below, is half mesh and is easy to open and close using the zips.

Zephyros 1 Each Way Door Zipper

There is also mesh ventilation which works pretty well in the climate conditions I camp in, however I suspect the tent might be a bit warm if you’re camping in hot summer temperatures though. Something to consider I think. The tent also comes with an owners manual and a basic repair kit as well for any emergencies.

Zephyros 1 Repair Kit

Best Uses

The Zephyros 1 is best suited for backpacking and any kind of camping where you need to camp out for a night or two with minimal fuss e.g. say on a fishing trip. It is easy to take a part and pack into a backpack. or just pack into the standard carry case that comes with it and throw it in your car.

It’s compact so not hard to store either while travelling or in your house. I think it is probably best suited to cooler temperate climates i.e. I think it could be a bit stuffy inside, in hotter and drier climates.

Customer Reviews

As of the date of this post, from about 10 user reviews I checked out, 71% gave the Zephyros 1, 3 stars (out of 5) or more, 57% 4 stars or more and 43% gave 5 stars. Respectable enough scoring but nothing I wouldn’t expect based on my own experience. I would give it a 3 star rating, as it does the basics of what it needs to do.

Our Rating 3 (Out of 5)

Conclusion

In conclusion, I think the Wild Country Zephyros 1 tent by Terra Nova is an OK buy for the price. It isn’t the best 1 person tent in the world, but it certainly isn’t the worst either.

For my needs, weekend backpacking trips across the year, mainly in spring and summer, it has worked out fine and I am happy with it. There are most definitely better options out there though.

It’s easy to put up, which is always a winner while out on the hills on a tough day when you don’t want to faffing about in wind and rain, and covers all the basic requirements a one person tent should.

If you’re totally new to tents, check out the tent buying guide before making a decision. It covers all the things you should consider before making a purchase.

I hope you found this review useful. If you’ve any questions about the Zephyros 1 tent, please leave them in the comments below and I’ll be happy to answer them if I can.

  • « Previous Page
  • 1
  • 2
  • 3
  • Next Page »
  • Facebook
  • Pinterest

What are you looking for?

Copyright © 2025 · Cool Hiking Gear

Cool Hiking Gear is a participant in the Amazon Services LLC Associates Program, an affiliate advertising program designed to provide a means for us to earn fees by linking to Amazon.com and affiliated sites.

  • About This Site
  • Privacy Policy
  • Affiliate Disclosure Statement
  • Contact