coolhikinggear.com

  • Men’s
    • Best Hiking Rain Jackets for Men In 2024
    • Best Men’s Hardshell Jackets Of 2023
    • Best Hiking Pants For Men In 2023
    • Best Ultralight Rain Pants For Men
    • Best Men’s Daypacks For Hiking In 2023
    • Best Backpacking Backpacks For Men In 2023
    • Best Base Layers For Men In 2023
  • Women’s
    • The Best Hiking Rain Jackets For Women In 2023
    • Best Women’s Hardshell Jackets Of 2023
    • Best Hiking Pants For Women In 2023
    • Best Ultralight Rain Pants For Women
    • Best Daypacks For Women
    • Best Backpacking Backpacks For Women In 2023
    • Best Base Layers For Women In 2023
  • Hiking Accessories
    • Best Hiking Poles
    • Best Trekking Pole Monopod Camera Mount
    • Best Hiking Headlamps
    • The Best Hiking Watches In 2023
    • The Best Hiking Gloves In 2023
    • Best Hydration Bladders For Hiking In 2023
    • Best Compass For Hiking Our Top Picks
    • Cool Hiking Gadgets
  • Footwear
    • The Best Men’s Hiking Boots In 2024!
    • Best Hiking Shoes For Men In 2023
    • The Best Women’s Hiking Boots In 2023!
    • Best Hiking Shoes For Women In 2023
    • Best Hiking Sandals
    • Best Hiking Sandals For Women in 2023
  • Hiking Guides and Resources

Glendalough – The Two Lakes Hike

Today’s post is about a short but very pleasant hike in the Wicklow Mountains National Park that I have done many times. That hike is the two lakes hike in Glendalough in the Wicklow mountains.

I think Glendalough actually means ‘The Glen of Two Lakes’ in the Irish language although I’m not 100% sure of that. Glendalough is a popular tourist destination in county Wicklow in Ireland. It’s close proximity to Dublin means that it’s an ideal location for a day trip from Dublin city and surrounds.

This hike is a relatively easy one and takes about 2 / 4 hours depending on your pace. If you’re a regular hiker, you’ll find this a comfortable hike. If you’re completely new, you might want to take it handy enough and just play it by ear as you walk around.

There is a clear trail the whole way and the terrain varies between rocky bits and boardwalk but there are a few steep ascents which could prove tough to legs that aren’t used to it.

Getting There

To get started you can park up in several locations in Glendalough. Normally, I park up in the Glendalough hotel as the parking there is free. It’s also a nice place to stop in after your hike for a cup of coffee or a bite to eat. The hotel is a bit further down from the actual lakes themselves, so it adds an extra 10 / 15 minutes to your hike.

Not a big deal but if you want you can drive further up past the hotel and there is paid parking available at the upper lake. There are also lots of nice green areas in the upper car park area and some picnic benches if relaxing in the sun is the order of the day.

I should also add that the area is very accessible from Dublin City Center. There are lots of day tours available from various private companies which will take you out and back for the day by coach.

Anyway, for our purposes today, we’ll start from the Glendalough hotel.  The map below shows the exact location.

As mentioned above there are lots of hikes to choose from. once you get into the national park there are boards dotted around showing some of the common walking trails people like to take. These walks are highlighted along the way by colored arrows, one color for each walk, so they’re very easy to follow.

You can also get a walking trail map in the information center at the upper lake and at the Glendalough Visitor center. You can learn more about these trails and you can download a free map here. This hike is a bit of a mix of a few of the trails listed on the map. Don’t be afraid to get a little lost as you venture around, it’s pretty easy to find you way back onto a main trail and any wrong turn will likely lead you on another beautiful trail anyway 🙂

Getting Started

Now, I should start by saying that there is no set route to take on this particular hike. You can approach it from either direction from the Glendalough hotel car park or from the upper lake car park.

However, I will cover the route I normally do. Firstly, I head out of the car park entrance and take a left which will take you further into Glendalough towards the lakes. Follow this road all the way down till you reach the upper lake car park which you will pass on your left. Along the way you will see some lovely medieval remnants of old buildings. You can visit St. Kevin’s church too as part of this hike but we’ll get to that later.

The Upper LakeBeside Glendalough Upper Lake

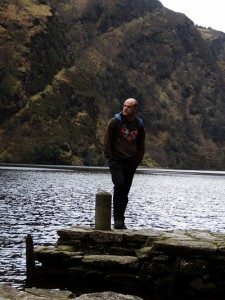
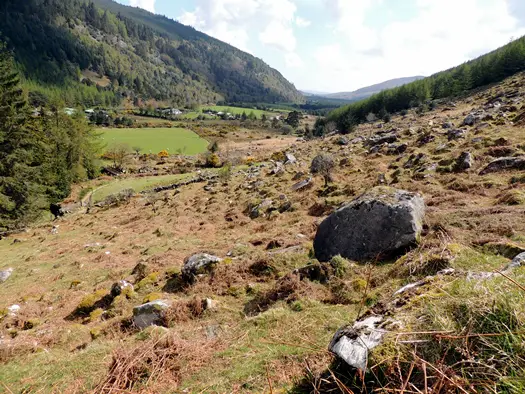
As you pass the upper lake car park on your left and continue on the road, it will eventually become a path and merge with another path which comes from the upper lake car park. At this point the upper lake will start to come into view on your left.

It’s a beautiful sight on any day of the year. You will have a faint treeline on your left and a mountain rolling upwards directly to your right. On the other side of the lake you also have a sharp mountain ascent.

All this combined provides a beautiful hilly backdrop that cradles the lake in its center. It’s worth taking the short walk down to the lake edge itself as the views are beautiful. The lake is peaceful and serene on good days but can get quite wild when the winds are up!

The Quarry

Heading back up onto the path, continue on along with the lake on your left. You will be surrounded by pleasant tree cover overhead for a short while before the path eventually opens up into an open area at the top end of the upper lake.

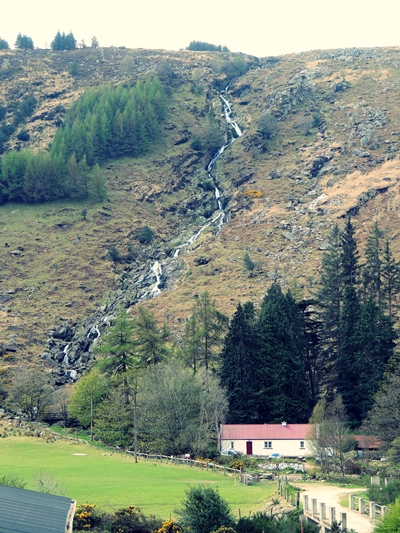
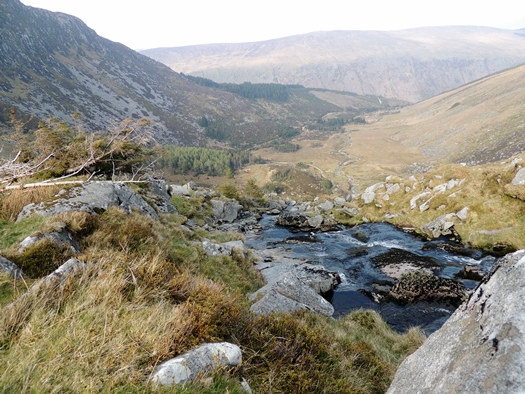
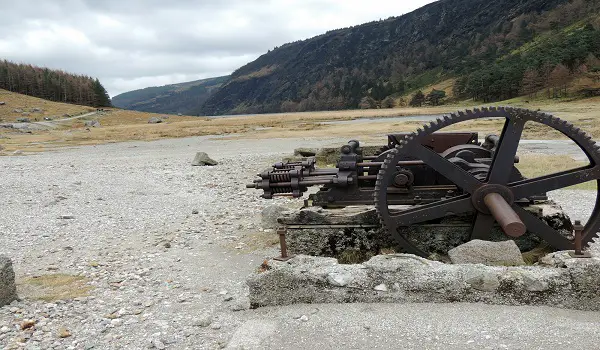
At this point you will see the two mountains on either side of you join at the end. Where they join a beautiful river flows down into the lake. Again the views are simply fantastic. As you walk towards the river, you will also pass a few old stone building ruins. I believe these were part of an old quarry which used to mine here, for Lead, Zinc and Silver to the best of my understanding.

View of the River

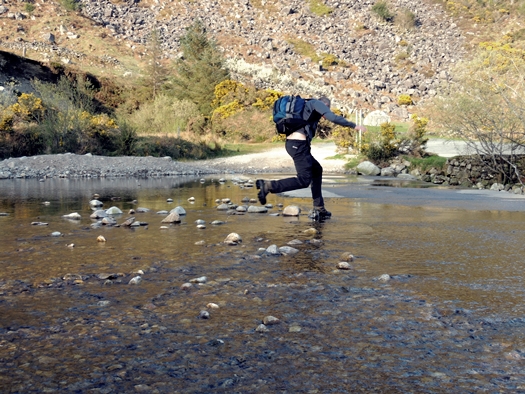
As you move towards the bottom of the river you will need to walk over stepping stones to get to stay with the path. This is fun and adds a nice mix to the hike but be careful not to slip in, although at worst you’ll get your feet wet. You’ll also pass some very old mining equipment from way back in the day as pictured below.

Old Mining Equipment At Glendalough

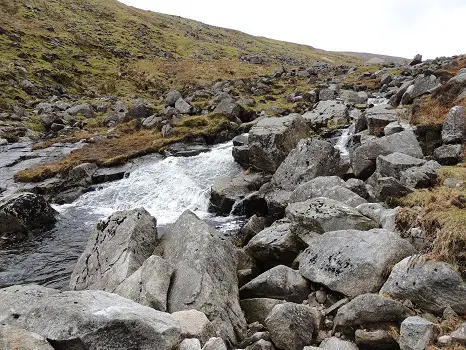
Eventually you’ll reach the base of a stony path that meanders up the side of the river. This is probably the toughest part of the hike coming from this direction as it’s a steep enough climb to get to the top.

It’s again really beautiful though and there is ample opportunity to walk over right beside the river. The sounds of the running and gurgling river provide a comfortable background to this part of the hike itself but going over right beside it is worth it. there are lots of little waterfalls and flowing streams within streams. It’s very beautiful.
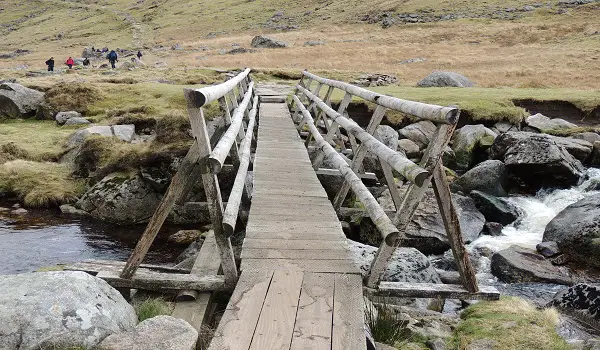
The River

The Foot Bridge

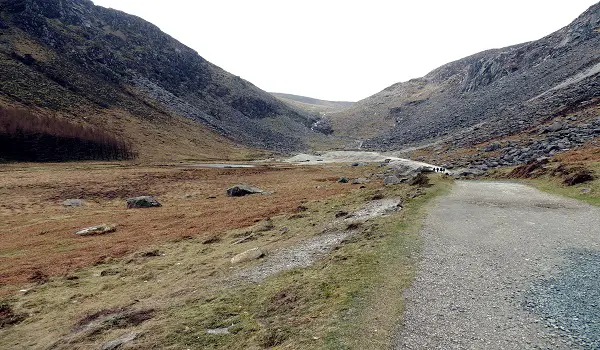
When you get to the top of the river, you will see a bridge crossing over it. The river continues on into the horizon but for this hike, it’s as far we go alongside it. We now want to cross over the bridge and head across the stone path. Again you will see some old stone building ruins along the path to your left. It’s worth taking a wander over to take a look around. It must have been a tough place to work or live back in the day, that’s for sure!

Bridge

This is an ideal place to stop and have a quick snack or cup of tea or coffee. At this point you’re looking back down through the vale and the views are again stunning.

It seems like I am repeating myself when I keep mentioning about the views but in all honesty, until you head into the forest at the end of the hike, all views available to you are just amazing. The forest walk is beautiful too but the views aren’t as striking mainly as you are surrounded by trees.

The BoardwalkBoardwalk

After heading over the bridge, keep following the stone steps along the path. They will start to rise upwards and they will eventually come to some boardwalk. This takes you up into an area known as the Spinc.

The boardwalk was put there as the ground in the Wicklow mountains is very marshy so it wouldn’t be practical or safe to walk over it as normal. It would damage the landscape too. The Boardwalk is made from railway track sleepers and has lots of round nails sticking out of it. This is excellent for walking on as it provides excellent grip for your hiking boots, even in rain.

The Boardwalk slopes upwards and as you continue to walk up it you will see the lake below you to your left. There is no real place to stop along the boardwalk until you start to come down the other side and single file walking is required the whole way along the boardwalk.

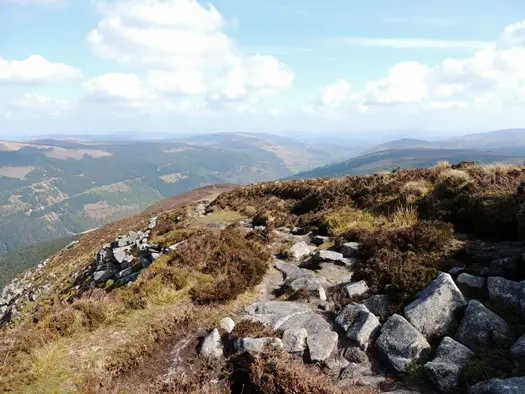
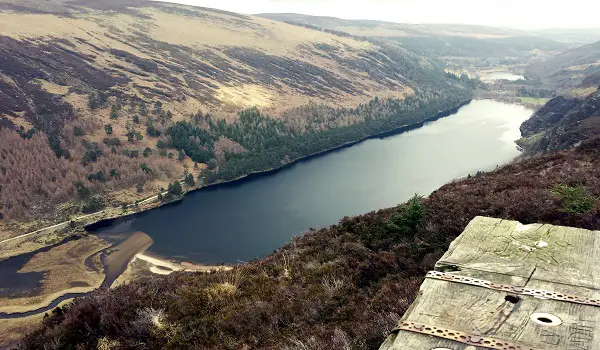
After about twenty or thirty minutes, you will reach the top of the upwards section of the boardwalk. The boardwalk then goes downward in a much steeper descent. Along the way there are a few viewing points which are definitely worth stopping at to take it all in.

The picture below looks back down across the upper lake and in the distance on the right you can see the lower lake.

View From The Boardwalk

The Forest Walk

The boardwalk continues on downwards and you will notice that it veers off to the right into the trees. You have two options here. You can take either the first exit into the forest that you come to or continue on to the next one. I recommend the last exit if this is your first time, as this will take you closer to the path than runs by St. Kevins.

This is a beautiful part of this walk as you walk downwards for about 15 minutes or so through the forest. Surrounded by trees on either side, it gives one a very secluded feeling as you descend.

When you get to the bottom, you will see a path going downwards alongside a large river. Continue down along this path which will take you towards the car park of the upper lake. As you follow the signs for the car park look out for a  path veering off to the right, I am nearly sure it is signposted, which will take you towards St. Kevins church.

Note, this is another great opportunity to stop off for a short break. You can head into the car park itself where there are bathrooms and a cafe where you can get food and drinks.

St. Kevin’sTower At St. Kevins

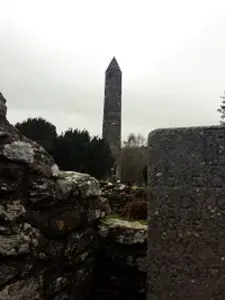
St. Kevin’s is an old monastic site which dates back to the 5th century BC. St. Kevin set it up and over the centuries the site played various roles throughout history. It has an interesting history which is worth checking out. You can read more about it here.

As you walk towards St. Kevins you will have the lower lake on your left. Again there are lots of opportunities to venture closer to the lake on other paths off of the main route. Going to visit St. Kevins is also optional as you can continue onward back towards the car park in the Glendalough hotel. However, if it’s your first time there I highly recommend you stop off and check it out, it’s an impressive piece of history to walk around in.

Pictured to the right is the round tower beside St. Kevin’s. I think this would have been used to hide in when under attack back in the day.

Back to The Hotel

After you’ve finished exploring and taking in all the history at St. Kevin’s, walk back to the main path you were on and continue onward in the direction you were going. Eventually you will see the back of the hotel in the distance. Just stay on route towards it and you will eventually come to another bridge which you cross to take you back to the car park.

Conclusion

Overall, this is a really pleasant hike that will be suitable for most although some will find it tougher than others. What I really like about this hike is the fact that it takes in so many different types of terrain and surroundings.

You start on country road and move to walking alongside beautiful lakes. Then you head upwards on a rocky path alongside a river. After that you move to a boardwalk which traverses marshy bog land before heading down through the thick of a forest. Finally you end up back on man made track again alongside a lake with the option to take in some medieval monastic ruins. Pretty impressive hey?

Another great advantage to this hike is that it is very accessible, save very bad weather, all year round and it is good to enjoy at any time of day or night. I recently did a full moon hike here and with a clear sky, it was just beautiful, peaceful and serene. If you do plan to do a night hike though, be sure to take a head lamp.

It’s a pretty special and it’s no wonder it’s such a popular tourist destination. Even as a hiker who has hiked it on many occasions, it’s one hike that never fails to satisfy!

Have you ever hiked along the two lakes in Glendalough? Did you enjoy it? I’d love to hear about your experience so please leave a comment below.

Lugnaquilla In The Wicklow Mountains

It was Easter Saturday last weekend and with a long weekend in play, some time to relax and a good long hike were on the cards. To top that off, it was a really sunny day when we got up on Saturday morning. All the signs were good so we got our gear together and headed for the hills!

The hike we decided to do was Lugnaquilla mountain in the Wicklow mountains in the province of Leinster Ireland. The Wicklow mountains are very accessible from Dublin city center and so are a popular haunt for tourists as well as weekend hikers coming from the city at the weekend.

The Wicklow Mountains form the largest continuous upland area in Ireland and were formed in the last ice age. They are located in the middle of County Wicklow in Ireland but they branch out into Counties Dublin, Carlow and Wexford. The mountains themselves are composed mainly of granite but other older rocks do form part of the geological makeup of the range. Many major rivers are sourced from the Wicklow mountains and the area itself has a lot of history running as far back as the 6th century.

As mentioned, the Wicklow mountains are a very popular tourist attraction and they provide a handy location for weekend hikers coming from Dublin city. With that in mind, they are officially a national park in Ireland and protected as such under European law.

Getting Started

To get started on this hike you need to head out of Dublin south on the M50 motorway. Take the exit marked Glendalough / Kilmacanogue and follow the signs to Glendalough and Laragh. When you get to Laragh, just before Glendalough, take a left at Lynams pub, located in the middle of Laragh, and follow the road for about one to two miles until you come to a a sign pointing right to Glenmalure.

Lugnaquilla Waterfall

At the junction take the right to Glenmalure, and follow the road for about three to four miles, that’s approximate, until you come to a crossroads on the road with a big pub called the Glenmalure Lodge on your left hand side ( This is a really nice spot and perfect to stop into for a quick coffee, beer or bite to eat after  your hike 😉 )

Take the right here in the opposite direction of the pub and follow the road for about one to two miles.

As you drive up the road you will have mountains on both sides of you with the ones on your left more visible. Keep going until you come to a waterfall running down the side of the mountain on the left hand side. You can’t really miss it, but I’ve taken a shot of it here to hopefully help identify it.

Now, this is the first place you can park up on the side of the road for this hike. It’s a little hard to get a definitive point on the road on Google maps but you can click onto street view on the map below and you’ll see the waterfall above. Park anywhere there but be sure to not block the road. You can also drive further on and you will find several car parks.

You can also do this hike in reverse starting from one of those car parks or, alternatively, walk back up to this spot and start from here. Whatever you prefer of course but for this hike we started from the waterfall.

The Zig Zag Path

When you stand on the road at the start of the hike and you look up towards the waterfall to the left, you should see a ziz-zag type path going upwards to the right of the waterfall. This is start of your path to the top of Lugnaquilla. Head off the road towards the white house in the picture above. The path is pretty well marked so you can’t miss it. There are some directional arrows on posts too which you can keep your eyes open for.

OK, on with the hike. The Zig Zag path is a gentle enough route ascending to the top of the first peak on the trail to Lugnaquilla. As you walk upwards you’ll start to get the opportunity for many beautiful views of the valley from the path. The shot below gives you a taster.

View From The Zig Zag Path

As mentioned, the path is pretty easy to walk up. It’s wide and clearly marked so no real fear of getting lost. However, for those of you who use a compass, it’s a good idea to take a general bearing to aim for the summit of Lugnaquilla from the top of the ziz zag path.

The Cliff Edge

After walking up to the top of the Ziz Zag path, you follow on upwards towards the summit of Cloghernagh which sits at about 800 meters altitude. There is still a visible path of sorts but it isn’t as obvious in places as the Zig Zag path was.

This is a popular hike though so you can see foot prints and natural steps, as such, left by previous hikers. The path becomes a mix of boggy terrain and granite stone. Depending on the time of year you’re hiking this can be tricky to negotiate in places with your hiking boots sinking deep into bog at times. You can stick to the stone for most of this part though too. The hike here also gets quite steep too, probably the steepest part of the whole hike.

As you go further and further up you will notice a cliff edge developing on your right hand side. Again, some of the views across the valley and over to the other mountains from here are just stunning.

View From The Cliff Edge

We were blessed with the weather. It was sunny with only some clouds in the sky. You can stop on some of these cliff edges for a cup of coffee or a banana break as we did. It’s worth stopping to take it all in!

The Summit in Sight

As you move further up from this cliff edge area, you will move into a flatter area going up in a steady but gradual incline. Now, on a good day, you can see the summit of Lugnaquilla from here. It’s a bit like a horseshoe shape to get from here to the top. You walk straight up and then you start to veer to the left to the summit.

Now, I should add here that the weather at the top of Lugnaquilla can be very temperamental. In fact, I have hiked to the top more than ten times and yesterday was the first time I could actually see the summit from a distance or see out from it for that matter. As it’s a high mountain close to the sea, it has a tendency to be wrapped in mist and fog at the summit so visibility isn’t always great. Still a joy to hike though, even in tougher weather.

It’s worth mentioning that there are little triangle sets of stones on the ground which you can follow, if the visibility isn’t great, that were put there as a guide for folks on the trail.

You’re now on the final leg when you veer left to swoop upwards to the summit!

The Summit

When you get to the summit you will be greeted with the summit marker on top of an island of stones. These are common on top of mountains in Ireland and the UK. This is an ideal spot to stop, if the weather is agreeable, have a bite to eat and take a breather. At this stage you’ve hiked about 5 kms to a height of 925 meters so you deserve a break 😉

Colm At Lugnaquilla Summit

After you’re sated, and weather permitting, I highly recommend that you head over towards the edge of the mountain at the top and take a look out at the views across the mountains. It really is beautiful to look out from there, the area known as the South Prison in particular has great view on a good day. As I mentioned though, yesterday was one of many times at the top of Lugnaquilla but only the first time I got to enjoy the views from the top!

Heading Back Down

At this point you have two options to head back down to the start point. Option one is to head straight back down the way you came up. This is easy and handy to do. However, if you’re feeling more adventurous you can head back down a different way effectively doing a loop back to your starting point. We were feeling adventurous yesterday so that’s what we did 🙂

From the top of Lugnaquilla we started out on, more or less, a reversal of the previous bearing from the way up, aiming to head across open mountain to descend down Fraughan Rock Glen. Now, it’s worth noting here that at the top of Lugnaquilla you are right beside an artillery range for the Irish army.

So be careful you don’t wander off in the wrong direction. The artillery range is well marked though so it should be easy to spot and stay out of. The bearing 59 took us along the edge of the south east corner of the artillery range.

As you move out this direction you will start to see a quite steep descent to get down to the top of Fraughan Rock Glen. Take your time here and find a spot you’re comfortable walking down. It’s slippy and steep so exercise caution.

We skirted along the top till we found a suitable point and started to side step down to the bottom. As you look down, weather permitting, you’ll see a river than leads off into the distance falling over the edge. You want to aim for the left hand side of that going down. As we had skirted up a bit I took another bearing to the river just to be safe. As we would descend it was possible the visual marker could go out of view so no harm to have a rough directional bearing.

As you head downwards you also need to cross a small river or two. These are all flowing into the main river down through the glen. They’re very beautiful with lot’s of little waterfalls along the way. There are plenty of handy places to cross so if you don’t fancy the place you’re at just walk up or down the little rivers a bit till you find a more suitable crossing point.

Fraughan Rock Glen

Eventually, you’ll come to the top of the river at the top of the Glen. As you look down the glen you’ll see lot’s of felled trees.  These do hamper the route down a bit so take your time and be careful. We decided to skirt along the river down through the glen. It was really pretty to hike down here with the sounds of the river all around. There is also plenty of nature in the glen too. From sheep to deer, there’s lot’s to see and enjoy!

Fraughan Rock Glen

When you get to the bottom of the glen you will see a path forming in front of you. Take this path and follow it all the way down back to the end of the road. The one you’re parked on. Tree’s surround you on either side and you might see some campers as you descend, we saw lot’s yesterday. There are loads of nice spots to camp out alongside the river at the bottom.

When you get to the bottom, you’ll see a big car park. There is one more obstacle you may have to cross to get to it though and that is the river! This river is quite big and normally it’s dry to cross over the road. However, yesterday the river was flowing over the road so I needed to do some nimble jumping to get across it!

Jumping Across The River

I’m only kidding, it wasn’t that deep at all but I guess it could get harder to cross in heavy rain.

Now it’s worth mentioning here that you can actually start the hike from here in this car park at the end of the road. You could drive to the end of the road and park there. This is effectively the hike above but in reverse as I mentioned at the start.

The Last Push

At this point we were back on the Road so we just had to walk back along it to the car. It’s about 30 minutes from the car park at the very bottom of the path from Fraughan Rock Glen back to the starting point.

Conclusion

This is a really nice hike to take any time of the year. It’s about 10 miles in total distance with about 900 meters in ascent so anywhere from 4 to 6 hours depending on your pace. You need to be pretty fit to attempt it so probably not a good start for a total newbie to hiking. You can of course take your time but it is steep in places and I think you’d be better to get a few shorter hikes in under your belt first before attempting this one.

We were really blessed with the weather on the day and, as you can see in the photo’s above, there are some amazing views to be had. It’s a hike I’ve done, in various forms via different routes, and it never ceases to please.

As always, be sure you have the right gear with you. As mentioned, we were lucky with the weather but it does rain a lot in Ireland so a good rain jacket, proper hiking boots and other suitable hiking gear are a must.

If you’re looking a challenging but really nice hike in the Wicklow Mountains, this fits the bill!

Enjoy 🙂

  • Facebook
  • Pinterest

What are you looking for?

Copyright © 2025 · Cool Hiking Gear

Cool Hiking Gear is a participant in the Amazon Services LLC Associates Program, an affiliate advertising program designed to provide a means for us to earn fees by linking to Amazon.com and affiliated sites.

  • About This Site
  • Privacy Policy
  • Affiliate Disclosure Statement
  • Contact