Whether you’re a day hiker or a multi-day trekker, eating well on the trail is something you need to prepare for. If you want to cook on the trail, traditionally you normally use either a camp fire or, in more recent decades, a gas stove.
The gas stove is pretty much ubiquitous in modern day hiking and camping and rightly so, it’s a great piece of kit that has successfully fed many folks, including myself, hot food and drinks while out on the trail for many years.
Now, to be honest I could never have really envisioned any other possibly efficient way to cook while out hiking or camping. The gas stove seemed to pretty much have it covered. However, recently I came across a new flame free (Yes, you read that right, no flames or ignition required) cooking technology which I have to say looked very exciting.
That technology is used in a series of products from a line called Barocook. So today I wanted to take a closer look at what Barocook is and also tell you how I got on when I tried it out the Barocook Flameless Cooker (Model: BC-007 Flameless Cooker) for myself while out hiking.
Summary
![]()
Cool Hiking Gear Rating: 4 stars out of 5
Available Sizes: 11 oz, 28 oz, 40 oz 
Price: Check price on Amazon
Pros:
- No flames, ignition or gas required to use
- Convenient and very easy to use
- Can be used where open flames cannot e.g. inside a tent
- Great for hot food on a day hike or a shorter hiking multi-day trip
- Ideal for reheating food
Cons:
- Not as suitable for longer backpacking trips – weight will go up with heating packs
- Heating packs need to be packed in and out
- May need to carry extra water to use
What is Barocook?
As mentioned above, Barocook is a flameless cooking technology. You need no gas, electricity or fire to cook with it. In brief summary, there are a series of different Barocook products that range from a flask to cooking containers, a pot and various accessories.
Today I am reviewing the BC-007 Flameless Cooker which has a capacity of 40 oz (1200ml). There are other sizes available in this particular line.
Ok, now let’s look at how this bad boy works.
How does it work?
I will try and avoid getting too sci-ency and will instead focus on the how it works from a practical perspective.
Step 1 – Remove both the lid and stainless steel bowl
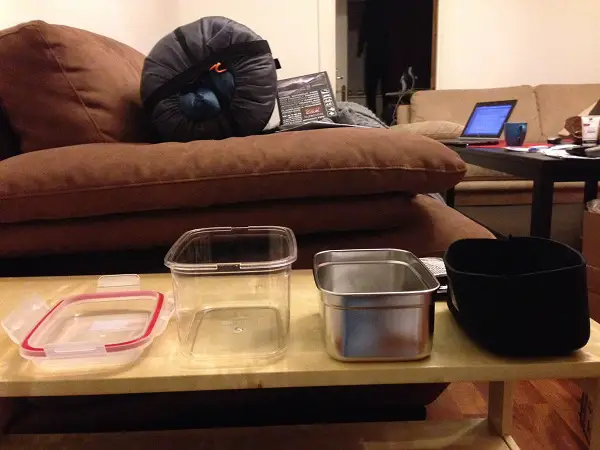
The cooker itself has four parts which all fit into one another. Looking at the picture below, from left 1. The cooker lid 2. An outer plastic container 3. An inner stainless steel bowl and 4. A cooker sleeve. You need to separate them all when you start. (You can leave the outer cooker sleeve on the outer plastic container but I’m removing it in the pictures below to make it clearer).
Step 2 – Put a heating pack into the outer container
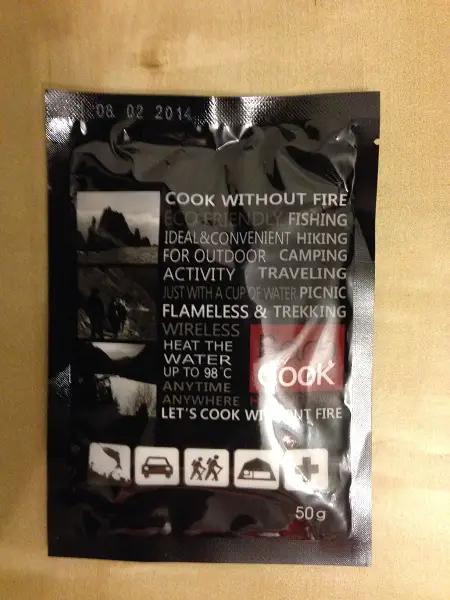
To get things moving you need to use a ‘heating pack’. A heating pack is what enables the Barocook to generate heat / steam to do it’s cooking. The heating pack in it’s packet is pictured below. You of course remove the packaging before using.
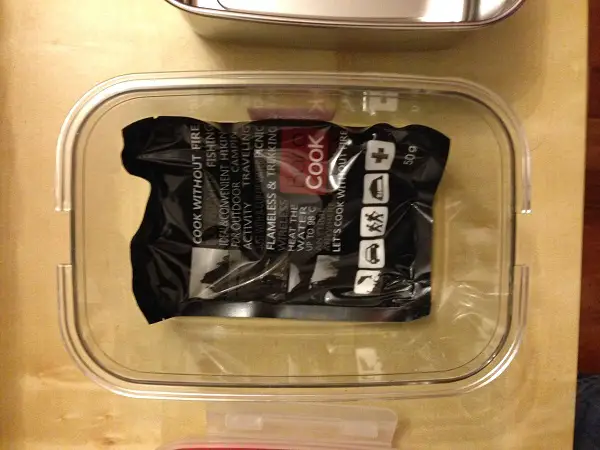
A heating pack is dropped into the outer plastic bowl as per the photo below. Please note, the wrapper is still on the heating pack below as I’m doing the walk through step by step bit in my living room 🙂
Don’t panic I have a video at the end of this post of me doing the whole actual process while out hiking. I just thought a step by step explanation first would be helpful.
Step 3 – Just Add Water!
Next up you add the desired amount of cold water into the outer plastic container. What is the desired amount of water and how the heck am I going to get that measured out correctly I hear you cry?
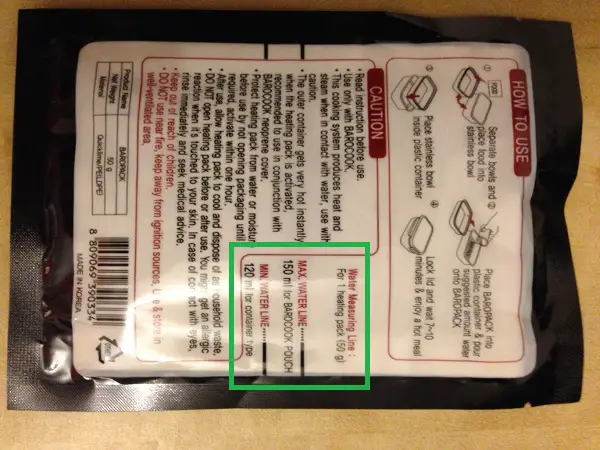
Well that’s marked on the back of the heating pack. You can get the desired amount ready quite quickly and easily by using the empty heating pad packet as a measuring jug. Just fill it up with water to the desired line, as highlighted by the green box in the picture below, and pour it in on top of the heating pack.
Step 4 – Put the Steel Bowl into the Plastic Container
Now, you should have had your food already prepared for cooking / heating up and placed it in the steel bowl. Once the water is added to the heating pack, you place the steel bowl into the outer plastic container as shown below. I’ve used my wallet to represent food in the picture below.
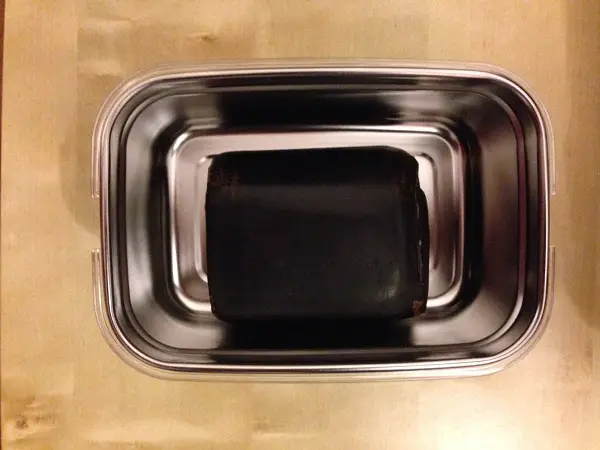
Step 5 – Seal the Barocook Flameless Cooker Using the Lid
After that, you put the lid on and close it tight using the latches around the top. You now have your cooker fully sealed as pictured below. Also note the black sleeve on the picture below. You would put this on the plastic container from step one above but I left it off so it’s easier to see inside the container.
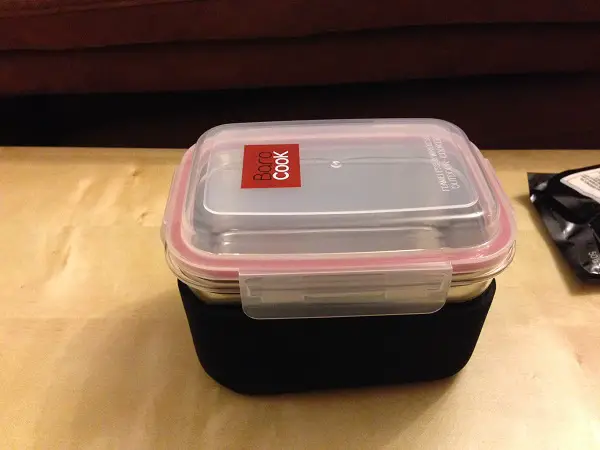
At this point, magic elves appear and Lord Saruman casts a spell that turns the water into a cauldron of steaming vapor … well not quite … but some kind of magic happens 😉 and the water begins to boil.
I don’t know 100% of the science behind the cooker, but in brief one of the main minerals in the heating pack is quick lime. Water added to quick lime creates a chemical reaction which generates heat.
Step 6 – Leave to cook, remove lid and enjoy!
You then leave your food for the required amount of time to cook. Overall you get somewhere between 25-30 minutes to cook so that should be enough to get whatever you need done. Depending on what you’re making, when the time is right, remove the lid and enjoy!
Out in the Field!
OK, so now that we’ve had a look at how it all hangs together. How did it actually fair out in the field? Well to test it I took it out hiking with me on a chilly December day last Saturday.
I pre-made pasta to re-heat while out on my hike. Now, you can cook food in the Barocook too but I wanted to test it for what my normal needs are. Normally, hot food comes into play for me when I go on a longer hike, usually for two or three days, when I also go into the hills camping.
The range of food I bring with me on that kind of trip is based on the minimal complication philosophy. That is, I bring stuff that at most needs to be re-heated or hydrated. While cooking fresh sausages on a pan in the morning after a nights camping is pretty special, carrying raw meat, additional pans and so on, isn’t something I do.
So, as I mentioned above, I packed my pre-heated pasta, as opposed to my normal sandwich, into my pack. As it was a cold day the prospect of a hot meal on the trail did sound pretty cool, but would it work?
Check out the video below to see how I got on!
My Thoughts on the Barocook Flameless Cooker
Well, I wanted to start by comparing my experience with Barocook with what I would normally use to cook food while out hiking. As mentioned above, if I camp a few days I normally bring food with me that I re-heat or hydrate.
The normal method I use is a little gas cooker I have. So, how did the Barcook fair in relation to the gas cooker? Overall, I think it did pretty good and I will definitely use it instead of my normal gas cooker in certain circumstances.
Convenience
Overall I found the Barocook very easy to use. There’s nothing complicated about it so it scores very well in this area.
Another thing that I think is worth noting is that as it’s steam cooking, if you’re camping on a really nasty day, I see no reason why you can’t use the Barocook inside your tent. As there are no flames, there should be no concerns about setting your tent on fire.
This particular one is fresh in my head as when I did my Mountain Leader training back in October, when we got to our campsite, the weather was terrible.
It was pouring rain and really windy. We were soaked and cold when we got to camp. We just wanted a hot drink, some hot food and to get inside the tent as soon as possible.
The priority being the hot food and drink, once we got our tents up we got the gas stoves out to cook and heat water for a hot cup of coffee.
We of course had to do this in the small porch area of a two man tent i.e. I was standing outside in the rain. If I had the Barocook cooker or flask with me, I could have just got inside the tent and cooked inside.
Definitely a plus to point out!
Weight and Size
The Barocook cooker isn’t heavy, I weighed the Barocook and it came in at 425g / 15 oz. To cook, you’ll also need a heating pack and water.
A heating pack for the cooker weighs 5og / 1.76 oz. For one heating pack, you will need 120 to 140 ml’s / 4 to 5 oz of water to cook. So we can add say 130g / 4.58 oz to the total for one hot meal.
So, if you’re going away for one nights camping you need to carry 470g / 16.5 oz (excluding water) or 605g / 21 oz (including water) to cook or re-heat one meal.
In comparison, I weighed my Vango gas cooker, gas tank and accompanying pot. The gas cooker came in at 150g. The Isobutane / propane gas tank came in at 200g. Finally, to cook food I use a pot which comes in at 275g. That give a total of 625g
For one warm meal, reheating food, the Barocook comes in at a slightly lighter weight. However, if you add another meal to your plans, you would need to bring another 50 g /1.76 oz heating pack with you for each hot meal and possibly 130g / 4.58 oz of water per meal if required.
Now, I am taking into account above that you may have to carry the water. That is, if you aren’t near a water source for a period of time, you will need to bring your own water to cook using the Barocook cooker.
However, if I’m camping, as standard practice, I normally look to set up as close to a stream or river as possible.
The Barocook Flameless Cooker does not need potable water to work so as long as you have a water source of some kind, you’re good to go. With that in mind, you can ignore the water weights above.
Finally, you of course need to pack your waste out. It’s worth noting that with regards to pack weight, any heating packs you bring into the wilds with you, you will need to bring back out.
I assume they may go up slightly in weight too post use as they probably retain water for a time although I didn’t measure this.
Shape and Mass
The Barocook dimensions for the BC-007 are approximately 4.75in * 4.75 in * 7 in (12cm * 12cm * 18cm). Maybe marginally bigger in total than a gas cooker, gas tank and cooking pot. Where I think it has an advantage here is that it is all in one rectangular unit rather than several separate pieces.
The other thing that is worth pointing out is that you can use all the interior of the Barocook for storage. You can probably comfortably fit two or three heating pads and a bag or two of food for reheating in there.
I like the rectangular shape of the Barocook, it was very easy to slot into my pack for carrying.
Price
I think the Barocook is pretty reasonably priced. The price is competitive in comparison to one burner gas stoves. Where the Barocook may be at a disadvantage though is that you need to buy heating packs. To check the up to date price, click on the image at the start of this review, or one of the links in the review to check out the price on Amazon.
You have to buy the heating packs separately and they come in at, as of the date of this posting, $1.89 each for a 50g pack for the Barocook Flameless Cooker. Gas tank prices for one burner stoves vary between approximately $5.00 and $15.00.
It’s hard to do a direct comparison but I assume you will probably get more cooking at a cheaper price from a gas canister than using the heating packs.
Finally, I can’t ascertain the long term durability of the Barocook at this point but it seems well built so it should be good for a long time.
Environmentally Friendly
With regards to the heating packs, the outer plastic packaging is recyclable. The inner contents are comprised of naturally occurring minerals and can be disposed of as ordinary household trash.
As mentioned above, as with any waste, you need to pack it out. Learn more about leave no trace here.
Where Flames aren’t Possible
I mentioned above the example of cooking in a tent in bad weather but another scenario that I think the Barocook is perfect for is hiking in bush in high summer. As you know, these areas can just be tinderboxes and naked flames are a major no no.
My experience of this was hiking in Southern Spain some years back. It’s so dry and hot that bush fires are common and can easily get out of control. Open flames are therefore of course banned in many areas.
When the sun goes down and the night gets a little chilly, some hot food would be welcome and I can see how the Barocook could really come into it’s own here. You can cook away as there’s is no danger of starting a fire with steam.
This is of course the main selling feature of the Barocook Flameless Cooker and I am sure there are many, many more examples where flames just aren’t possible.
Using the Barocook at Altitude
I of course wasn’t testing the Barocook at very high altitudes but I did query the distributors if altitude would have any effect on performance.
I was informed that the effects of altitude on performance are negligible. I was given the example of product demonstrations being done at 3,330 meters or 10,925 feet in the the Swiss Alps and the product worked fine. So, using the Barocook at altitude should pose no issues.
They also pointed out that at extreme temperatures, -40⁰ F, the Barocook performs fine where isobutane and propane stoves will flame out. I don’t plan to be hiking at those temperatures any time soon but something I thought I would add in here as this review draws to a close.
Conclusion
Overall, based on first impressions from my initial trial use in the field, I have to say that I am very impressed with the Barocook Flameless Cooker.
While there are definitely circumstances that I feel it wouldn’t be suitable for, there are also plenty of scenarios where I feel it would be preferable to a gas stove. It’s also a pretty clever idea so definitely a winner in the ingenuity department.
As a hiker, I feel like it is now a real option to have hot food on a day hike. While I could of course always cook using my gas stove, I simply would never have really considered bringing my gas stove with me to heat food on a day hike, too much hassle. However, having used the Barocook, I actually think I would do that now. Mainly because it’s so easy to use.
The fact it doesn’t use flames or any ignition is also pretty cool and again gives it a unique advantage to the traditional gas cooker in many scenarios.
I don’t think that Barocook can totally replace the trusty gas cooker but I do think it definitely has some very specific niche areas and scenarios where I can see it trumps the traditional gas stove.
The Barocook product line is to be officially launched across the US in January 2015 so I think you should start to see it pop up in retailers soon. I’ll be sure to add more information on that to this post as it becomes more widely available. You can get the Barocook Flameless Cooker on Amazon.
Have you tried the Barocook Flameless Cooker? What did you think? I’d love to hear your thoughts in the comments below.
Great review. Thank you for being so thorough.
Hi Tom, you’re very welcome, glad you found it useful.