Last weekend I went on a remote emergency care / wilderness first aid course, basically first aid for the outdoors. I have to do this as part of the requirements for various qualifications in Mountaineering but I was also very interested to do it to learn more about what to do if I found myself in an emergency on the trail. It lasted three days, probably about 26 or so hours of training so pretty intense. Overall, it was really excellent.

Photo Credit: Michael R Perry
As you can imagine, when you’re out on the hills you’re, generally speaking, far away from populated areas and in places that are not the easiest to access by normal transport means. For example, a rocky crag on the side of a mountain isn’t somewhere that is easy to access should you need help from any emergency services trying to get there.
This is also of course the main appeal in hiking on the trail. You get to get away from the masses and into wide open spaces away from all things related to the hustle and bustle of the big towns and cities.
The very nature of these beautiful spaces is that they are, broadly speaking, not spoiled by human development and remain in their natural form. However, this very charm also of course lends itself to accidents as the terrain can often be uneven, rocky, slippery when wet, etc.
Accidents Happen
So with all that in mind, it seems that at some point it is very possible that an accident could happen to you or someone in your hiking party. Even with all the best gear in the world and taking the utmost care on the feet, a simple but unlucky turn on an ankle, and you could easily be immobilized and need to get help as you can’t walk out.
If you can’t walk out due to an injury or accident, it is wise to know how to keep someone, or yourself, as comfortable as possible while you wait for help to get there. To learn how best to do that, you should look into doing some kind of emergency first aid course for the outdoors. I highly recommend it.
In this post, I only want to give you a flavor of some of the awesome content we covered on the course. This isn’t meant to be an instructive post, it is instead informative to give you an idea of what is involved.
If you want to learn more I strongly recommend you search out an officially recognized remote emergency care or wilderness first aid course in your area and book yourself into one. You will learn a lot of great information that will really help you deal with an emergency in the mountains should you ever find yourself in one.
What we Covered
Wow, where to start lol 🙂 The course was excellent and really extensive. It’s hard to describe everything so I thought I would just run over one of the core themes we covered in the course. That was the main approach on how to approach any accident. This falls into the handy acronym DR ABCDE.
D – Danger
On witnessing or arriving at an accident scene in the hills, check around for danger. For example, are there loose rocks around that could come loose and land on you, your party or the casualties head.
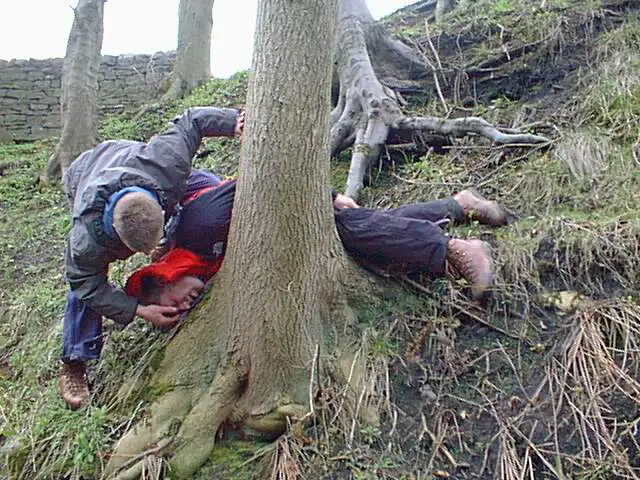
Photo Credit: Nicola Pickering
Also, try and establish what happened by surveying the scene or asking some of the group is there are other people present.
In terms of people, the order of importance in the situation is to protect:
a. yourself – You can’t be much use to anyone if you get hurt
b. the rest of the group – Make sure the uninjured people are not in a precarious position, you don’t need another casualty on your hands
c. the casualty – Following that, approach the casualty with caution so as not to startle or scare them and don’t step over them when you get there.
R – Response
Next up, check if the casualty is responsive. This uses another acronym called AVPU. Using this, you first check if the casualty is ‘A = Alert’.
Speak loudly as you approach them and listen for a response and look to see if they are aware of your approach i.e. their eyes are following you as you move closer. Assuming you get no joy from A, they’re most likely at some level of unconsciousness so you need to get on the phone to the emergency services. As a general rule, always contact help as soon as possible.
With the casualty not responding under A, you next move to ‘V = Voice’. Speak / shout loudly to them and into their ears when you arrive beside them. Are they reacting when you speak to them? Even a slight register on their face i.e. do they move their face when you speak to them or any other part of their body?
If not, you then move to ‘P = Pain’. Pinch the casualty in a suitable place, the nerve on the shoulder is a good place, to generate a little bit of pain. Does their face move or react to it?
If not, they’re fully ‘U = Unconscious’. However, they may still be able to hear you so you should keep talking to them.
Whichever level on the AVPU scale they are at, you make note as you will record it into your accident report for when you hand over to the emergency services when they arrive.
A – Airway
Next up, you need to check if their Airway is clear. If not, you need to clear it and we were shown various ways to do this on the course.
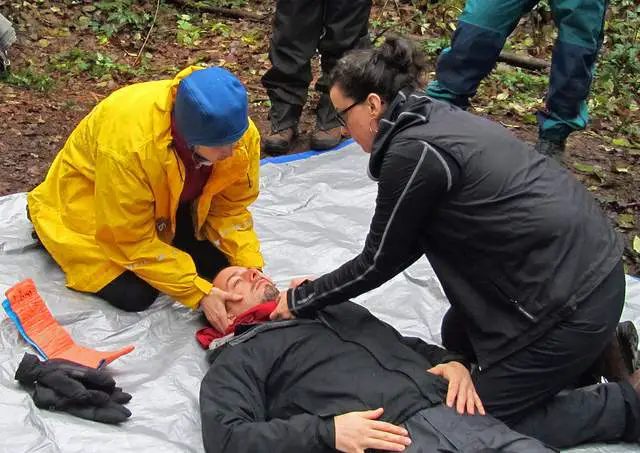
Photo Credit: Steve
You also may need to move them into the safe airway position, or you may need to keep their airway clear if they’re unconscious and you suspect a spinal injury. Again we were shown how to do this on the course.
B – Breathing
With the airway clear, you need to check if the casualty is breathing. You do this by checking the pulse, either at the neck or at the wrist, and the by placing your hand on the chest to count the breaths.
A healthy and normal pulse for a resting adult should be between 60 – 100 and breathes should be between 12-20 per minute. We were shown how to do this on the course and how to count it quickly using 10 seconds. We also went through the varying possibilities if these were too slow or too fast.
C – Circulation
The face is the main one at the start. What color is it? Flushed and red? Grey? Yellow?
Is there any blood around the casualty? Any obvious signs of bleeding? You also check for circulation on the hands and, if appropriate, feet.
D – Deformity
This is where you look for any obvious outward signs of injury. For example a bump on the head, an arm that is bent out of shape, etc. You find it and then start to think about what to do about it.
E – Environment
There were 3 ‘E’ elements to this. First off, just to ‘Ensure’ no further damage happens to the casualty and they’re as secure as possible until help arrives.
The next one was ‘Emotion’ provide emotional support if required, they could be very upset after a bad accident so keep that in mind. Talk to them and reassure them that all will be OK and help is on the way. Try and help them to stay calm.
Finally, you need to start thinking about your ‘Evacuation’ plan. Are they fit enough to walk out with support? If not, have you called for help This should have been done at the start but if not, get onto it.
And that is just a very brief summary of DR ABCDE!
Wow, just writing the above reminds me how much we covered over the three days as this was only one element of it and there was so much in this alone and we covered so much other stuff.
It really was a great course. From how to treat wounds, dress cuts, make splints out of hiking gear, deal with spinal injuries, CPR, deal with hypothermia, heat stroke, etc. it covered a hell of a lot of stuff.
Conclusion
In this post I have only touched on a very small part of the remote emergency care / wilderness first aid course that I did last weekend. I stress that this post is intended to be informative only and meant to indicate the benefits of doing a first aid remote emergency care course.
To learn this stuff, you need to do a proper and officially certified course from the relevant governing body / providers in your region or area. It’s a really hands on course and so the practical element is critical to really learn what to do in an emergency situation.
I really hope I never have to use any of this on the trail but I am really grateful that I now have a much better idea of what to do in an emergency, and it of course doesn’t just have to be on the trail. These skills are useful anywhere at anytime. Someone’s life, even my own, could depend on it!
Whether you’re an avid or casual hiker and enjoying getting out on the hills on your own or with a group of friends, I strongly recommend that you take the time to learn this type of thing. Always look for an officially certified course in your region as you want to be sure you are getting the best possible training. It’s definitely worth taking the time to do this!